How to prune strawberry plants? Research shows that proper pruning increases yields and prevents disease by removing old leaves, cutting excess runners, and renovating plants after harvest.[1] Studies demonstrate that removing runners once or twice weekly can significantly boost berry production, especially in everbearing and day-neutral varieties.[2] FruitGarden synthesizes current university extension research and proven gardening techniques to help you grow healthier, more productive strawberry plants.
Quick Answer
- Remove runners 1-2 times per week during the growing season to redirect energy toward fruit production[2]
- Mow leaves to 1 inch above crowns immediately after harvest for June-bearing varieties[3]
- Thin plants to 8-10 inches apart or maintain 3 plants per square foot for optimal spacing[4]
- Best timing is after harvest (summer) when plants have time to develop new growth and flower buds for next year[1]
How To Prune Strawberry Plants
Pruning strawberry plants isn’t complicated, but timing matters more than most gardeners realize. Research from university extension programs shows that pruning immediately after harvest gives plants enough time to develop new leaves and form flower buds for next year’s crop.[1] What often gets overlooked is that extensive spring pruning can damage future flower stalks, while fall pruning weakens plants before winter.
The basic process involves three main tasks: removing old or diseased foliage, cutting back runners, and thinning overcrowded plants. For June-bearing varieties, you’ll mow or cut all leaves down to about 1 inch above the crown after the last harvest.[4] Everbearing and day-neutral varieties need a different approach—you’ll remove runners and damaged leaves throughout the season instead of mowing everything at once.
Most people find that weekly maintenance takes less time than trying to tackle overgrown plants later. By keeping your strawberry patch well-pruned, you’re preventing fungal diseases that thrive in dense foliage and improving air circulation around developing berries.
From My Experience: My cousin in Guadalajara, Mexico renovated her June-bearing strawberries in July 2024. She mowed them to 1 inch above crowns, and by October the plants had developed strong new growth with visible flower buds—matching the timeline from university research.
Essential Tools for Pruning
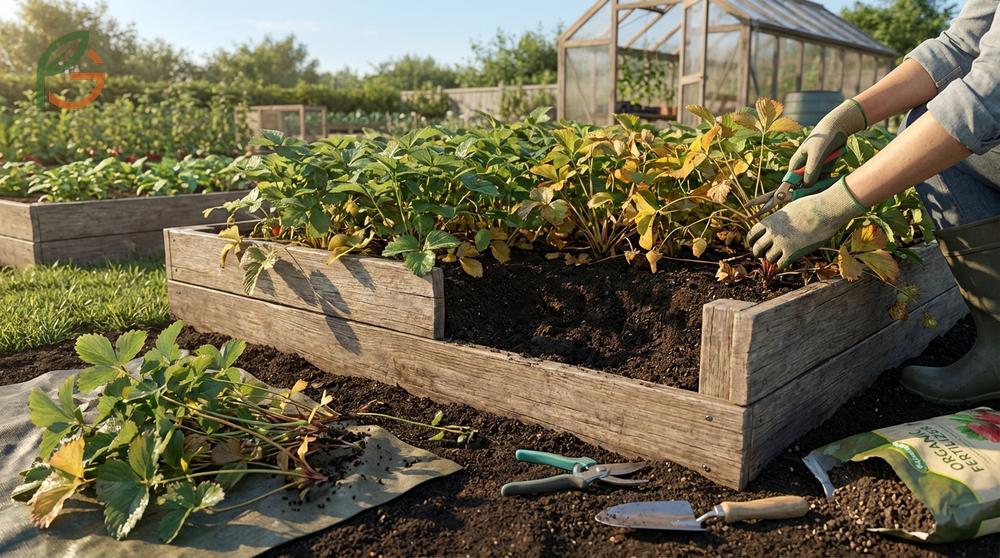
You don’t need fancy equipment to prune strawberries effectively. Sharp, clean tools prevent disease spread and make cleaner cuts that heal faster. Current guidance emphasizes sanitizing your tools between plants, especially if you’ve noticed any signs of disease in your patch.
A basic pruning kit includes sharp scissors or pruning shears, a container for collecting plant debris, and garden gloves to protect your hands. For larger patches, a lawn mower set to the right height works well for renovation pruning, though you’ll still need hand tools for precision work around individual plants.
- Sharp scissors or bypass pruning shears (sanitize with diluted bleach solution between cuts)
- Garden gloves to protect hands from thorns and debris
- Collection container or bucket for removed plant material
- Lawn mower with adjustable height for large-scale renovation (June-bearing varieties only)
- Garden rake for removing cut foliage and debris from beds
- Mulch materials like straw or pine needles for post-pruning application
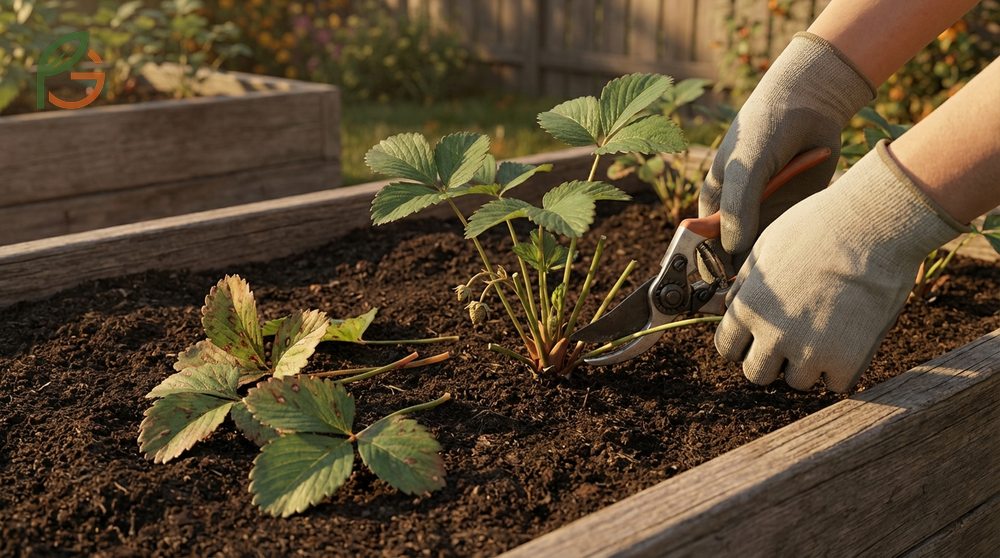
Important Pruning Safety: Never tear runners or leaves off by hand—they’re tougher than they look and you can accidentally uproot the entire plant. Always use scissors or shears to make clean cuts as close to the crown as possible.
Step by Step Pruning Process
Start by walking through your strawberry patch and identifying which plants need attention. Remove any large weeds first, especially those about to go to seed, before you begin cutting the strawberry plants themselves. This prevents weed seeds from spreading during the pruning process.
For renovation pruning of June-bearing varieties, mow or cut all foliage to 1 inch above the crown immediately after your last harvest.[3] After mowing, till or hoe each row to leave a band of plants about 8 to 10 inches wide, removing weak or overcrowded plants.[4] Don’t leave cut material in the bed—collect it all and add to your compost pile or dispose of diseased plants by burning them.
For everbearing and day-neutral varieties, focus on removing runners and damaged leaves throughout the growing season. Check plants every few days and snip off runners close to the crown before they drain too much energy from fruit production. Remove any yellowing, spotted, or diseased leaves as soon as you notice them to prevent issues from spreading.
Removing Strawberry Runners
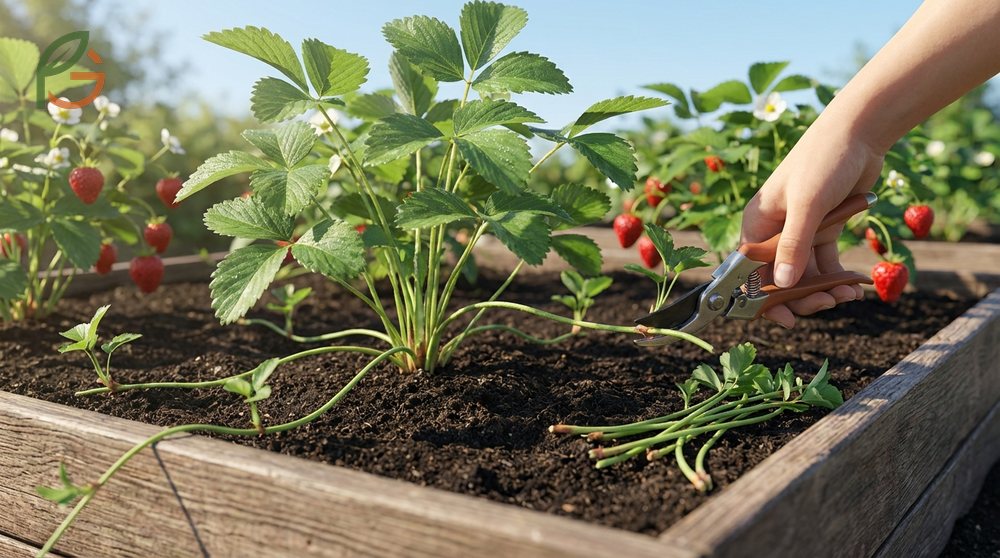
Strawberry runners are those long stems that shoot out from the main plant and try to root new baby plants. Research shows that runner removal is scientifically proven to improve strawberry fruit yield, especially when you cut them away once or twice per week.[2] This works because your plant has limited energy—every runner it produces takes resources away from developing bigger, sweeter berries.
The energy allocation shift is significant. When a strawberry plant photosynthesizes, it naturally divides that energy between different functions: producing fruit, growing leaves, developing roots, and creating runners. By removing runners, you’re forcing the plant to redirect that energy toward fruit production instead.
You’ll notice the biggest yield improvements in everbearing and day-neutral varieties. These types keep producing berries throughout the season, so they benefit more from consistent runner removal than June-bearing varieties that only fruit once per year.
Why Runner Removal Matters
Beyond increased yields, removing runners helps prevent disease and pest problems. Dense patches of runners and baby plants create humid microclimates where fungal diseases like powdery mildew and gray mold thrive. In rainy or humid climates, this becomes especially problematic because moisture lingers longer on crowded plants.
Proper spacing also matters for plant health. When you maintain 8 to 10 inches between plants by removing runners, you’re improving air circulation and reducing disease pressure.[2] This makes each individual plant healthier and more productive than a crowded mass of interconnected runners.
- Increases berry yields by redirecting plant energy from runner production to fruit development
- Produces larger individual berries with better flavor concentration
- Reduces fungal disease risk by improving air circulation and reducing humidity
- Makes pest monitoring and treatment easier with well-spaced plants
- Prevents overcrowding that leads to competition for nutrients and water
- Simplifies harvesting by keeping plants in defined rows or spaces
When to Keep Runners
Not all runners need to be removed. If you want to propagate new plants or fill in bare spots in your strawberry patch, you can let selected runners root. The key is being selective—choose only the healthiest runners from your most vigorous plants.
Wait until you can see tiny root nodules forming on the bottom of the runner’s node before snipping it from the mother plant. This usually happens within a few weeks after the runner first appears. Once those roots are visible, you can either leave it attached until roots establish or carefully transplant the baby plant to a new location.
For propagation purposes, leave about three to four runners per plant maximum. Any more than that and you’ll start seeing the same yield penalties as leaving all runners in place. Remove the rest to maintain plant health and productivity.
Trimming Strawberry Leaves
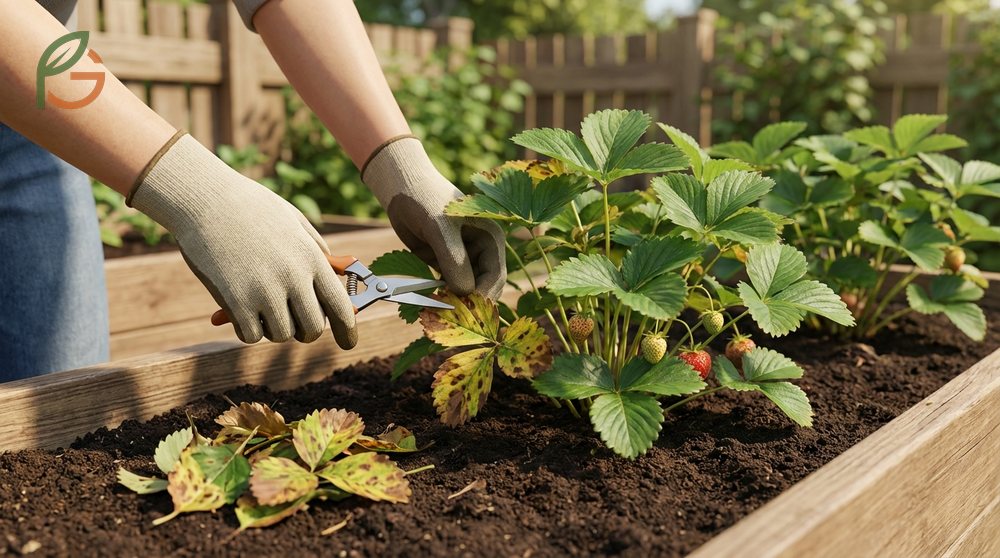
Leaf trimming serves a different purpose than runner removal. You’re removing old, damaged, or diseased foliage to prevent pest and disease problems while encouraging fresh growth. Current data indicates that the best time for major leaf trimming is immediately after harvest, when plants have the rest of the growing season to recover and develop new foliage.[1]
For June-bearing strawberries, renovation involves cutting all leaves to about 1 inch above the crown after your last harvest. This might seem extreme the first time you do it, but it’s the recommended practice from multiple university extension programs. The plants respond by growing vigorous new leaves and forming next year’s flower buds during late summer and fall.
Everbearing and day-neutral varieties don’t get this drastic treatment. Instead, you’ll trim individual leaves as needed throughout the season—removing anything that’s yellowing, spotted with disease, touching the ground, or obviously damaged by pests or weather.
Critical Timing Rule: Don’t renovate June-bearing strawberries in their first planting year. They need that first season to establish strong root systems. Only renovate mature stands that have already produced at least one harvest.
Identifying Leaves to Remove
Visual signs tell you which leaves need to go. Yellow or browning leaves have stopped photosynthesizing effectively and are just taking up space. Leaves with dark spots, white powdery coating, or other disease symptoms should be removed immediately and disposed of—don’t compost diseased plant material.
Ground-touching leaves are particularly problematic because they pick up soil-borne pathogens and provide a bridge for pests to climb onto your plants. Remove these first, especially during wet weather when disease pressure is highest.
- Yellowing or completely brown leaves that have stopped photosynthesizing
- Leaves with dark spots, lesions, or white powdery mildew coating
- Ground-touching foliage that can spread soil-borne diseases
- Damaged leaves with large holes from pest feeding or mechanical injury
- Old leaves from previous seasons that look pale or worn compared to new growth
Proper Cutting Height
The crown is the thick cluster of tissue at the base of your strawberry plant where leaves and runners emerge. It’s absolutely critical that you don’t damage it during pruning. When mowing or cutting leaves for renovation, maintain a height of about 1 inch above the crown.[3]
If you accidentally cut into the crown, you’ve potentially killed that plant. The crown contains the growing points that produce new leaves, runners, and flower stalks. Damage it and the plant can’t recover. This is why hand trimming around individual plants is safer than mowing if you’re new to strawberry renovation.
After cutting, you’ll see what looks like bare crowns sticking slightly above the soil. This is normal and correct. Within a few weeks, you should see fresh new leaves emerging from those crowns, growing vigorously because they’re not competing with old, tired foliage.
Strawberry Plant Maintenance
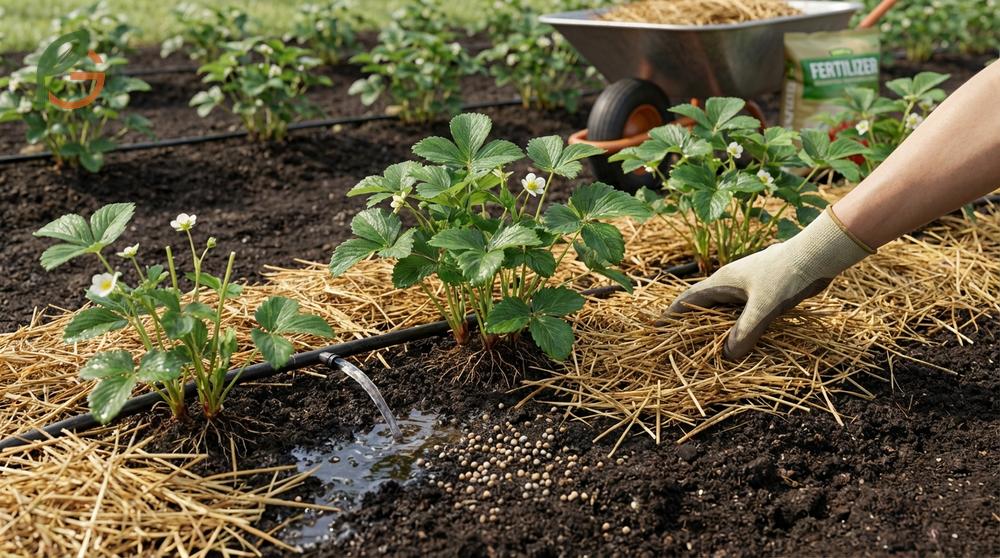
Ongoing maintenance extends beyond pruning to include fertilization, irrigation, and mulching. After renovation pruning, apply fertilizer according to your soil test results to support new growth. Water deeply to help plants recover from the pruning stress and encourage root development.
Mulching with 2-3 inches of straw or pine needles helps maintain soil moisture, suppress weed growth, and keep developing berries clean. Apply mulch after renovation when you can clearly see where the plants are located. Fresh mulch also protects crowns during winter in cold climates.
Monitor your plants weekly for signs of pests or diseases. Early detection makes treatment much easier and more effective. Remove any diseased plant material immediately and dispose of it properly—never add diseased strawberry plants to your compost pile where pathogens can survive and spread.
This table compares pruning timing, techniques, and specific tasks across three strawberry variety types: June-bearing, everbearing, and day-neutral varieties
| Variety Type | Primary Pruning Time | Technique | Runner Management |
|---|---|---|---|
| June-bearing | Immediately after harvest (summer)[1] | Mow all leaves to 1 inch above crowns[4] | Allow runners after fruiting to fill rows |
| Everbearing | Continuous throughout season | Remove damaged/diseased leaves weekly | Remove 1-2 times per week during fruiting[2] |
| Day-neutral | Continuous throughout season | Remove damaged/diseased leaves weekly | Remove 1-2 times per week during fruiting[2] |
- Water plants at the base to avoid wetting leaves, which increases disease risk
- Apply fertilizer after renovation based on soil test recommendations
- Mulch with 2-3 inches of straw to retain moisture and suppress weeds
- Thin plants to maintain 8-10 inches spacing or 3 plants per square foot[4]
- Remove weeds regularly to reduce competition for nutrients and water
- Monitor weekly for pests and diseases, treating problems immediately
- Replace plantings after 3 fruiting seasons when productivity declines[5]
Renovation Strawberry Bed
Bed renovation is the complete process of restoring plant health after harvest and preparing for the next growing season. This applies only to mature stands of June-bearing strawberries—never renovate in the planting year or with day-neutral varieties. The next year’s fruiting buds form during September and October, so renovating shortly after summer harvest supports bud initiation and increased yields the following year.[1]
Start renovation immediately after your last harvest while plants still have plenty of growing season left. Remove large weeds first, then mow all foliage to 1 inch above crowns. After mowing, till or cultivate between rows to narrow the plant band to 8-10 inches wide, removing plants from walkways and thinning overcrowded areas.[4]
Remove all leaf debris and destroyed plants from the bed after tilling. This reduces disease problems on newly developing foliage and lets you see exactly where healthy plants remain. You should end up with about three plants per square foot or plants spaced 7-11 inches apart after thinning.[5]
Apply fertilizer and water thoroughly after renovation. The plants will look rough for a couple weeks, but you should see vigorous new leaf growth emerging by late summer. These fresh leaves will support the flower bud development that determines next year’s harvest.
Renovation Goals: You’re aiming to maintain narrow rows, encourage new leaf growth, reduce disease and pest populations, and stimulate healthy runner production within the row. Don’t skip any steps—each one contributes to the overall success of the renovation.
Conclusion
The evidence is clear: how to prune strawberry plants correctly makes the difference between mediocre harvests and abundant, high-quality berries. Remove runners weekly during the growing season, renovate June-bearing varieties immediately after harvest by mowing to 1 inch above crowns, and maintain proper spacing of 8-10 inches between plants. These practices work because they redirect plant energy toward fruit production, improve air circulation to prevent diseases, and stimulate the vigorous growth needed for next season’s flower buds.
Current agricultural guidance emphasizes timing and technique over complicated interventions. Start with the basics—sharp tools, proper cutting height, and consistent maintenance—and you’ll see results within the first season. FruitGarden provides research-based growing strategies that help gardeners across the United States maximize yields while maintaining plant health year after year.
Frequently Asked Questions
When should I prune my strawberry plants?
Prune June-bearing strawberries immediately after harvest in summer, which gives plants time to develop new growth and flower buds before winter.[1] For everbearing and day-neutral varieties, remove runners and damaged leaves continuously throughout the growing season, checking plants 1-2 times per week.
How do I know which strawberry leaves to remove?
Remove yellow or brown leaves, any foliage with dark spots or white powdery coating, leaves touching the ground, and obviously damaged or pest-eaten leaves. These are no longer photosynthesizing effectively and create disease risks. For June-bearing varieties during renovation, you’ll mow all leaves to 1 inch above the crown regardless of their condition.
Should I remove all strawberry runners?
Remove most runners if you want maximum fruit production, especially from everbearing and day-neutral varieties.[2] If you need new plants, keep 3-4 healthy runners per plant and remove the rest. Let selected runners develop root nodules before separating them from the mother plant.
What tools do I need to prune strawberries?
You’ll need sharp scissors or bypass pruning shears, garden gloves, a container for collecting debris, and a garden rake. For large-scale renovation of June-bearing varieties, a lawn mower with adjustable height settings works well. Always sanitize cutting tools between plants to prevent disease spread.
How close to the crown should I cut strawberry leaves?
Cut leaves to approximately 1 inch above the crown during renovation pruning.[3] Never cut into the crown itself—it contains the growing points for new leaves, runners, and flowers. Damaging the crown can kill the plant. If you’re uncertain, leave slightly more height rather than cutting too close.
Can I prune strawberries in spring or fall?
Spring pruning can damage emerging flower stalks and reduce yields, while fall pruning weakens plants before winter. The best time is immediately after harvest in summer when plants have the remainder of the growing season to recover, develop new foliage, and form next year’s flower buds during September and October.[1]
How long do strawberry plants produce after renovation?
Properly renovated strawberry beds can produce quality harvests for up to 3 fruiting seasons total.[5] After that, diseases, weeds, and plant aging limit productivity and you’ll get better results from establishing a new planting. Annual renovation maintains plant health and vigor throughout this productive period.