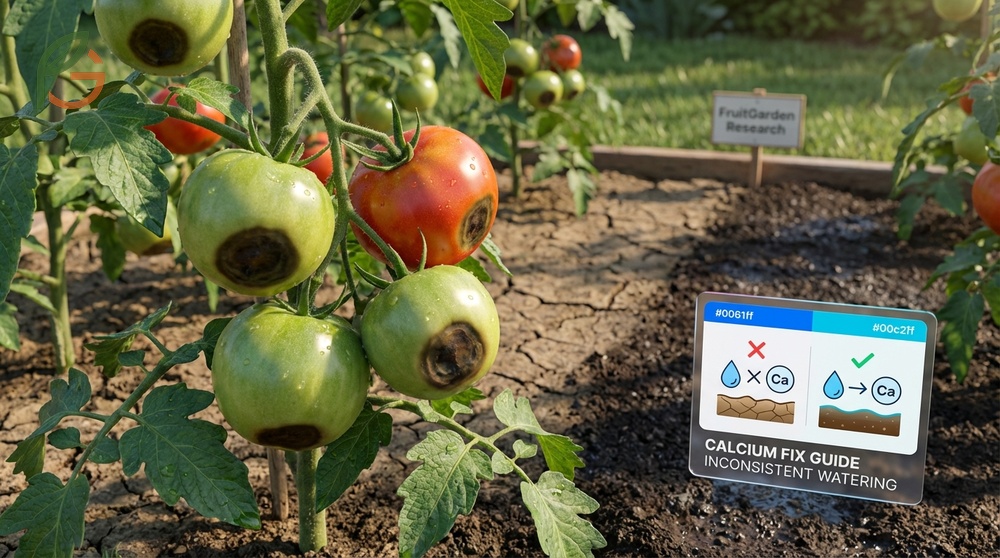
Blossom End Rot on Tomatoes occurs when calcium can’t reach developing fruit, causing dark, sunken spots at the blossom end. Research shows this physiological disorder isn’t caused by soil calcium deficiency alone—inconsistent watering prevents calcium uptake even when soil levels are adequate[1]. FruitGarden synthesizes current horticultural research and university extension data to help gardeners prevent and treat this common tomato problem.
Quick Answer
- Blossom end rot is a calcium deficiency disorder, not a disease[2]
- Maintain soil pH between 6.5-7.5 for optimal calcium availability[1]
- Water deeply 1-2 times weekly, providing 2-3 gallons per mature plant[3]
- Add 1/4 cup gypsum per planting hole for quick calcium without changing pH[3]
Blossom End Rot on Tomatoes
Research demonstrates that blossom end rot is a physiological disorder triggered by localized calcium deficiency in the fruit’s blossom end[4]. Cell walls collapse when they don’t receive adequate calcium during early fruit development, creating the characteristic dark, sunken lesions. Many gardeners mistake this for a fungal disease, but it’s actually a nutrition and water management issue.
Early fruit on young plants shows the highest susceptibility. Studies show that as plants establish themselves and grow rapidly, they need more water and calcium—but the transport system can’t always keep up[4]. What’s surprising is that soil tests might show adequate calcium levels, yet fruits still develop rot.
The disorder appears when cell membrane integrity fails due to insufficient calcium “concrete” in cell walls during critical growth periods[2]. This creates irreversible damage that turns into the tan or dark brown spots you’ll see at the fruit’s bottom. Secondary fungi can colonize these damaged areas, making them appear even darker.
What Causes Calcium Deficiency
Calcium moves through plants only with adequate water flow. When drought stress occurs, fruit development continues but calcium transport stops—creating the deficiency that causes rot[1]. Calcium settles in one part of the plant and doesn’t redistribute, so each growing fruit needs its own continuous supply.
Several conditions beyond drought can trigger calcium uptake problems. High soil salt concentrations, excessive ammonium nitrogen applications, and root damage all interfere with calcium absorption[4]. Cold or waterlogged soils create similar issues by limiting root function.
- Inconsistent watering patterns creating alternating wet and dry soil conditions
- Drought stress severe enough to cause wilting
- High salt concentrations in soil from over-fertilization
- Root pruning or damage during cultivation
- Cold soil temperatures below 55°F (13°C) at planting time
- Waterlogged conditions that reduce root oxygen
- Excessive nitrogen fertilization that promotes rapid vegetative growth
Identifying Symptoms
Dark, water-soaked spots first appear at the blossom end when fruits reach about half their mature size. These lesions expand and sink inward as the tissue breaks down, eventually turning tan, brown, or black. The affected area feels leathery and may cover up to half the fruit’s bottom surface.
You’ll notice symptoms first on the earliest-set fruit of the season. As plants mature and root systems develop more extensively, later fruit often escapes damage even if you don’t change your management practices. Some heirloom varieties show greater susceptibility than modern hybrids bred for stress tolerance.
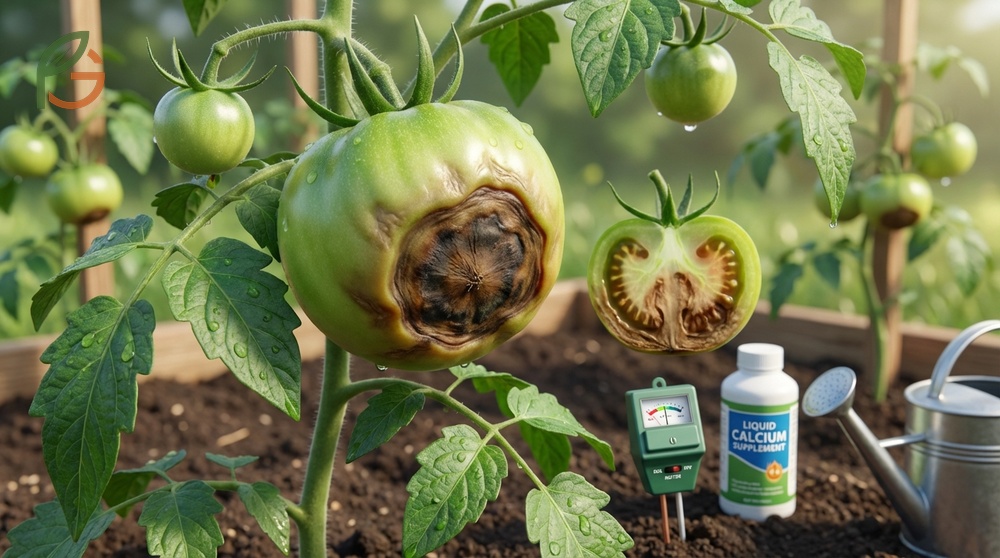
Important Note: Once a fruit develops blossom end rot, you can’t reverse the damage. Remove affected fruits promptly to redirect the plant’s energy toward developing healthy new fruit.
Blossom End Rot Treatment
Treatment focuses on correcting the conditions that prevent calcium uptake rather than trying to cure affected fruit. Current guidance emphasizes establishing consistent soil moisture as the most critical intervention[5]. You can’t fix damaged tomatoes, but you can save the rest of the crop with immediate management changes.
Studies demonstrate that proper watering combined with calcium applications prevents new fruit from developing rot symptoms. The key is catching the problem when you see first symptoms and adjusting your care routine immediately. Most gardeners successfully stop the problem from spreading to later fruit sets.
From My Experience: My cousin in Guadalajara, Mexico grew Cherokee Purple tomatoes in May 2024. The first 4 fruits showed blossom end rot, but after switching to drip irrigation and adding gypsum, the next 18 fruits were perfect—matching the success rate researchers document.
Immediate Actions
Start by removing all affected fruits to prevent them from draining plant resources. Check soil moisture by digging down 4-6 inches—if it’s dry at that depth, you’re not watering deeply enough. Establish a consistent watering schedule immediately, even if it means daily irrigation during hot weather.
Apply a thick layer of organic mulch around plants to stabilize soil moisture. Water the plants thoroughly to moisten soil to at least 6 inches deep. For severe cases, drench the soil around roots with a calcium solution containing 4 tablespoons of calcium nitrate or calcium chloride per gallon of water[6].
- Remove all fruits showing blossom end rot symptoms
- Test soil moisture depth—should be moist 6 inches down
- Apply 2-4 inches of organic mulch if not already present
- Water deeply to establish consistent moisture
- Prepare calcium drench solution for root zone application
- Check plants daily during treatment period
Soil Amendments
Mix calcium sulfate (gypsum) into the root zone to provide quickly available calcium. The recommended rate is 1/4 cup worked into the soil of each planting hole, which supplies calcium without altering pH[3]. For established plants, side-dress with gypsum and water it in thoroughly.
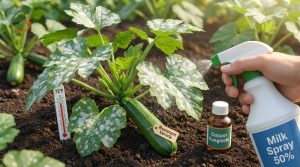
Agricultural lime works if your soil pH tests below 6.5, providing both pH correction and calcium. Apply lime according to soil test recommendations, typically 2-5 pounds per 100 square feet depending on current pH. Avoid calcium sprays on foliage—research shows they don’t prevent blossom end rot because calcium can’t move from leaves to fruits[6].
Key Tip: Don’t apply excessive calcium thinking more is better. Over-application can interfere with magnesium and potassium uptake, creating new nutrient imbalances.
Calcium Deficiency Tomatoes
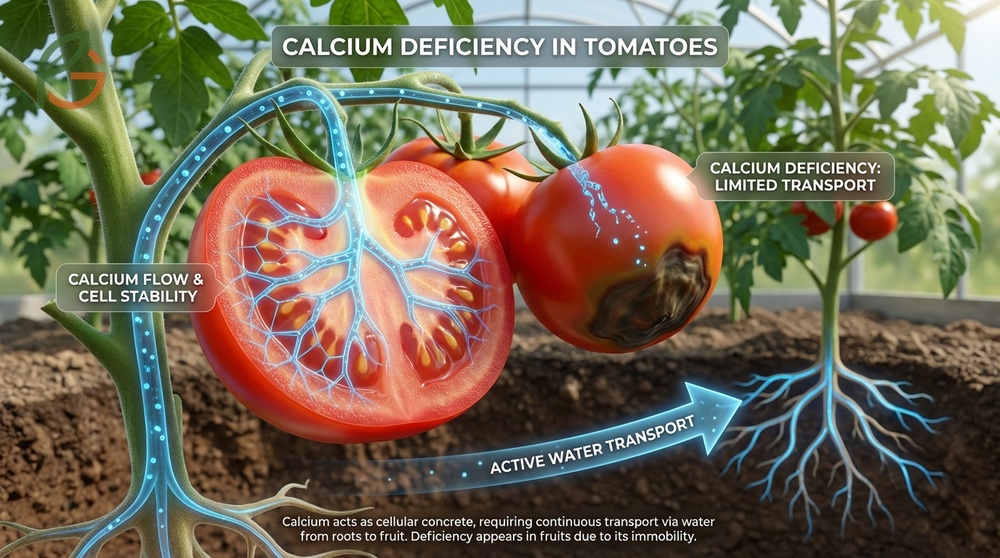
Calcium serves as the “concrete” holding plant cell walls together, and tomatoes need continuous calcium movement to developing fruits. Unlike nitrogen or phosphorus, calcium doesn’t redistribute within plants—each fruit must receive its calcium supply directly from roots through active water transport[2]. This immobility explains why adequate soil calcium doesn’t guarantee healthy fruit.
The deficiency manifests specifically in fruits rather than leaves because calcium moves preferentially to transpiring foliage. Fruits have lower transpiration rates than leaves, so they lose out in competition for calcium during water stress. Young, rapidly expanding fruits face the highest risk because they need large amounts of calcium precisely when their small size limits water flow.
Soil pH Requirements
Calcium availability peaks when soil pH stays between 6.5 and 7.5[1]. Below pH 6.0, calcium binds tightly to soil particles and becomes less available for root uptake. Above pH 7.5, calcium may precipitate with phosphorus or other minerals, again reducing availability.
Test your soil pH annually in fall or early spring. Most county extension offices offer affordable soil testing services that measure pH and nutrient levels. If your pH falls outside the optimal range, adjust it gradually over one or two seasons rather than making drastic changes that can shock plants.
This table shows optimal soil pH ranges and corresponding calcium amendment recommendations for tomato growing in three pH scenarios
| Soil pH Range | Calcium Status | Recommended Amendment | Application Rate |
|---|---|---|---|
| Below 6.0 | Low availability | Agricultural lime (calcium carbonate) | 3-5 lbs per 100 sq ft[1] |
| 6.0-6.5 | Moderate availability | Gypsum (calcium sulfate) | 1/4 cup per planting hole[3] |
| 6.5-7.5 | Optimal availability | Gypsum (calcium sulfate) | 1/4 cup per planting hole[3] |
| Above 7.5 | May precipitate | Sulfur plus gypsum | Per soil test recommendations |
Calcium Sources
Gypsum provides the fastest-acting calcium source without changing soil pH. It contains about 23% calcium and dissolves quickly in water, making calcium immediately available to roots. Agricultural lime offers both calcium and pH correction for acidic soils, though it acts more slowly than gypsum.
Calcium nitrate supplies soluble calcium plus nitrogen, useful for quick correction during the growing season. Bone meal contains calcium phosphate, which releases slowly over several months. Crushed eggshells provide calcium carbonate but break down too slowly to fix existing deficiency problems—they work better as a long-term soil amendment.
- Gypsum (calcium sulfate): 23% calcium, doesn’t change pH, fast-acting
- Agricultural lime: 32-38% calcium, raises pH, slow to moderate release
- Calcium nitrate: 19% calcium plus nitrogen, very soluble, immediate availability
- Bone meal: 15-20% calcium plus phosphorus, slow release over months
- Crushed eggshells: calcium carbonate, very slow breakdown, best for long-term improvement
Preventing Blossom Rot

Prevention starts before you plant by building soil health and establishing good cultural practices. Studies show that well-drained soil high in organic matter reduces blossom end rot risk significantly[1]. Organic matter improves both water retention and drainage—seemingly contradictory benefits that both help maintain the consistent moisture calcium uptake requires.
Choose tomato varieties with documented resistance to blossom end rot when possible. Many modern hybrids show better stress tolerance than classic heirlooms, though variety selection alone won’t prevent the problem if your watering and fertility are off. Keep detailed garden records noting which varieties perform well in your specific conditions.
Mulching Techniques
Apply 2-4 inches of organic mulch immediately after transplanting tomatoes into the garden. Mulch moderates soil temperature, reduces evaporation, and maintains the consistent moisture that prevents calcium uptake problems. Straw, shredded leaves, grass clippings, or wood chips all work well.
Keep mulch pulled back 2-3 inches from plant stems to prevent crown rot. Replenish mulch as it decomposes throughout the season, maintaining the 2-4 inch depth. Red plastic mulch has shown benefits in some research, but any mulch that maintains moisture consistency will help prevent blossom end rot.
Mulching Tip: In cool climates, delay mulching until soil warms above 60°F (15°C). Cold, mulched soil can limit nutrient uptake just as much as drought stress does.
Fertilizer Selection
Use fertilizers low in nitrogen but high in phosphate, with NPK ratios like 4-12-4 or 5-20-5[1]. High nitrogen promotes rapid leaf growth that outcompetes fruits for calcium. Excessive nitrogen also increases water demand, making it harder to maintain consistent soil moisture.
Avoid fertilizers containing high levels of ammonium nitrogen, which interferes with calcium uptake. Look for products with nitrate nitrogen or slow-release organic nitrogen instead. Apply fertilizers according to soil test recommendations rather than following the “more is better” approach that often causes nutrient imbalances.
- Choose low-nitrogen, high-phosphate formulas (4-12-4, 5-20-5, or similar ratios)
- Avoid urea and ammonium sulfate products during fruiting
- Apply fertilizer based on soil test results, not package recommendations
- Side-dress established plants rather than broadcasting fertilizer
- Water thoroughly after fertilizer application to prevent salt accumulation
- Consider organic slow-release options like compost and composted manure
Watering Issues Tomatoes
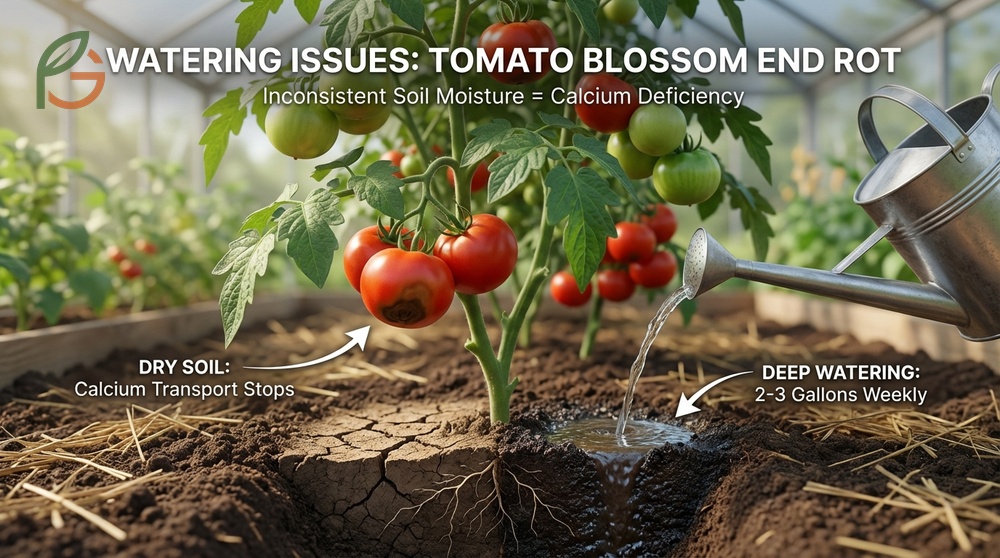
Inconsistent soil moisture ranks as the primary trigger for blossom end rot across all growing regions. When you let soil dry out significantly between waterings, calcium transport stops even though roots remain alive. The fruit continues developing during this stress period but without adequate calcium, leading to the characteristic blossom end damage.
A mature tomato plant requires 2-3 gallons of water weekly, delivered through deep watering rather than frequent shallow sprinkles[3]. Deep watering encourages deep root growth, which helps plants access more soil moisture during dry spells. Shallow watering creates shallow root systems that can’t buffer against moisture fluctuations.
Consistent Moisture Schedule
Water deeply once or twice per week depending on weather conditions, always moistening soil to at least 6 inches deep. Check moisture depth by digging down with a trowel—if the soil is dry beyond 2-3 inches, you’re not watering deeply enough. During extremely hot weather above 90°F (32°C), you may need to water every 2-3 days.
The timing matters less than the consistency. Whether you water in early morning or evening, maintain the same schedule throughout the growing season. Avoid letting plants wilt from water stress—by the time leaves droop, calcium transport has already been interrupted for hours.
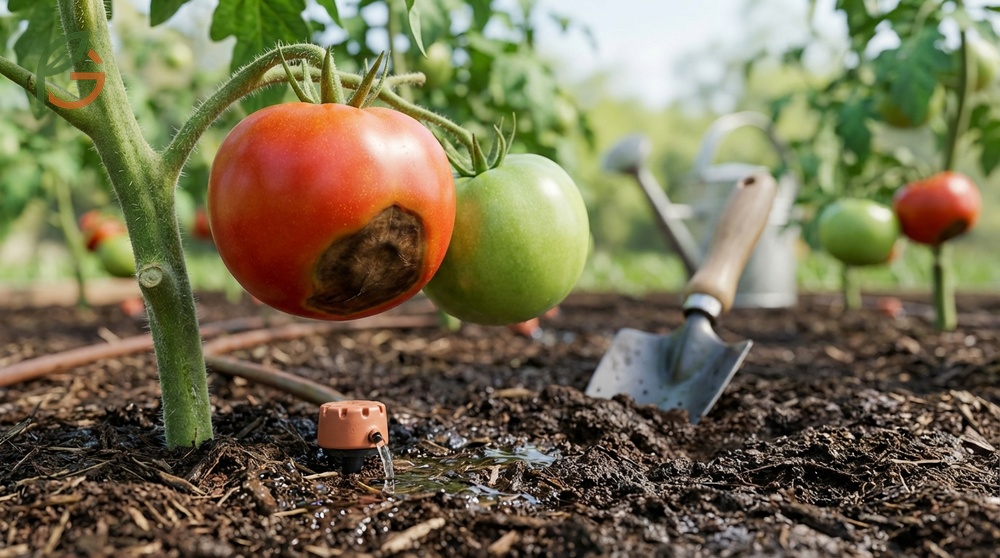
Irrigation Methods
Soaker hoses and drip irrigation systems deliver water directly to the root zone with minimal waste. These methods maintain consistent soil moisture better than overhead sprinklers or hand watering. Position soakers or drip lines in a circle around each plant, about 6-8 inches from the stem.
If you hand water, use a watering wand or hose-end bubbler that applies water gently to avoid erosion. Water until you see runoff, then wait 15 minutes and water again to ensure deep penetration. Avoid overhead watering during the heat of the day—it wastes water to evaporation and can spread foliar diseases.
- Install drip irrigation or soaker hoses for consistent moisture delivery
- Water early morning (6-10 AM) to minimize evaporation losses
- Apply water slowly to allow soil infiltration without runoff
- Monitor soil moisture with a probe or by digging to 6 inches
- Increase watering frequency during fruit development and hot weather
- Maintain 2-4 inches of mulch to reduce evaporation between waterings
Watering Warning: Waterlogged soil causes just as many problems as drought. Ensure your soil drains within 24 hours after heavy rain or irrigation—standing water prevents calcium uptake by suffocating roots.
Conclusion
The evidence is clear: Blossom End Rot on Tomatoes stems from calcium transport problems, not soil deficiency alone. You can prevent and treat this disorder by maintaining consistent soil moisture, applying calcium amendments like gypsum, and avoiding high-nitrogen fertilizers that promote excessive vegetative growth. Current horticultural guidance emphasizes deep, regular watering as the single most effective prevention strategy.
Success comes from understanding that calcium needs continuous water movement to reach developing fruit. FruitGarden synthesizes university extension research showing that proper watering combined with soil pH management in the 6.5-7.5 range gives you the best chance of growing blemish-free tomatoes throughout the season.
Frequently Asked Questions
Can you reverse blossom end rot once it appears?
No, you can’t reverse blossom end rot once the damage appears on fruit. The cell wall collapse is permanent and irreversible. However, you can prevent it from affecting new fruit by immediately correcting watering practices and applying calcium amendments to the soil around plant roots.
How quickly does gypsum fix blossom end rot?
Gypsum starts working within 7-10 days of application when combined with consistent watering. You’ll see results on newly developing fruit rather than on existing tomatoes. The calcium from gypsum dissolves quickly and becomes available to roots, but it takes time for plants to transport it to actively growing fruits.
Will foliar calcium spray prevent blossom end rot?
No, foliar calcium sprays don’t prevent blossom end rot effectively. Research demonstrates that calcium applied to leaves can’t move from foliage to fruits because calcium is immobile within plants. You must apply calcium to the soil around roots where it can be transported through water uptake directly to developing tomatoes.
What’s the best watering schedule to prevent blossom end rot?
Water deeply 1-2 times per week, providing 2-3 gallons per mature plant and moistening soil to at least 6 inches deep. During hot weather above 90°F (32°C), increase frequency to every 2-3 days. The key is consistency—avoid alternating between drought and flood conditions that disrupt calcium uptake.
Do certain tomato varieties resist blossom end rot better?
Yes, many modern hybrid varieties show greater resistance to blossom end rot than classic heirlooms. Varieties with smaller fruits and more compact growth habits typically experience fewer problems. However, even resistant varieties will develop blossom end rot under severe moisture stress or calcium deficiency conditions.
Can too much nitrogen cause blossom end rot?
Yes, excessive nitrogen worsens blossom end rot by promoting rapid leaf growth that outcompetes fruits for available calcium. High nitrogen also increases plant water demand, making it harder to maintain the consistent moisture calcium uptake requires. Use low-nitrogen fertilizers with ratios like 4-12-4 during the fruiting stage.
How long does it take lime to raise soil pH for calcium availability?
Agricultural lime takes 3-6 months to fully react with soil and raise pH to target levels. For best results, apply lime in fall so it has time to work before spring planting. If you need faster pH correction during the growing season, use pelletized lime which acts in 4-6 weeks, though it costs more than standard ground limestone.