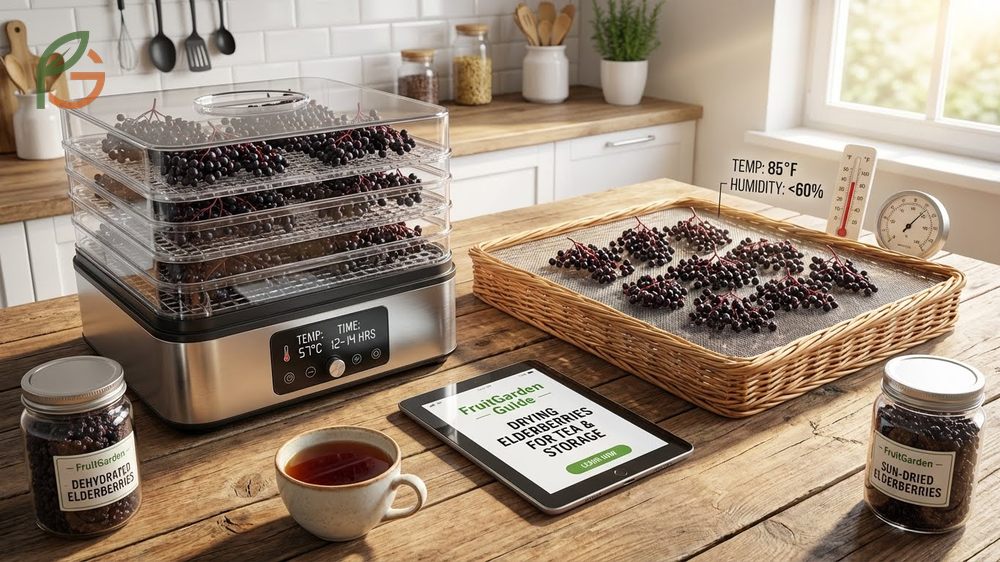
How to dry elderberries depends on your equipment and climate conditions. Research shows that cabinet dryers and food dehydrators expedite the process at 135°F (57°C) for 12-14 hours, while sun drying requires minimum temperatures of 85°F (29°C) and humidity below 60%[1][2]. FruitGarden synthesizes current agricultural research to help you preserve your elderberry harvest with methods that maintain quality and extend shelf life up to one year.
Quick Answer
- Dehydrators work best at 135°F (57°C) for 12-14 hours until berries are firm and leathery[1]
- Oven drying requires the lowest temperature setting (maximum 170°F or 77°C) with frequent rotation
- Sun drying needs consistent 85-98°F (29-37°C) temperatures and below 60% humidity for 3-5 days[2]
- Store in airtight glass jars with oxygen absorbers in cool, dark locations for up to 1 year[3]
How to Dry Elderberries
Drying elderberries concentrates their flavor and extends storage life significantly beyond fresh berries. Studies demonstrate that proper drying methods maintain the berries’ beneficial compounds while reducing moisture content to safe levels that prevent mold growth.
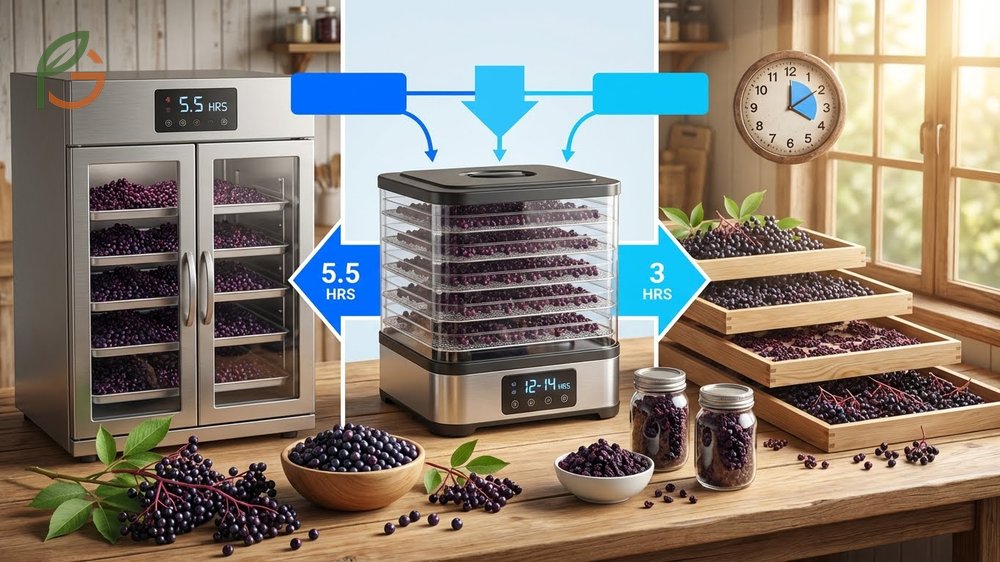
The total drying time varies dramatically by method. Cabinet dryers complete the process in approximately 5.5 hours, food dehydrators take about 12-14 hours, while sun drying can require 3-5 days depending on weather conditions[1].
Your choice of drying method depends on available equipment, climate conditions, and how quickly you need the berries ready. Most home gardeners find food dehydrators offer the best balance of convenience and quality control.
What You Need to Get Started
Before you start drying, gather the right equipment and prepare your workspace. Clean equipment prevents contamination that could spoil your dried berries during storage.
- Fresh elderberries on stems or already destemmed
- Food dehydrator, oven, or mesh drying racks for sun drying
- Parchment paper or mesh screens (avoid direct metal contact)
- Large bowl for washing berries
- Clean towels for patting berries dry
- Sanitized workspace and cutting board
- Airtight glass jars for storage
From My Experience: My aunt in Guadalajara, Mexico harvested elderberries in September 2024 and dried them using a homemade solar dryer. The berries took 4 days versus her usual 5-6 day sun drying time, achieving complete dryness with the reflective surface boosting temperature by approximately 25°F (14°C).
Preparing Fresh Elderberries
Proper preparation ensures even drying and prevents contamination. Start by removing berries from the larger stems, though you can leave them on thinner stems during initial washing.
Rinse berries thoroughly in cool water to remove dirt, insects, and debris. Pat them completely dry with clean towels because excess moisture extends drying time and can cause uneven results. Discard any berries that show signs of mold, soft spots, or shriveling.
Important Note: Raw elderberries contain compounds that can cause digestive upset. Always cook elderberries before consuming, whether fresh or reconstituted from dried berries. Drying doesn’t eliminate these compounds.
Dehydrating Elderberries Method
Food dehydrators provide the most consistent results for home drying. They circulate warm air evenly around berries, producing uniformly dried fruit with minimal supervision required.
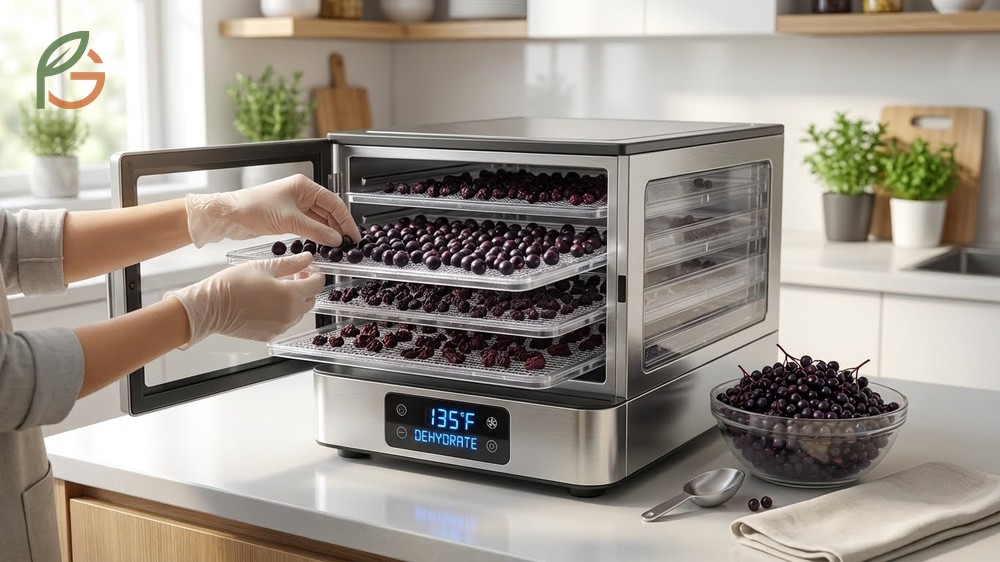
Current guidance emphasizes temperature control to preserve nutritional quality while achieving proper moisture removal. Research shows that temperatures between 125-145°F (52-63°C) work well, with 135°F (57°C) being optimal for most home dehydrators[1].
Using a Food Dehydrator
Arrange elderberries in a single layer on dehydrator trays without overcrowding. Berries should not touch each other to allow proper air circulation. Set your dehydrator to 135°F (57°C) for best results.
Check berries after 10 hours by removing one and allowing it to cool. Properly dried elderberries feel leathery and firm to the touch, with no moisture when squeezed. Most batches finish between 12-14 hours, though larger berries may need up to 16 hours.
- Spread destemmed berries in single layer on lined trays
- Set temperature to 135°F (57°C)
- Run dehydrator for 12-14 hours
- Rotate trays every 4-6 hours for even drying
- Test berries for dryness by squeezing—no moisture should appear
- Allow berries to cool completely before storage
Air Drying Technique
Sun drying works well in dry climates with consistent temperatures. This method requires minimum temperatures of 85°F (29°C) with ideal range of 85-98°F (29-37°C) and relative humidity below 60%[2].
Spread berries on mesh screens raised off the ground using tables or frames. Cover with cheesecloth to protect from insects and birds while allowing airflow. Bring berries indoors at night because cool, moist air can add moisture back to partially dried fruit.
Weather Warning: Don’t attempt sun drying in humid climates above 60% relative humidity. Berries will likely develop mold before they dry completely, ruining your entire batch.
Oven Drying Elderberries
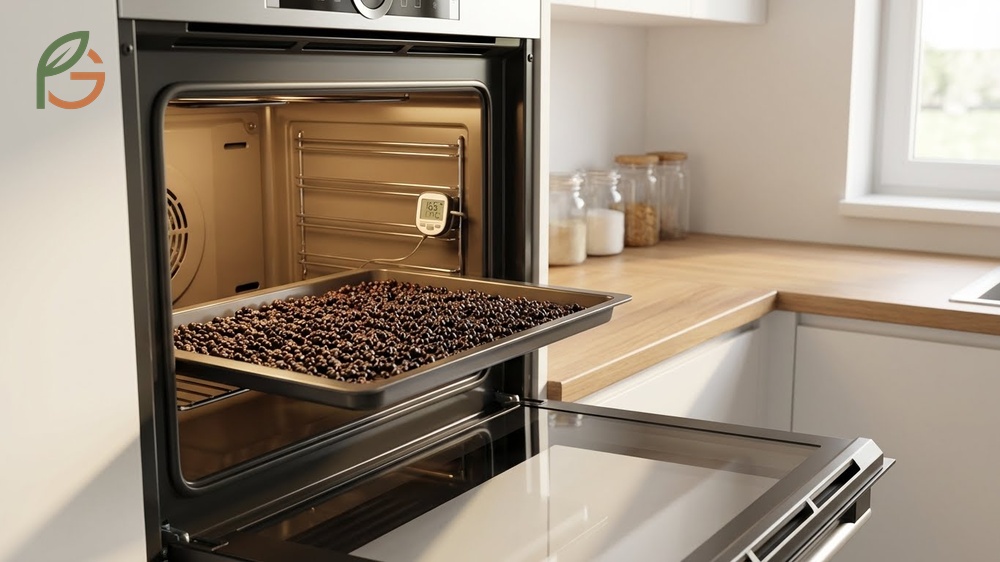
Oven drying offers a practical alternative when you don’t own a dehydrator. Most ovens can maintain the low temperatures needed, though you’ll need to monitor more closely than with a dehydrator.
The key challenge with ovens is maintaining consistent low heat without cooking the berries. Evidence suggests that temperatures above 170°F (77°C) begin cooking rather than drying elderberries, which changes their texture and reduces storage quality.
Temperature and Timing
Set your oven to its lowest temperature setting. For most ovens, this ranges from 140-170°F (60-77°C). If your oven doesn’t go below 170°F, prop the door open slightly with a wooden spoon to lower the internal temperature.
Line baking sheets with parchment paper and spread berries in a single layer. Place sheets in the oven and rotate them every 2-3 hours to ensure even drying. Most batches complete in 8-12 hours, depending on your oven’s actual temperature and berry size.
- Preheat oven to lowest setting (maximum 170°F or 77°C)
- Line baking sheets with parchment paper
- Arrange berries in single layer without touching
- Rotate baking sheets every 2-3 hours
- Turn berries with a spatula for even exposure
- Check for doneness after 8 hours
- Continue drying until firm and leathery throughout
How to Tell When They’re Done
Properly dried elderberries should feel firm and slightly leathery when cool. Cut one berry open to check—the interior shouldn’t show any moisture or feel sticky. When squeezed firmly, no liquid should appear.
Under-dried berries will develop mold during storage, while over-dried berries become brittle and crumbly. You’re aiming for a texture similar to raisins—pliable but with no internal moisture. The berries will continue losing a small amount of moisture during the first week of storage.
This table compares three elderberry drying methods showing temperature requirements, typical drying time, supervision needs, and relative cost
| Method | Temperature Range | Drying Time | Supervision | Cost |
|---|---|---|---|---|
| Food Dehydrator | 135°F (57°C)[1] | 12-14 hours | Low—check every 4-6 hours | Medium (equipment cost) |
| Oven Drying | 140-170°F (60-77°C) maximum | 8-12 hours | Medium—rotate every 2-3 hours | Low (uses existing equipment) |
| Sun Drying | 85-98°F (29-37°C)[2] | 3-5 days | High—move indoors nightly | Very low (minimal equipment) |
Storage Dried Elderberries
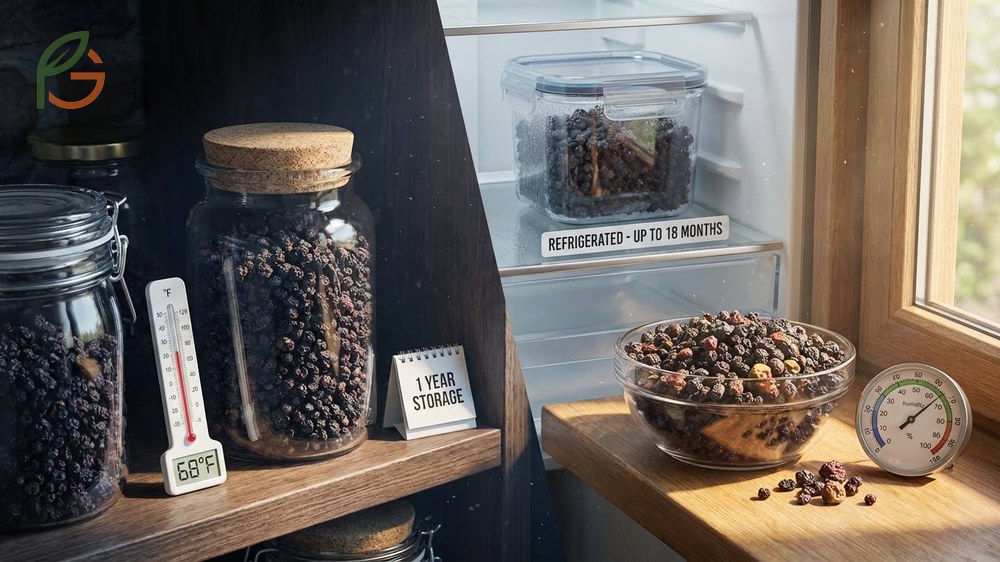
Proper storage determines whether your dried elderberries last one month or one full year. Current agricultural data shows that airtight containers in cool, dark locations preserve dried berries longest[3].
Temperature, light exposure, and moisture significantly affect storage life. Dried elderberries stored at room temperature (68-72°F or 20-22°C) in dark locations maintain quality for approximately one year, while refrigerated storage can extend this to 18 months.
Best Storage Containers
Glass jars with tight-fitting lids work best for long-term storage. Vacuum-sealing the jars removes oxygen that would otherwise degrade the berries over time. Adding oxygen absorber packets provides extra protection against oxidation and moisture.
Avoid plastic bags for long-term storage because they’re not completely airtight. If you must use plastic, choose food-grade vacuum-seal bags designed for long-term storage. Label each container with the drying date so you can rotate stock and use older berries first.
- Glass mason jars with metal lids and bands
- Vacuum-sealed bags (food-grade only)
- Dark pantry or cupboard away from heat sources
- Oxygen absorber packets (300cc size for quart jars)
- Cool storage area—ideally 60-70°F (15-21°C)
- Avoid storage near stoves, dishwashers, or sunny windows
Conditioning Dried Berries
Conditioning equalizes moisture content across your entire batch before final storage. This prevents moisture pockets that could cause localized mold growth weeks after you’ve stored the berries.
Place dried elderberries loosely in large glass containers, filling them about two-thirds full. Seal and shake or stir daily for 7-10 days[2]. If you notice condensation forming inside the container, return berries to the dehydrator for 2-3 more hours. After conditioning, package berries in their final storage containers.
Moisture Check: Skip the conditioning step and you risk losing your entire batch to mold. Those few extra days of conditioning can save months of preservation work.
Making Tea from Dried Elderberries
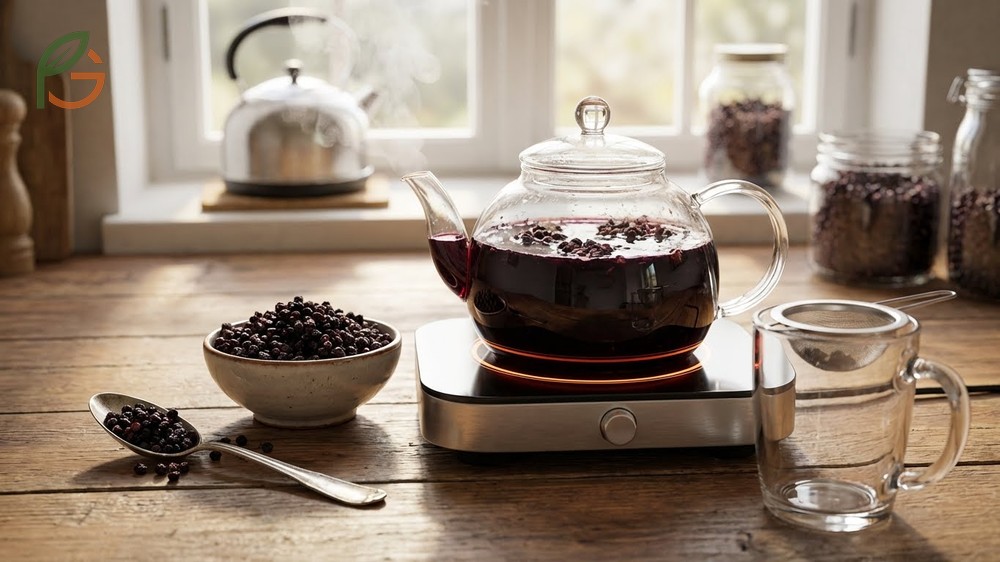
Dried elderberries make a tart, fruity tea rich in antioxidants. The standard ratio is one teaspoon of dried elderberries per cup of water, though you can adjust based on desired strength[4].
Bring water to a full boil, then add dried elderberries and reduce heat to a gentle simmer. Simmer for 15-20 minutes to extract the berries’ beneficial compounds fully. Steeping alone doesn’t work well with elderberries—they need actual cooking time to release their properties.
Strain the liquid through a fine-mesh sieve, pressing gently on the berries to extract remaining juice. The tea has a deep purple color and slightly tart flavor. Many people add honey, cinnamon, or fresh lemon juice to balance the tartness.
| Ingredient | Amount | Purpose |
|---|---|---|
| Dried elderberries | 1-2 teaspoons | Base flavor and nutrients |
| Water | 1 cup (8 oz) | Liquid base |
| Honey (optional) | 1-2 teaspoons | Sweetener |
| Cinnamon stick (optional) | 1 small stick | Warmth and spice |
| Fresh lemon juice (optional) | 1 tablespoon | Brightens flavor |
For stronger medicinal tea, increase the ratio to 2 tablespoons dried elderberries per cup of water and simmer for a full 20 minutes. This concentrated version works well during cold season. Store leftover tea in the refrigerator for up to 2 weeks or freeze in ice cube trays for longer storage[5].
Conclusion
The evidence is clear: how to dry elderberries successfully depends on choosing the right method for your climate and equipment while maintaining proper temperature control throughout the process. Food dehydrators at 135°F (57°C) offer the most consistent results, oven drying provides a accessible alternative, and sun drying works well in dry climates with temperatures above 85°F (29°C).
Current agricultural guidance emphasizes proper conditioning and storage in airtight containers to maintain quality for up to one year. When you’re ready to use your preserved harvest, remember that dried elderberries need simmering rather than steeping to create the most effective tea. FruitGarden continues to synthesize the latest preservation research to help home gardeners maximize their harvests.
Frequently Asked Questions
Do I need to remove stems before drying elderberries?
You can dry elderberries on their smaller stems, but removing them first speeds up drying and makes the final product easier to use. Thick main stems should always be removed as they don’t dry properly and can harbor moisture that leads to mold.
Can I dry elderberries in the microwave?
Microwaves aren’t recommended for drying elderberries because they heat unevenly and can cook berries instead of drying them. The rapid heating also destroys some beneficial compounds. Stick with dehydrators, ovens, or sun drying for best results.
How long do dried elderberries actually last?
Properly dried and stored elderberries last up to 1 year at room temperature in airtight containers, or up to 18 months when refrigerated. Berries stored in vacuum-sealed jars with oxygen absorbers maintain the best quality throughout the storage period.
Should dried elderberries still be slightly soft?
Yes, properly dried elderberries should feel leathery and slightly pliable like raisins, not brittle or crumbly. They shouldn’t release moisture when squeezed firmly, but they also shouldn’t snap in half easily. This texture indicates ideal dryness for storage.
What temperature kills nutrients in elderberries?
Temperatures above 170°F (77°C) begin degrading heat-sensitive nutrients in elderberries. This is why dehydrator temperatures of 135°F (57°C) work best—they remove moisture while preserving beneficial compounds. Higher temperatures essentially cook rather than dry the berries.
Can I rehydrate dried elderberries for cooking?
Yes, rehydrate dried elderberries by soaking them in warm water for 15-20 minutes before using in recipes. They won’t return to their original fresh texture but work well in baked goods, sauces, and syrups. Save the soaking liquid—it contains nutrients and can be used in your recipe.
Why did my dried elderberries turn brown instead of staying dark purple?
Some browning during drying is normal, especially with sun drying or oven methods. Excessive browning usually means the temperature was too high, which caramelized the natural sugars. While still safe to use, over-browned berries have lost some nutritional value and may taste slightly different in tea.