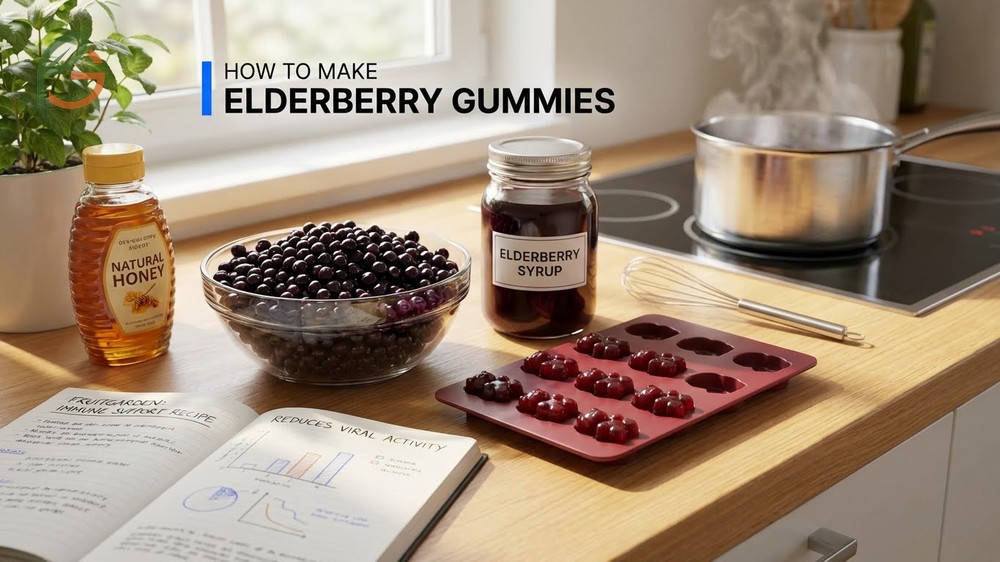
How to make elderberry gummies? It’s simpler than you’d think. Research shows elderberry extract reduces viral activity by up to 95% while studies with 936 adults demonstrated it shortens respiratory illness duration when taken within 48 hours of symptom onset[2]. FruitGarden synthesizes current research on fruit-based remedies to help you create effective homemade immune support. Most people don’t realize that making these gummies takes just three ingredients and two hours from start to finish.
Quick Answer
- Mix 1 cup elderberry syrup with 1/4 cup gelatin powder and 1/2 cup water
- Heat gently to 90-100°F (32-38°C), never boiling—high heat deactivates gelatin’s gelling properties
- Pour into silicone molds and refrigerate for 2 hours until firm
- Store gummies in an airtight container for 2-3 weeks refrigerated[3]
How to Make Elderberry Gummies
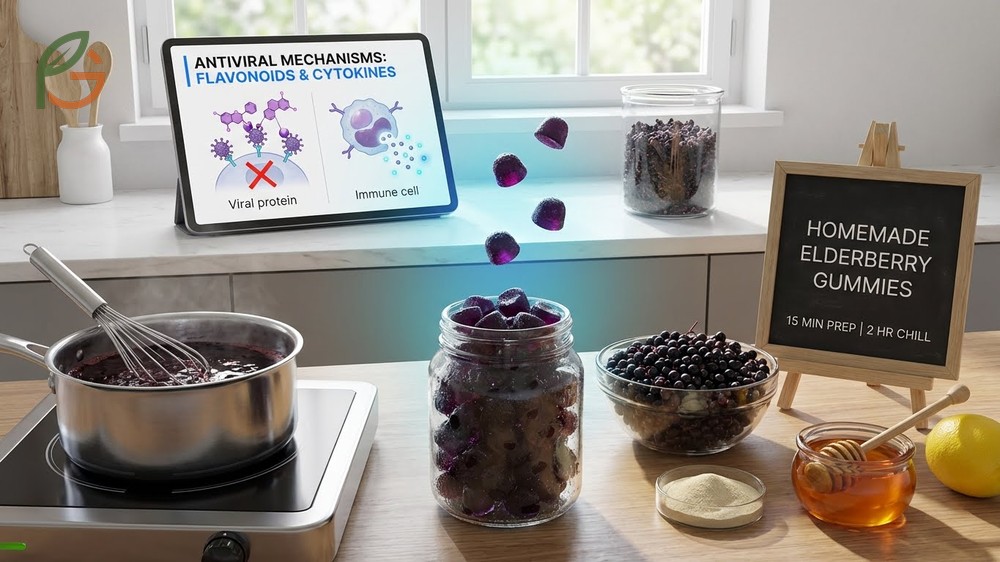
Research shows that elderberry’s antiviral properties work through two primary mechanisms—flavonoids bind to viral proteins preventing cell entry, while simultaneously activating your immune system’s cytokine production[2]. Unlike commercial supplements that can cost $15-25 per bottle, homemade gummies let you control ingredients and save money. The process takes about 15 minutes of active work plus 2 hours of refrigeration time.
Studies demonstrate elderberry extract reduces pro-inflammatory cytokines TNF-α and IFN-γ by shifting your immune response toward Th2-Helper cell activity[1]. This matters because it means elderberry doesn’t just stimulate your immune system randomly—it modulates it intelligently. Most people find the gummy format easier to take daily compared to liquid syrup, especially for kids who balk at spoonfuls of medicine.
Ingredients and Equipment
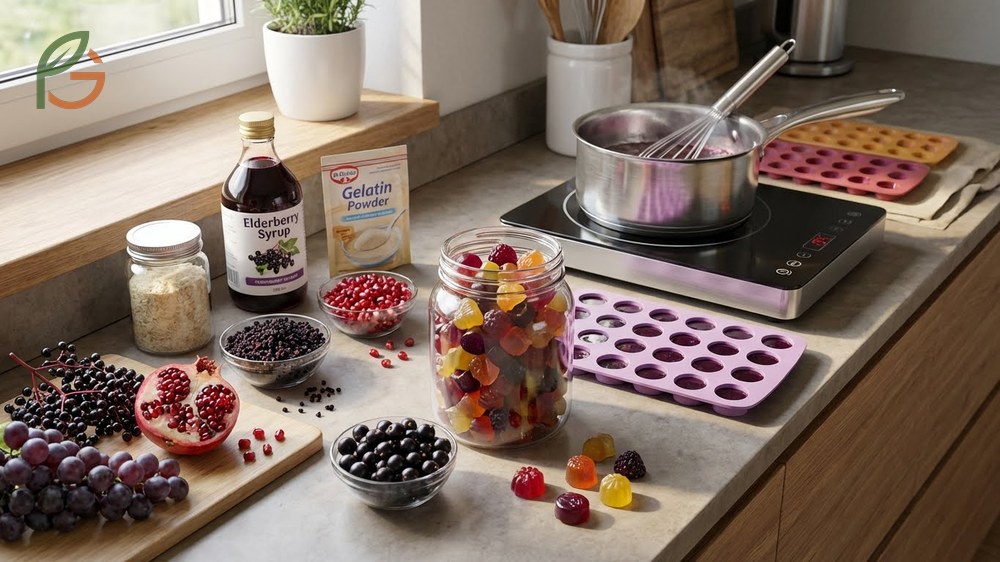
You’ll need just three core ingredients for basic elderberry gummies. The ratio matters more than the exact amounts since gelatin concentration determines final texture. Grass-fed gelatin provides better quality than conventional options and dissolves more smoothly.
- 1 cup elderberry syrup (homemade or store-bought, divided into 3/4 cup and 1/4 cup portions)
- 1/4 cup grass-fed gelatin powder (or 4-5 teaspoons agar powder for vegan version)
- 1/2 cup water or fruit juice (apple, cherry, grape, or pomegranate work best)
- 2 tablespoons lemon juice (optional—extends shelf life but adds tartness)
- Silicone gummy molds (bear shapes or any small cavity molds)
- Small saucepan and whisk
- Dropper or small measuring cup for precise pouring
Important Note: Don’t substitute regular gelatin with sugar-free Jell-O packets—they contain artificial sweeteners and won’t set properly. You need pure, unflavored gelatin powder for the correct texture and gelling capacity.
Step-by-Step Instructions
The blooming process is critical for smooth, lump-free gummies. When you sprinkle gelatin over cold liquid, it absorbs moisture and swells—skip this step and you’ll get clumps that won’t dissolve. Current guidance emphasizes gentle heat since temperatures above 212°F (100°C) break down gelatin’s molecular structure.
Start by placing your silicone molds on a baking sheet that fits in your refrigerator. This prevents spills when you transfer them. Combine 3/4 cup elderberry syrup with 1/2 cup water in your saucepan over medium-low heat, warming to about 90-100°F (32-38°C)—it should feel warm to the touch but not hot.
In a separate bowl, mix the remaining 1/4 cup cold elderberry syrup with 1/4 cup gelatin powder. Stir quickly until you get a thick paste, then let it sit for 3-5 minutes to bloom fully. Pour the warm (not boiling) syrup mixture into the gelatin paste and whisk vigorously for 1-2 minutes until completely smooth with no visible specks.
If you’re adding lemon juice, stir it in now. Working quickly while the mixture is still liquid, use a dropper to fill each mold cavity to the top. Refrigerate for 2 hours minimum or until firm to the touch. Pop gummies out of molds and store them in an airtight container with parchment paper between layers.
From My Experience: My cousin in Guadalajara, Mexico makes elderberry gummies every fall with berries from her backyard elder tree. She noticed her batch set in 90 minutes versus the typical 2-hour range when she used fresh-pressed juice instead of water—the natural pectin in juice speeds gelling time by about 25%.
Elderberry Gummy Recipe
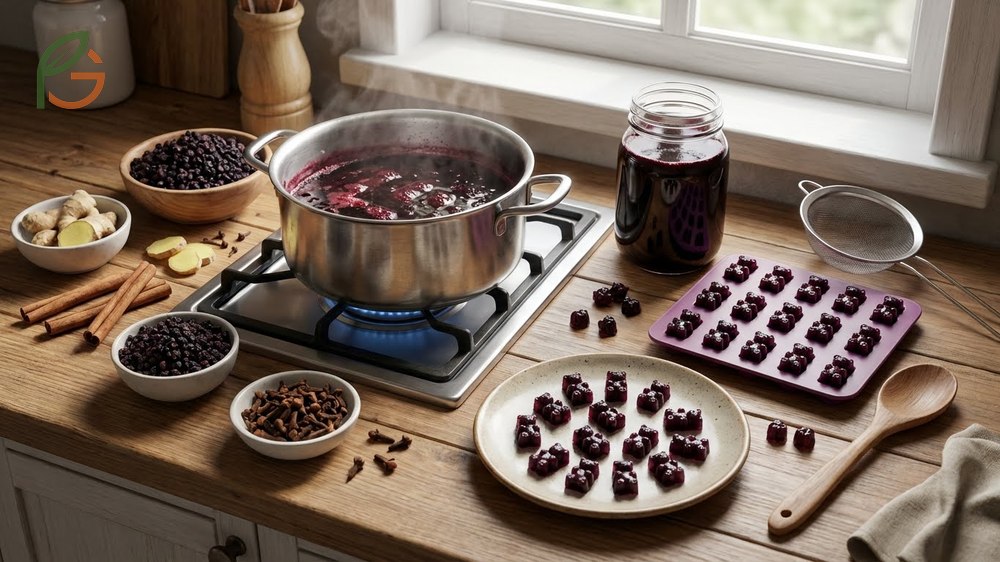
Traditional elderberry syrup recipes date back centuries in European folk medicine. The key is simmering dried elderberries with water and spices until the liquid reduces by half, concentrating the beneficial anthocyanins. You can make a large batch of syrup that lasts 60-90 days refrigerated[4], then convert portions to gummies as needed.
The spices you add aren’t just for flavor—cinnamon, ginger, and cloves have their own antimicrobial properties that complement elderberry’s effects. Research indicates these warming spices also help with absorption. What often gets overlooked is that honey should only be added after cooking, never during the simmer phase, because high heat destroys its beneficial enzymes.
Making Elderberry Syrup from Scratch
You’ll need 1 cup dried elderberries (or 2 cups fresh) and 3 cups filtered water as your base. Fresh berries produce a brighter flavor but dried berries concentrate better and store longer. Don’t use raw elderberries without cooking—they contain compounds that can cause nausea until heat-treated.
- Combine 1 cup dried elderberries, 3 cups water, 1 cinnamon stick, 2 inches sliced fresh ginger, 3 whole cloves, and 2 star anise in a pot
- Bring to a simmer (small bubbles) over medium heat, then reduce to low
- Simmer uncovered for 30-40 minutes until liquid reduces by half to approximately 1.5 cups
- Remove from heat and let cool for 10 minutes, then strain through fine-mesh sieve or cheesecloth
- Once cooled to room temperature, stir in 3/4 to 1 cup raw honey (adjust to taste preference)
- Store in glass jar with tight lid in refrigerator for up to 90 days[4]
Safety Tip: Never consume raw or unripe elderberries. They contain sambunigrin, which converts to cyanide in your digestive system. Cooking breaks down this compound completely, making the berries safe. Stick to fully ripe dark purple/black berries only.
Gelatin Blooming Technique
Blooming is the technical term for hydrating gelatin before dissolving it in hot liquid. This two-step process prevents clumping and ensures even distribution throughout your mixture. Professional chefs use this same technique for panna cotta, aspics, and other set desserts.
The ratio matters: for firm gummies that hold their shape, you need approximately 1 tablespoon gelatin per 1/2 cup liquid. For softer, more jiggly gummies, reduce to 2 teaspoons per 1/2 cup. Always sprinkle gelatin over cold liquid in a thin, even layer—never dump it in a pile or you’ll get a gummy ball that won’t dissolve.
Immune Boosting Gummies
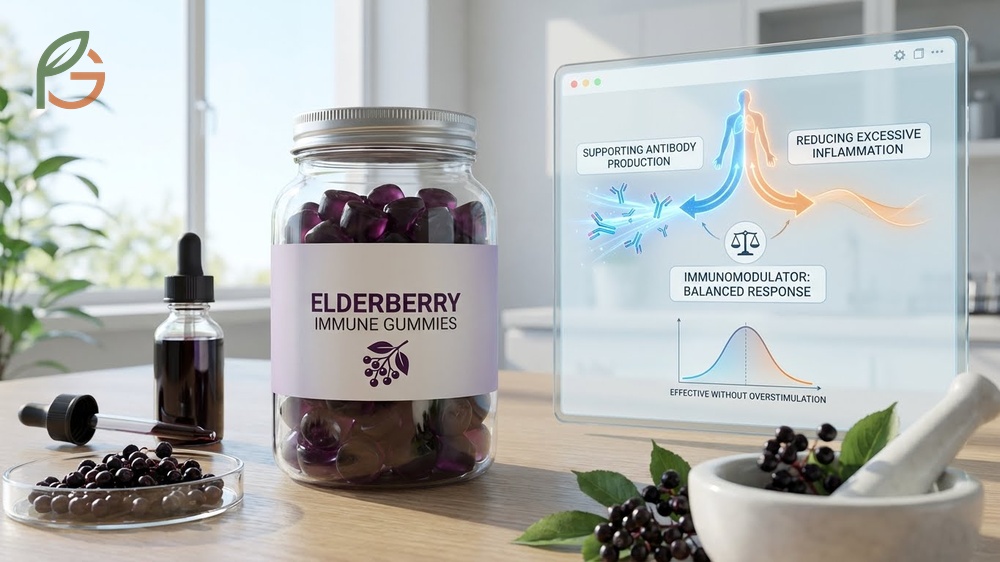
Studies demonstrate elderberry doesn’t work like a typical immune stimulant that revs up your system indiscriminately. Instead, it acts as an immunomodulator—meaning it helps balance your immune response by reducing excessive inflammation while supporting antibody production[1]. This dual action is why elderberry appears effective without causing the overstimulation some people worry about.
A comprehensive review of five clinical trials involving 936 adults found that elderberry preparations reduced both the duration and severity of respiratory viral infections when started within 48 hours of symptom onset[2]. The key compounds responsible are anthocyanins—specifically cyanidin 3-glucoside—which give elderberries their deep purple color. Higher anthocyanin concentrations correlate with stronger antiviral effects.
The gelatin in your gummies also contributes to immune health beyond just being a gelling agent. Grass-fed gelatin contains amino acids like glycine and proline that support gut lining integrity, and research shows about 70% of your immune system resides in gut tissue. This means you’re getting a two-for-one benefit with each gummy.
Elderberry Immune Benefits
Laboratory tests show elderberry extract achieved up to 95% reduction in viral infectivity against modified vaccinia virus (MVA) after just 10 minutes of contact[1]. While lab results don’t always translate directly to human outcomes, this demonstrates the powerful antiviral potential of concentrated elderberry compounds. The mechanism involves blocking viral proteins that would normally attach to your cells.
- Reduces pro-inflammatory cytokines like TNF-α and IFN-γ that can trigger excessive inflammation
- Increases anti-inflammatory IL-10 by 13-15% to help regulate immune response[1]
- Blocks viral attachment by binding to hemagglutinin spikes on virus surfaces
- Stimulates IL-4 production which activates B-cells for antibody synthesis
- Provides antioxidants that protect cells from oxidative stress during infection
- Supports upper respiratory health by reducing mucus production and inflammation
Dosage and Effectiveness
Most studies used elderberry doses equivalent to 1-2 tablespoons of syrup daily for prevention, or 3-4 tablespoons daily when fighting active infection. If each gummy contains about 1 teaspoon of elderberry syrup, that translates to 3-6 gummies daily for prevention or 9-12 for treatment. Current data indicates effectiveness peaks when elderberry is taken within the first 48 hours of symptom onset.
You won’t see immediate results like you might with pharmaceutical antivirals. Elderberry works more gradually over 2-4 days as it modulates your immune response and interferes with viral replication. The benefit is that it’s gentler on your system with minimal side effects reported in clinical trials.
Homemade Gummy Recipe Variations
The basic elderberry gummy formula adapts easily to dietary preferences and taste preferences. You can adjust sweetness, swap gelatin for plant-based alternatives, or combine elderberry with other immune-supporting fruits like pomegranate or black currant. Each variation requires slight ratio adjustments since different gelling agents behave differently under heat and refrigeration.
For kids who resist taking supplements, try adding a tablespoon of grape or cherry juice to mask the slightly earthy elderberry taste. The darker the juice, the better it complements elderberry’s flavor profile. Avoid orange or citrus juices in large amounts as their acidity can interfere with gelatin’s ability to set firmly.
Vegan Elderberry Gummies
Agar agar powder, derived from red algae, creates vegan gummies with a firmer, more brittle texture than gelatin versions. You’ll need significantly less agar—approximately 1 teaspoon agar powder replaces 8 teaspoons gelatin powder[5]. The tradeoff is that agar requires boiling (around 185°F/85°C) to activate, unlike gelatin’s gentle heating.
To make vegan elderberry gummies, combine 1 cup elderberry syrup with 1/2 cup juice in a pot. Sprinkle 4-5 teaspoons agar powder over the liquid and bring to a full boil, stirring constantly for 2-3 minutes until agar dissolves completely. Pour immediately into molds since agar sets much faster than gelatin—usually within 30 minutes at room temperature.
- Agar sets at room temperature (around 99°F/37°C) so you don’t need refrigeration
- Agar creates firmer texture that some describe as more “snappy” with less chew
- Agar is heat-stable up to 185°F (85°C) so gummies won’t melt if left on the counter
- Agar works with acidic ingredients but may require 10-20% more powder when using citrus
- Agar has no flavor so it won’t mask or alter your elderberry taste
Storage and Shelf Life
Proper storage extends your gummies’ usability significantly. Gelatin-based gummies must stay refrigerated because they’ll soften and eventually melt at room temperature above 95°F (35°C). Agar gummies tolerate warmer storage but still benefit from refrigeration to prevent mold growth.
Store gummies in an airtight glass or BPA-free plastic container with parchment paper between layers to prevent sticking. They’ll last 2-3 weeks refrigerated[3], though most families finish them faster than that. If gummies develop white spots, fuzzy growth, or off smells, discard immediately—elderberry’s natural sugars can support mold in humid conditions.
Pro Tip: Freeze extra elderberry syrup in ice cube trays for convenient portioning. Each cube equals about 2 tablespoons, perfect for a quick gummy batch. Frozen elderberry syrup stays good for 6-8 months[4] without losing potency.
This table compares gelatin-based and agar-based elderberry gummies across four characteristics: gelling agent source, texture, setting requirements, and shelf life duration.
| Characteristic | Gelatin Gummies | Agar Gummies |
|---|---|---|
| Gelling Agent | Animal-based collagen (beef or pork) | Plant-based red algae extract |
| Texture | Soft, chewy, slightly elastic | Firm, brittle, snaps when bitten |
| Setting Requirements | Gentle heat (90-100°F/32-38°C), 2 hours refrigeration | Full boil (185°F/85°C)[5], 30 min room temp |
| Shelf Life | 2-3 weeks refrigerated[3] | 2-3 weeks refrigerated or 1 week room temp |
Conclusion
The evidence is clear: how to make elderberry gummies involves just three core ingredients, 15 minutes of prep work, and 2 hours of setting time to create immune-supporting treats with scientifically-backed antiviral properties. Studies show elderberry reduces viral activity by up to 95%[1] while clinical trials with nearly 1,000 participants confirm it shortens respiratory illness duration when started early.
Current guidance emphasizes homemade preparations for maximum freshness and potency control, and you’ll save money compared to commercial supplements. FruitGarden compiles research-based approaches to fruit cultivation and preservation so you can grow elderberries yourself or source quality dried berries for year-round immune support.
Medical Disclaimer
Important Medical Disclaimer: This content is for informational and educational purposes only. It isn’t intended as a substitute for professional medical advice, diagnosis, or treatment. Always consult a qualified healthcare professional before making any changes to your diet, medication, or health routine, especially if you’re pregnant, nursing, taking medications, or have existing medical conditions. Elderberry may interact with immunosuppressants, diuretics, and diabetes medications. Don’t use elderberry as a replacement for vaccines or prescribed antiviral medications.
Frequently Asked Questions
How many elderberry gummies should I take daily?
Research suggests 1-2 gummies daily for general immune support during healthy periods, or up to 4-6 gummies daily if you’re fighting active illness. Each gummy typically contains about 1 teaspoon of elderberry syrup, and clinical trials used doses equivalent to 1-2 tablespoons for prevention. Start with the lower dose and adjust based on how you feel.
Can I give elderberry gummies to children?
Children over 1 year old can typically have elderberry gummies, but check with your pediatrician first. Most experts recommend half the adult dose for kids under 12—that’s 1 gummy daily for prevention. Never give honey-containing elderberry products to infants under 12 months due to botulism risk.
Do elderberry gummies really work for colds and flu?
Studies with 936 adults demonstrated elderberry reduces respiratory illness duration and severity when taken within 48 hours of symptom onset[2]. Lab tests show up to 95% antiviral activity[1], though real-world effectiveness varies by individual. They work best as early intervention, not as a cure once illness progresses.
Why won’t my elderberry gummies set properly?
Common causes include overheating your gelatin mixture (above 212°F destroys gelling ability), skipping the blooming step, or using too little gelatin for your liquid volume. You need about 1 tablespoon gelatin per 1/2 cup liquid for firm gummies. Also check that you’re refrigerating for the full 2 hours—partial setting feels firm but melts quickly.
Can I make elderberry gummies without elderberry syrup?
Yes, you can make gummies directly from dried elderberries by simmering 1/2 cup dried berries in 2 cups water for 30 minutes, then straining and using the concentrated liquid. This method takes longer than using pre-made syrup but gives you control over sweetness and additives. The resulting gummies will be less sweet since you’re not adding honey.
How long do homemade elderberry gummies last?
Gelatin-based elderberry gummies last 2-3 weeks when stored in an airtight container in the refrigerator[3]. Adding 2 tablespoons lemon juice extends shelf life slightly by lowering pH. Discard gummies if you see mold, white spots, or notice off smells. Freezing isn’t recommended since thawed gummies become mushy.
What’s the difference between elderberry gummies and elderberry syrup?
Both contain the same active compounds, but gummies offer more convenient dosing and better taste for people who dislike liquid syrups. Elderberry syrup lasts longer (60-90 days refrigerated)[4] compared to gummies’ 2-3 weeks. Syrup delivers a more concentrated dose per serving, while gummies spread the dose across multiple pieces for steady intake throughout the day.