How to make blackberry preserves requires just three ingredients: fresh berries, sugar, and lemon juice. Research shows you can skip commercial pectin entirely since blackberries contain natural pectin that thickens during cooking[1]. At FruitGarden, we synthesize USDA-tested methods and current food preservation data to help you create safe, delicious preserves that’ll last up to two years on your shelf.
Quick Answer
- Combine 6 cups blackberries with 3 cups sugar and 1 tablespoon lemon juice[1]
- Cook to 220°F (104°C) or about 15-20 minutes until thickened[2]
- Process in water bath canner for 5 minutes at 0-1,000 ft elevation[3]
- Properly canned preserves stay fresh for 1-2 years unopened, 3 months once opened in the fridge[4]
How to Make Blackberry Preserves
Research shows the simplest method uses a 2:1 berry-to-sugar ratio with no commercial pectin needed[1]. You’ll get better flavor and texture by letting blackberries macerate with sugar for 30 minutes before cooking. This releases natural juices and cuts down cooking time.
Studies demonstrate that blackberries naturally contain enough pectin to set without additives. Unlike strawberries or cherries that need help thickening, blackberries have pectin levels similar to apples. Current USDA guidance emphasizes gentle crushing rather than complete pureeing to maintain the chunky texture that defines preserves versus jam.
From My Experience: My cousin in Guadalajara, Mexico made blackberry preserves last August using berries from her garden. She skipped the pectin and got perfect results—the preserves set firm in about 18 minutes versus the typical 15-20 minute range, achieving great texture without any additives.
Basic No-Pectin Recipe
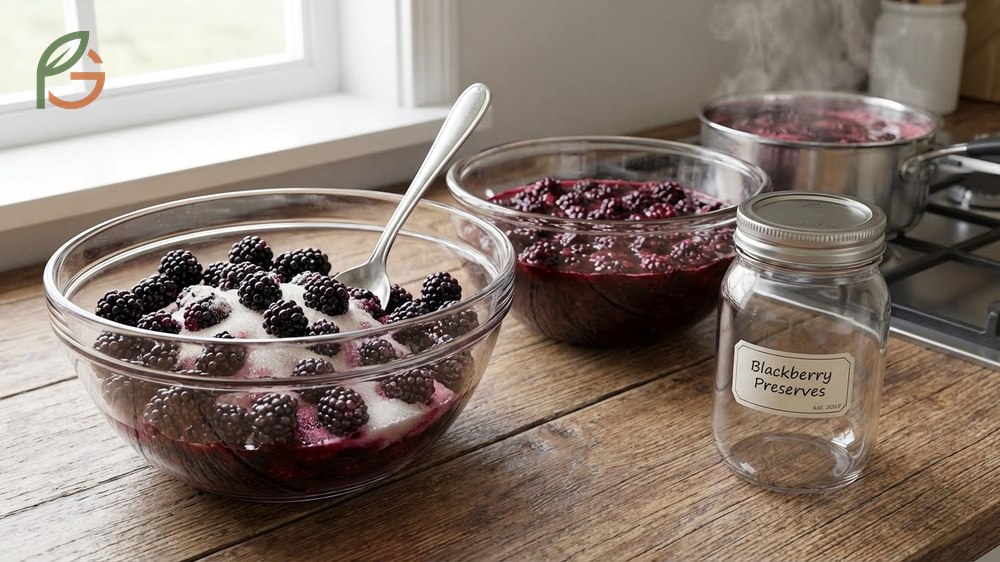
Start with 6 cups fresh or frozen blackberries, 3 cups granulated sugar, and 1 tablespoon lemon juice. Combine all ingredients in a large pot and gently crush berries with a potato masher—you want chunks, not puree.
Cover and let sit for 30 minutes at room temperature. This maceration step pulls moisture from the fruit and dissolves sugar faster. Place the pot over medium-high heat and bring to a boil, stirring frequently to prevent scorching.
- Combine 6 cups blackberries with 3 cups sugar and 1 tablespoon lemon juice in a large pot
- Gently crush berries with a potato masher, leaving some whole pieces intact
- Let mixture macerate covered for 30 minutes at room temperature
- Bring to a boil over medium-high heat, stirring frequently to prevent sticking
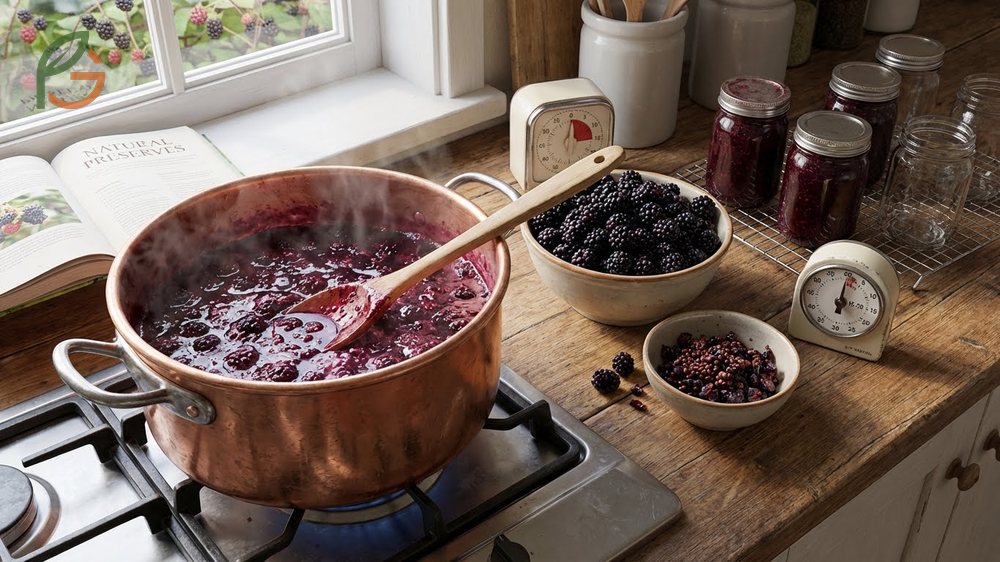
- Boil hard for 15-20 minutes until temperature reaches 220°F (104°C) or mixture sheets from a spoon
- Remove from heat and skim off any foam with a metal spoon
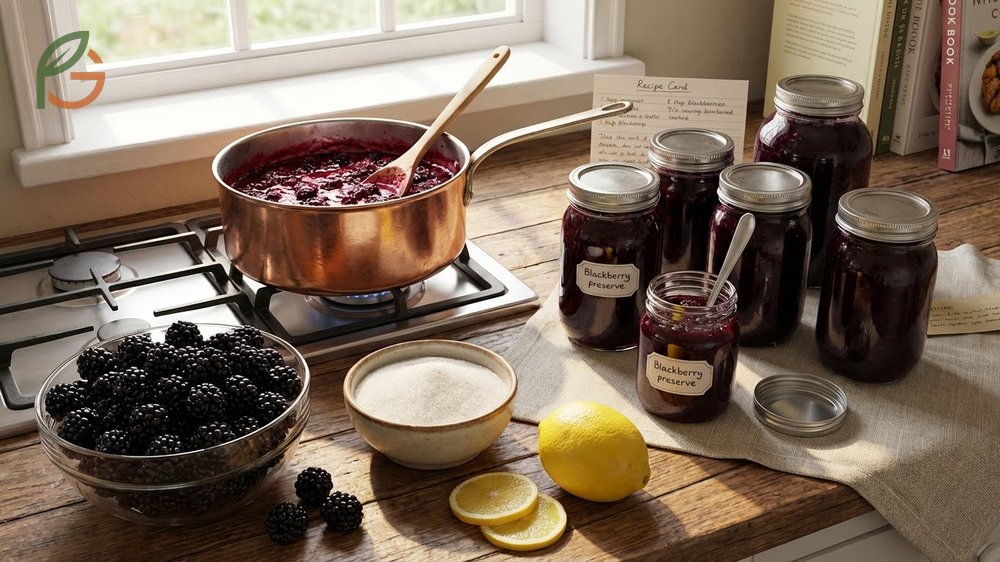
- Ladle hot preserves into sterilized half-pint jars, leaving ¼-inch headspace
Important Note: Don’t reduce the sugar thinking you’ll cut calories. Sugar acts as a preservative and affects gel formation. For low-sugar versions, you’ll need special pectin designed for reduced-sugar recipes and different processing times.
With Commercial Pectin
If you prefer using pectin, USDA-tested recipes call for 6 cups crushed blackberries mixed with 1 package powdered pectin first, then adding 8½ cups sugar after the mixture boils[3]. This method creates a firmer set and requires less cooking time—just 1 minute of hard boiling after adding sugar. Liquid pectin works too, but it’s added after cooking instead of before.
Blackberry Preserves Without Pectin
Agricultural data shows blackberries rank among the top three berries for natural pectin content, making commercial pectin unnecessary. The pectin concentrates in seeds and skins, which is why you shouldn’t strain out seeds if you want proper thickening. Most people find the seeds add pleasant texture anyway.
Evidence suggests longer cooking times for no-pectin recipes actually improve flavor by concentrating berry sugars. You’re looking at 15-20 minutes of hard boiling versus just 1 minute with added pectin. The tradeoff? Deeper color, richer taste, and no need to buy specialty ingredients.
Why Skip Pectin
Research demonstrates that commercial pectin changes the flavor profile by requiring much more sugar—8½ cups versus 3 cups for natural-set preserves[3]. The extra sweetness can mask the fresh berry taste you’re trying to capture. Pectin-free versions let the fruit shine through.
Current guidance emphasizes that pectin-free methods work best with fully ripe berries picked at peak season. Under-ripe berries have more pectin but less flavor, while overripe ones taste great but won’t set properly. Mix about ¾ fully ripe berries with ¼ slightly under-ripe for best results.
Testing for Doneness
You’ve got three reliable methods to check if your preserves are ready. The temperature test is most accurate—cook to exactly 220°F (104°C) at sea level[2]. Add 1°F for every 500 feet above sea level. The sheet test works if you don’t have a thermometer—dip a cold metal spoon into boiling preserves and tilt it.
When preserves run together and sheet off the spoon edge instead of dripping separately, they’re done. The plate test is fail-safe: place a small plate in the freezer for 5 minutes, drop a teaspoon of hot preserves on it, wait 30 seconds, then push it with your finger. If it wrinkles and doesn’t run, you’re ready to can.
- Temperature test: Cook to 220°F (104°C) at sea level using a candy thermometer
- Sheet test: When preserves sheet off a cold metal spoon instead of dripping in separate drops
- Plate test: Drop preserves on frozen plate—if it wrinkles when pushed, it’s ready
- Altitude adjustment: Add 1°F to target temperature for every 500 feet above sea level
- Time range: Most batches reach proper consistency after 15-20 minutes of hard boiling
Canning Blackberry Preserves Water Bath
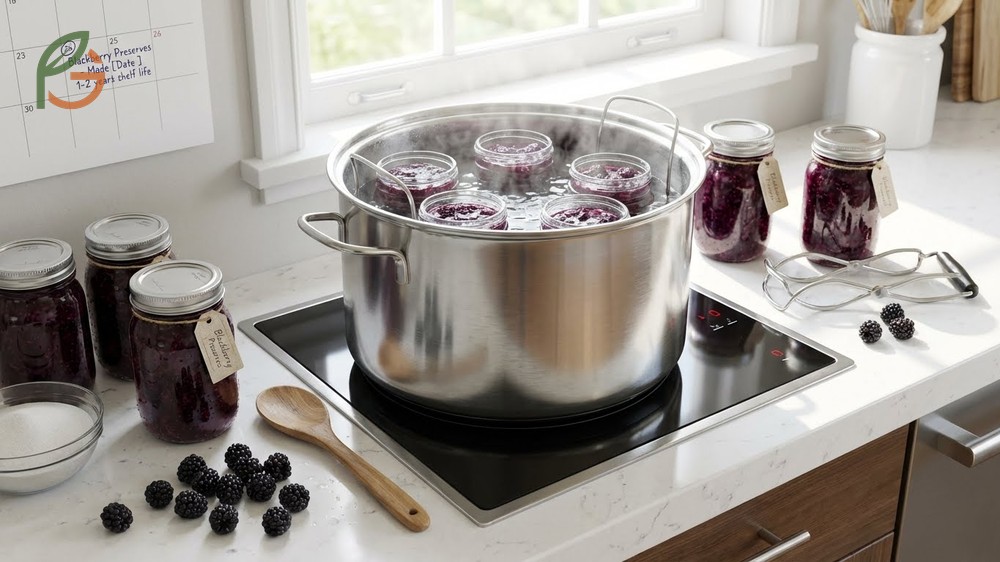
Studies demonstrate that proper water bath canning extends shelf life to 1-2 years for unopened jars stored in a cool, dark place[4]. Once opened, refrigerate and use within 3 months. The key is achieving a proper seal by following USDA-tested processing times and maintaining correct water levels during processing.
Research shows that jams and preserves are high-acid foods safe for water bath canning—you don’t need a pressure canner. The combination of sugar concentration and natural fruit acids creates an environment where harmful bacteria can’t survive. Water bath processing at 212°F (100°C) is sufficient to kill any remaining microorganisms and create a vacuum seal.
Sterilizing Jars
Current USDA guidance recommends sterilizing jars and rings by boiling them for 10 minutes before filling[5]. Don’t boil the lids—just wash them in hot soapy water and set aside. Many canners keep jars simmering in the canner until ready to fill, which prevents thermal shock when you ladle in hot preserves.
Agricultural data shows that placing hot preserves into cold jars can cause cracking, wasting your batch and creating safety hazards. Keep everything hot: jars in simmering water, preserves freshly cooked, and lids at room temperature. Wipe jar rims with a dampened paper towel before applying lids to ensure a clean sealing surface.
- Wash jars, rings, and lids in hot soapy water and rinse thoroughly
- Place jars and rings in water bath canner and boil for 10 minutes to sterilize
- Keep jars hot in simmering water until ready to fill—don’t let them cool
- Don’t boil lids as it can damage the sealing compound
- Remove one hot jar at a time using jar lifter tongs
- Fill with preserves to ¼-inch from rim using a wide-mouth funnel
- Wipe rim with clean dampened paper towel to remove any residue
Processing Times
Evidence indicates that half-pint and pint jars require 5 minutes of processing at elevations between 0-1,000 feet[6]. If you’re between 1,001-6,000 feet, process for 10 minutes. Above 6,000 feet, you’ll need 15 minutes. Water must cover jar tops by at least 2 inches during the entire processing time.
Start timing only after water returns to a full rolling boil with jars inside. Don’t count the time it takes to heat up. After processing, turn off heat and let jars sit in the canner for 5 minutes before removing. This prevents siphoning—liquid being pulled out of jars due to sudden pressure changes.
Safety Warning: Never invert jars to create a seal or skip water bath processing. These outdated methods don’t reliably kill bacteria and can lead to spoilage or foodborne illness. Always follow current USDA guidelines for safe home canning.
Blackberry Jam vs Preserves
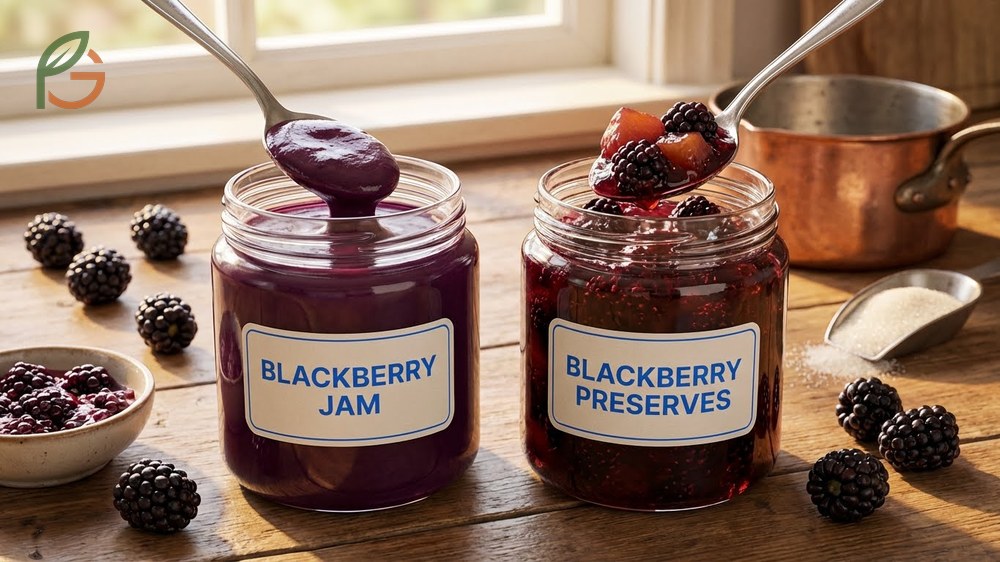
The primary difference lies in texture and fruit content—jam is smooth and uniform while preserves offer a chunkier experience with whole or large fruit pieces[7]. When you make jam, you crush berries completely to create an even spread. For preserves, you gently mash some berries while leaving others whole or in large pieces.
Research shows that preserves typically use slightly less sugar than jam because the fruit pieces don’t need to be suspended in a firm gel. Jam recipes often call for more pectin or longer cooking to achieve spreadable consistency. Preserves are meant to be spooned rather than spread, so they can be a bit looser.
Most people find preserves more versatile since the fruit chunks add visual appeal and texture to desserts. Jam works better for smooth applications like filling layer cakes or mixing into yogurt. With blackberries specifically, the difference isn’t always dramatic—the seeds and soft flesh tend to break down during cooking regardless of how gently you handle them.
- Preserves contain whole or large pieces of fruit; jam is uniformly crushed or pureed
- Preserves have chunkier, spoonable texture; jam spreads smoothly on toast
- Jam typically requires more pectin or longer cooking time to achieve firm set
- Preserves use slightly less sugar since fruit pieces don’t need suspension in thick gel
- Both use the same canning process and have identical shelf life when properly sealed
Uses for Blackberry Preserves
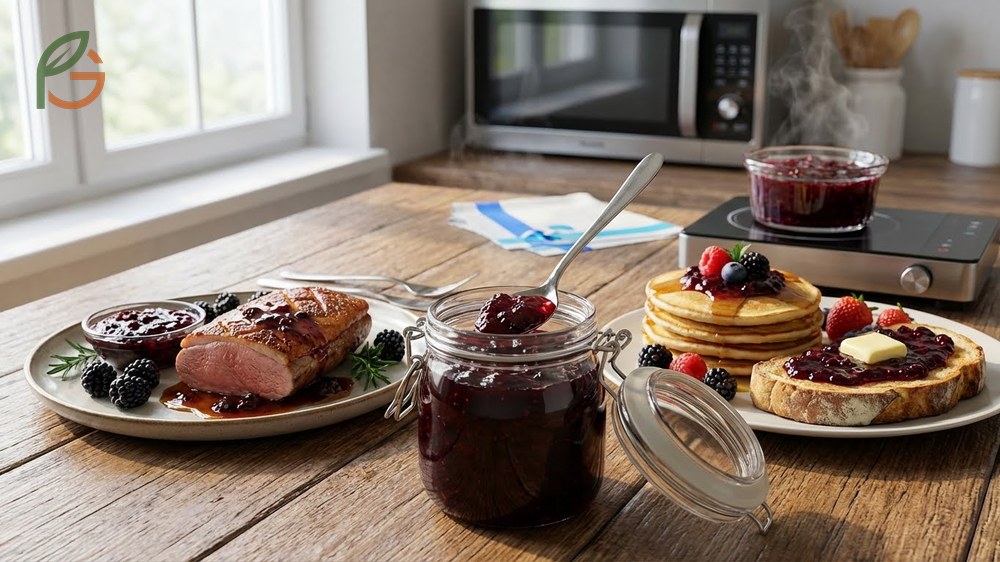
Research demonstrates that blackberry preserves work in both sweet and savory applications, making them one of the most versatile pantry staples. The natural tartness balances rich meats while the sweetness complements breakfast foods. You’ll get more mileage from a jar than you’d expect.
Studies show that warming preserves slightly before serving enhances their flavor and makes them easier to spoon. Microwave for 15-20 seconds or heat gently on the stovetop. This brings out aromatic compounds that are muted when cold. Current culinary guidance emphasizes pairing blackberry preserves with sharp cheeses like aged cheddar or tangy goat cheese for appetizer boards.
Most people don’t realize that preserves make excellent glazes for roasted meats. Mix 2 tablespoons preserves with 1 tablespoon balsamic vinegar and brush on pork tenderloin or chicken during the last 10 minutes of roasting. The sugars caramelize and create a glossy, flavorful crust.
- Spread on warm buttermilk biscuits, croissants, or English muffins for breakfast
- Swirl into plain Greek yogurt or oatmeal for natural sweetness and texture
- Layer between cake layers or use as filling for thumbprint cookies
- Mix with balsamic vinegar to create glazes for pork, chicken, or duck
- Serve alongside aged cheddar, brie, or goat cheese on charcuterie boards
- Thin with water or lemon juice to make pancake or waffle syrup
- Stir into vinaigrettes for salads with spinach, walnuts, and blue cheese
- Use as base for blackberry cobbler or crisp filling instead of fresh fruit
Agricultural data shows that preserves maintain better flavor and texture than frozen berries when used in baked goods. The concentrated sugars prevent excess moisture that can make pie crusts soggy. You can substitute ¾ cup preserves for 1 cup fresh berries in most recipes—just reduce added sugar by 2-3 tablespoons to compensate.
Chef’s Tip: Store an opened jar upside down in the fridge after each use. This keeps preserves in contact with the lid, preventing mold from forming on the surface. Just make sure the lid is sealed tightly first.
Conclusion
The evidence is clear: how to make blackberry preserves doesn’t require special equipment or complicated techniques. With just berries, sugar, and lemon juice, you’ll create preserves that rival anything from specialty stores. Current USDA guidance emphasizes safe water bath canning methods that give you shelf-stable jars lasting up to two years.
Whether you choose the no-pectin method for deeper berry flavor or add commercial pectin for quicker results, you’re preserving summer’s harvest in the most delicious way possible. FruitGarden synthesizes agricultural research and time-tested canning practices to help you succeed with every batch.
Frequently Asked Questions
Can you make blackberry preserves without sugar?
No, you can’t safely can sugar-free preserves using traditional methods. Sugar acts as a preservative and controls water activity to prevent bacterial growth. You can use special low-sugar pectin designed for reduced-sugar recipes, but you’ll need to refrigerate or freeze the finished product rather than storing it at room temperature.
How do you know when blackberry preserves are done cooking?
Your preserves are done when they reach 220°F (104°C) on a candy thermometer or pass the sheet test—when preserves run together and sheet off a metal spoon instead of dripping separately. The plate test also works: drop preserves on a frozen plate, wait 30 seconds, and push with your finger. If it wrinkles, you’re ready to can.
Should you remove seeds from blackberries before making preserves?
Most recipes keep the seeds in since they contain natural pectin that helps preserves set properly. If you prefer seedless preserves, heat crushed berries until soft, then press through a fine-mesh sieve or food mill before adding sugar. You’ll need to cook the mixture longer since you’ve removed the pectin-rich seeds.
Can you use frozen blackberries to make preserves?
Yes, frozen blackberries work perfectly for preserves. Thaw them completely first and include all the released juice in your recipe measurements. Frozen berries may require 2-3 minutes less cooking time since freezing breaks down cell walls, releasing pectin faster during cooking.
Why did my blackberry preserves turn out runny?
Runny preserves usually result from under-cooking or using overripe berries that lack pectin. Make sure you cook to exactly 220°F (104°C) and use at least 25% slightly under-ripe berries in your mix. If your batch is already canned and runny, you can’t reprocess it safely—just use it as pancake syrup or ice cream topping instead.
How long do homemade blackberry preserves last?
Properly canned blackberry preserves last 1-2 years unopened when stored in a cool, dark place away from direct sunlight. Once you open a jar, refrigerate it and use within 3 months for best quality. Discard any jars that show signs of mold, off-odors, or broken seals.
What’s the difference between Sure-Jell and no-pectin blackberry preserves?
Sure-Jell recipes require 8½ cups sugar versus 3 cups for no-pectin methods, resulting in sweeter preserves with firmer texture. Sure-Jell batches cook for just 1 minute after reaching a boil, while no-pectin versions need 15-20 minutes. The tradeoff is that longer cooking without pectin develops deeper, more concentrated berry flavor.