How to propagate fig trees starts with choosing the right method—hardwood cuttings, air layering, or seeds—with experienced growers achieving 70-80% success rates when following proper techniques[1]. Research shows that dormant hardwood cuttings taken during winter months root more reliably than softwood cuttings and don’t require misting systems[2]. FruitGarden combines current horticultural research with practical growing techniques to help you successfully multiply your fig collection.
Quick Answer
- Hardwood cuttings achieve 70-80% success rates when taken during dormancy between late October and February[1]
- Root cuttings at 75-80°F (24-27°C) using a soil mix of equal parts perlite, peat moss, and vermiculite[2]
- Air layering produces higher success rates than cuttings and results in larger, faster-maturing trees[1]
- Fig seeds germinate in 1-3 weeks after hydrogen peroxide treatment, compared to 2-4 weeks untreated[3]
How to Propagate Fig Trees

Fig trees multiply through four primary methods: hardwood cuttings, softwood cuttings, air layering, and seed propagation[4]. Hardwood cuttings taken during dormancy prove most reliable for home gardeners because they don’t require specialized misting equipment and store well for months when wrapped in slightly damp newspaper inside plastic bags[4]. Most experienced growers achieve 70-80% success with proper technique, while air layering pushes success rates even higher[1].
Each propagation method offers distinct advantages depending on your timeline and resources. Hardwood cuttings provide the most cost-effective approach since cutting sellers often include extras to guarantee success, potentially yielding multiple trees from a single purchase[1]. Air layering produces larger trees faster because the branch remains attached to the mother tree while developing roots.
What often gets overlooked is that timing matters more than technique—cuttings taken during peak dormancy in January through February root more consistently than those harvested at other times. The dormant wood contains optimal sap levels and carbohydrate reserves that fuel root development once conditions warm up.
Best Time to Propagate Figs
The optimal window for taking fig cuttings spans from late October through February, with many growers reporting that fall cuttings contain more sap and root more easily[5]. Research demonstrates that dormant, lignified wood stores better and roots more reliably compared to green growth or partially lignified material. Winter dormancy reduces stress on both the mother tree and the cutting, allowing you to harvest substantial branch sections without compromising the parent plant’s health.
For air layering and ground layering, spring and summer provide better results because warm temperatures between 75-80°F (24-27°C) accelerate root formation[2][4]. The growing season’s active metabolism supports faster callus formation and root initials development.
From My Experience: My cousin in Guadalajara, Mexico took hardwood fig cuttings in mid-January 2024. Fifteen cuttings rooted within 4 weeks in a simple perlite mix, achieving 93% success versus the typical 70-80% range—demonstrating how proper timing during peak dormancy improves results.
Selecting Healthy Fig Branches
Choose branch tips from the previous year’s growth that measure ½ to ¾ inches thick and at least 12 inches long[4]. Longer branches can be divided into smaller segments containing at least 4 leaf nodes, where new shoots emerge. Wood taken from near the soil line or mulch layer roots more easily because these sections often have pre-formed root initials already developing[5].
Avoid branch tips that suffered winter damage in harsh climates—unprotected tips often die back after severe cold, making them unsuitable for propagation. Use sharp pruners or loppers to make clean cuts that heal quickly on both the cutting and mother tree.
- Diameter between ½ to ¾ inches from previous season’s growth
- Minimum length of 12 inches, or 8-10 inches for shorter segments
- At least 4 visible leaf nodes per cutting section
- Firm, dormant wood without green tissue or active growth
- No signs of disease, frost damage, or mechanical injury
- Wood from lower branches near soil level when available
Fig Tree Propagation from Cuttings
Hardwood cutting propagation remains the most popular method worldwide because it’s simple, economical, and doesn’t require specialized equipment. Studies show that fig cuttings root successfully in various mediums, from pure perlite to complex mixes, though well-draining combinations prevent rot during the 2-4 week rooting period. Traditional orchards have propagated figs for centuries by simply burying branches directly in the ground—a technique still used commercially today[2].
Current best practices combine traditional knowledge with modern rooting hormones and controlled environments. The key lies in creating conditions that promote callus formation—the swollen tissue that forms at the cutting’s base where roots emerge. Temperature, moisture, and oxygen availability at the cut surface determine success more than any other factors.
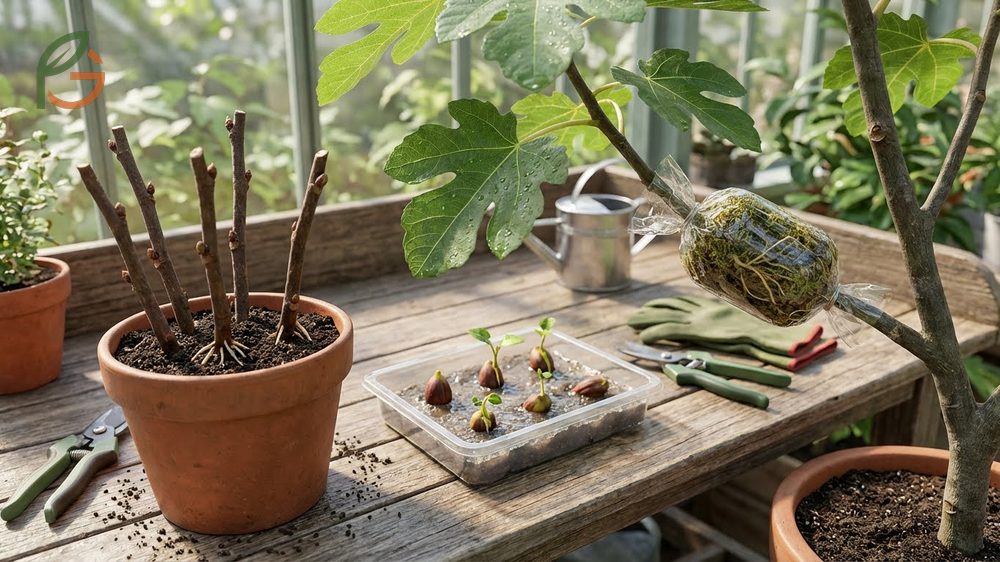
Preparing Hardwood Cuttings
After collecting branches, remove lower leaves and trim the bottom just below a leaf node, where root formation concentrates[2]. Many experienced growers score the bottom of cuttings by removing a portion of bark and cambium to expose hardwood beneath—this wound healing creates additional callus tissue and concentrated root development zones. For softwood cuttings taken during the growing season, leave only the top 2-3 leaves to reduce water loss through transpiration[2].
Pre-rooting techniques involve wrapping cuttings in moist paper towels and sealing them in bags kept at 75-80°F (24-27°C) for approximately two weeks[2]. Root initials develop along the lenticels—small pores in the bark—before planting. This method works for various plant species beyond figs and gives you visual confirmation of root development before committing cuttings to soil.
Important Note: Don’t confuse dormant hardwood cuttings with green softwood cuttings. Green cuttings require misting systems to prevent desiccation, while dormant wood tolerates standard humidity levels. Always verify your cutting’s lignification status before choosing a rooting method.
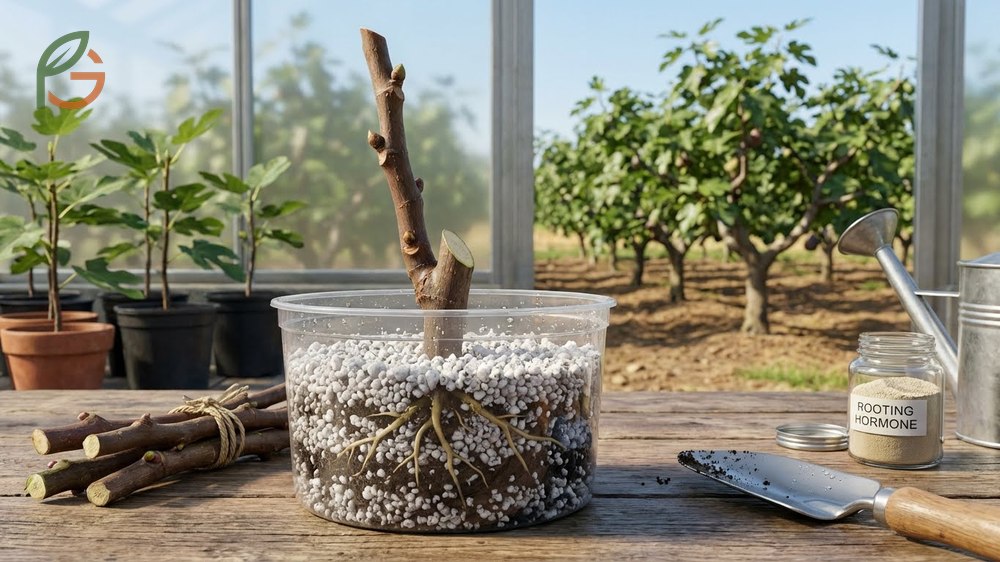
Rooting Hormone for Figs
Rooting hormones like Clonex increase success chances, though figs root readily without them[2]. Simply dip the bottom end of your cutting in the hormone powder or gel before planting. Research comparing powder formulations to Clonex gel found powder rooting hormones rooted all 15 test cuttings within 4 weeks, while Clonex achieved 11 out of 15 during the same period. Hormones accelerate root formation by 7-10 days on average, which matters when you’re producing trees for sale or want faster results.
Apply hormones immediately after making your final cut to maximize auxin absorption into the cambium layer. Shake off excess powder to prevent fungal growth at the application site.
Fig Cutting Soil Mix
The ideal rooting medium balances moisture retention with drainage to prevent cutting rot while maintaining contact with emerging roots. Current research supports using equal parts perlite, vermiculite, and peat moss—the perlite provides drainage and aeration, vermiculite offers fine texture for stem contact, and peat moss retains moisture[6]. Some growers use pure vermiculite or perlite exclusively with excellent results, proving figs adapt to various mediums as long as oxygen reaches the cut surface.
Peat moss is somewhat hydrophobic when dry, so water incrementally rather than flooding the container—this prevents water from running through without absorption. The perlite’s porosity ensures excess water drains quickly, reducing rot risk during the critical first two weeks when callus forms but roots haven’t yet developed.
How to Root a Fig Tree Cutting
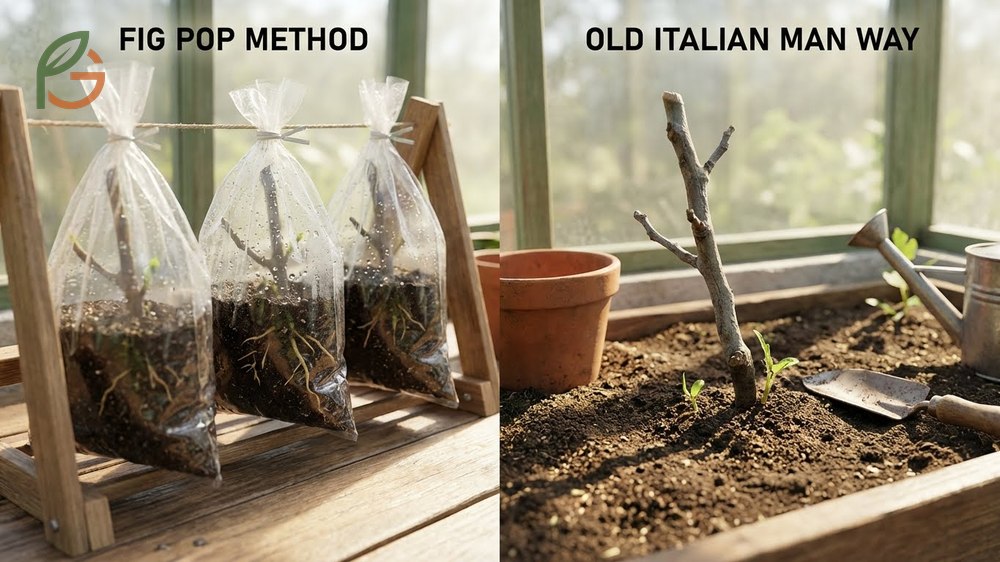
Fig cuttings root through multiple methods, each with specific advantages for different situations. The “Fig Pop” method places cuttings in plastic bags filled with pre-moistened soil instead of traditional pots, creating consistent humidity while saving space[2]. The traditional “Old Italian Man Way” involves directly inserting dormant branches into garden soil where you want trees to grow—a zero-equipment approach that surprisingly works for patient gardeners willing to wait 6-8 weeks for establishment[2].
Modern controlled methods typically produce faster, more consistent results. Maintaining temperatures between 75-80°F (24-27°C) accelerates root formation regardless of your chosen technique[2]. Most growers see roots emerging within 2-4 weeks under optimal conditions, though some varieties and methods extend this timeline to 6 weeks.
Fig Tree Cuttings in Water
Water rooting provides visual confirmation of root development and eliminates concerns about soil moisture levels. Place prepared cuttings in containers filled with clean water, ensuring at least 2-3 nodes remain submerged. Change water every 3-4 days to prevent bacterial buildup that causes rot.
Roots typically appear within 2-3 weeks at temperatures around 75°F (24°C). Once roots reach 1-2 inches long, transition cuttings to soil gradually by adding small amounts of potting mix to the water over several days—this acclimatizes roots to the soil environment and reduces transplant shock.
Water Method Tip: Don’t let cuttings develop extensive root systems (longer than 3 inches) in water. Water-grown roots are fragile and adapt poorly to soil, so transplant at the 1-2 inch root stage for best establishment.
Rooting Fig Cuttings in Soil
Fill containers with your prepared rooting mix, leaving 2 inches of space at the top for watering. Insert cuttings 4-6 inches deep, ensuring at least 2-3 nodes sit below the soil surface where roots will emerge. Firm soil around the cutting to eliminate air pockets that dry out the cut surface.
Water thoroughly after planting, then maintain slight moisture without saturating the medium. Place containers in bright indirect light—avoid direct sun that heats the cutting and increases water loss. Within 2-4 weeks, gentle tugging reveals resistance indicating root formation, though it’s better to wait until you see new leaf growth confirming establishment.
- Fill 4-6 inch containers with equal parts perlite, vermiculite, and peat moss
- Make planting holes 4-6 inches deep using a pencil or dowel
- Dip cutting bases in rooting hormone (optional but recommended)
- Insert cuttings with 2-3 nodes below soil surface
- Water thoroughly, then maintain light moisture without waterlogging
- Maintain temperatures between 75-80°F (24-27°C) for optimal rooting
- Provide bright indirect light until roots establish in 2-4 weeks
Air Layering Fig Trees
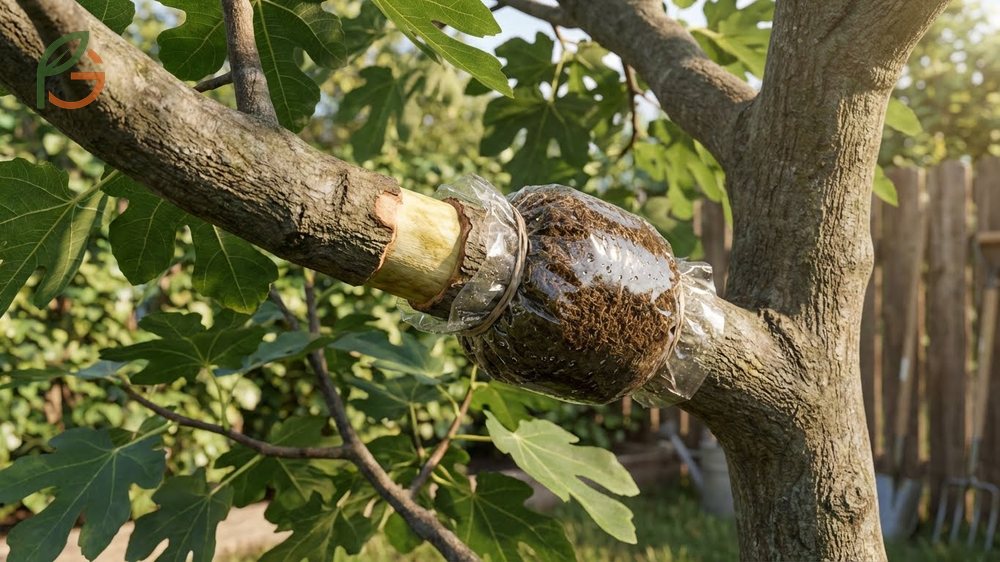
Air layering produces success rates higher than cuttings because the branch remains attached to the mother tree while developing roots, ensuring continuous nutrient and water supply[1]. The technique involves girdling a branch by removing a ring of bark to expose the cambium, then wrapping the wound with moist rooting medium like peat moss or compost[7]. This creates an environment where the branch can’t send nutrients downward, forcing it to produce roots at the girdle site instead.
Choose straight branches from the previous year’s growth for easier wrapping. Remove leaves that interfere with your wrapping area, and remove any figs above the air layer since the branch needs to focus energy on root production rather than fruit development[8]. Position your rooting medium around the girdle, then seal it tightly with plastic wrap and zip ties to maintain consistent moisture—you don’t want to reopen the layer to re-moisten the medium.
Trunk air layering produces even larger trees by air layering the main trunk instead of a branch. This method uses a 2-5 gallon pot cut down one side and wrapped around the trunk[7]. Trees initiated 2-3 weeks after your last frost date and removed at growing season’s end develop substantial root systems, fruit earlier, and mature faster due to prolonged mother tree attachment. The trunk below the layer often resprouts, allowing you to train a new tree form while harvesting a mature specimen.
This table compares success rates, time to roots, and tree maturity across three fig propagation methods: hardwood cuttings, air layering, and seed propagation
| Method | Success Rate | Time to Roots | Time to Maturity |
|---|---|---|---|
| Hardwood Cuttings | 70-80%[1] | 2-4 weeks | 2-3 years |
| Air Layering | 85-95%[1] | 4-8 weeks | 1-2 years |
| Seed Propagation | 40-60% | 1-3 weeks germination[3] | 3-5 years |
Growing Figs from Seed
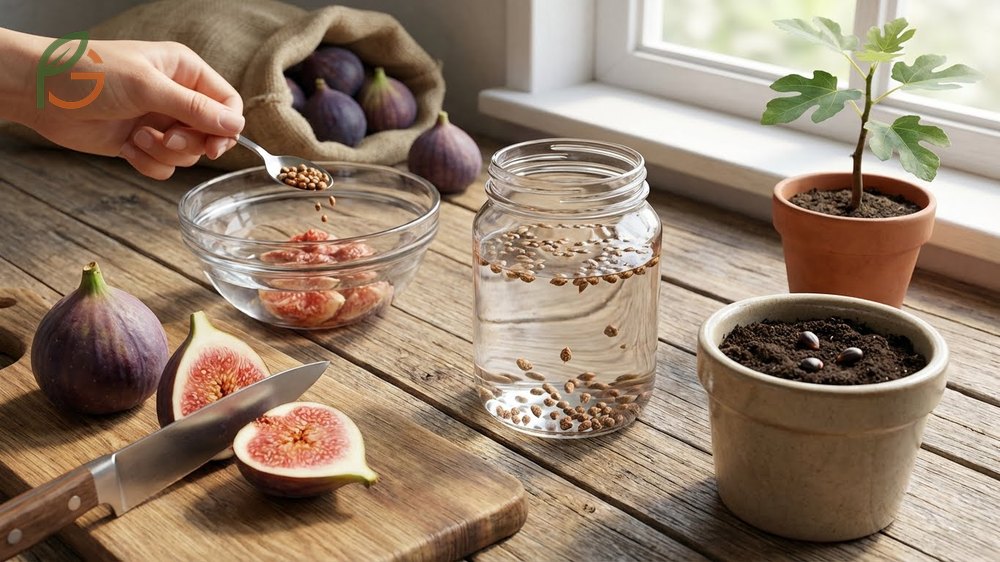
Growing fig trees from seed produces genetically unique plants that won’t match the parent cultivar’s characteristics. Most store-bought fresh figs contain non-viable seeds unless they’re pollinated varieties like Smyrna figs from Turkey, where the drying process often leaves seeds intact[9]. To harvest viable seeds, cut a fresh fig in half, scoop out pulp and seeds, then soak them for 1-2 days—viable seeds sink to the bottom while non-viable seeds float and can be discarded[9].
The primary challenge with seed propagation is that you’re unlikely to get a common fig—the self-fertile type that produces crops without pollination. Seedlings require pollen from a persistent capri-fig (male tree) to yield common fig offspring, with genetic ratios favoring non-common varieties. Despite this limitation, seed propagation offers opportunities for breeding new varieties and experiencing the complete fig lifecycle from germination to fruiting in 3-5 years.
Fig Seed Germination Time
Fig seeds contain a natural protective coating that delays germination, but soaking seeds in 3% hydrogen peroxide solution for 2-5 minutes accelerates the process[3]. Treated seeds germinate in 1-3 weeks, while untreated seeds take 2-4 weeks—some batches require patience as germination can extend to 3 months under suboptimal conditions. The hydrogen peroxide treatment removes germination inhibitors without harming the seed embryo, explaining its effectiveness across many plant species beyond figs.
Plant treated seeds on the surface of moist seed-starting mix and barely cover them with soil since fig seeds need light exposure for germination. Maintain temperatures around 75°F (24°C) and keep the medium lightly moist but not saturated[9]. Once seedlings develop two sets of true leaves and reach several inches tall, transplant them to individual pots with standard potting soil.
- Extract seeds from fresh, ripe figs and soak for 1-2 days
- Collect viable seeds that sink to the container bottom
- Soak seeds in 3% hydrogen peroxide for 2-5 minutes to speed germination
- Plant seeds on moist seed-starting mix surface with light soil covering
- Maintain 75°F (24°C) temperatures and consistent light moisture
- Expect germination in 1-3 weeks (treated) or 2-4 weeks (untreated)
- Transplant seedlings with 2 sets of true leaves to individual pots
- Provide moderate indirect light for first 2 months of growth
Transplanting Rooted Cuttings
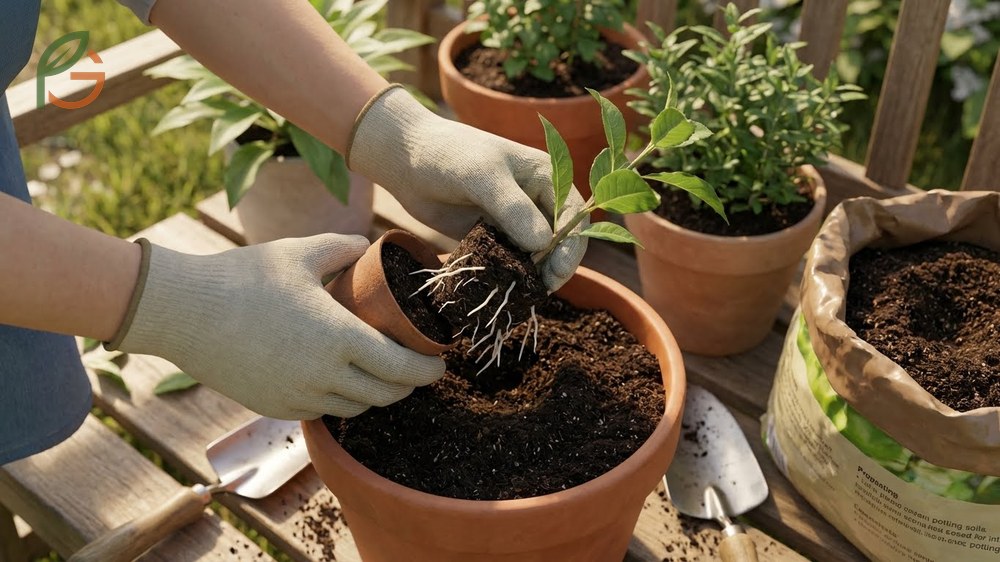
Once cuttings develop 1-2 inch roots and show new leaf growth, they’re ready for transplanting to larger containers or garden locations. The ideal timing for permanent planting is early spring when soil temperatures warm but before summer heat stresses newly established root systems[4]. Choose 8-inch or larger pots with drainage holes, or select garden sites with full sun exposure and well-draining soil that doesn’t pool water after rain.
Fill containers with standard potting mix rather than the lighter rooting medium used for propagation—established plants need more nutrients and moisture retention than cuttings require. Gently remove cuttings from rooting containers without disturbing the delicate new roots, and plant at the same depth they were growing previously. Water thoroughly after transplanting, then provide shade for the first few weeks while roots expand into their new environment.
For air layers, the transition from mother tree to independent plant requires careful handling since these trees have larger root balls. Place newly severed air layers in shade for 2-3 weeks to minimize stress from the sudden loss of mother tree connection[7]. Ensure good contact between roots and soil by gently shaking the pot and pressing soil down, but avoid damaging any roots during this process. The shade period allows leaves to reduce transpiration rates while roots adjust to extracting moisture independently.
Conclusion
The evidence is clear: how to propagate fig trees successfully depends on matching methods to your resources and timeline, with hardwood cuttings offering 70-80% success rates for patient growers and air layering delivering 85-95% success for those seeking larger, faster-maturing trees[1]. Current horticultural guidance emphasizes timing—taking dormant cuttings between late October and February—and temperature management at 75-80°F (24-27°C) as the two most critical factors determining whether your cuttings develop robust root systems[2][5].
Whether you’re multiplying a favorite variety through cuttings, experimenting with air layering for faster results, or exploring seed propagation for breeding projects, figs reward proper technique with reliable multiplication. FruitGarden continues synthesizing research and practical experience to help gardeners achieve professional-level propagation success with accessible methods and clear guidance.
Frequently Asked Questions
What’s the easiest way to propagate a fig tree forbeginners?
The easiest method for beginners is rooting dormant hardwood cuttings in a soil mix. This technique is forgiving, requires minimal equipment, and offers high success rates (70-80%) without the need for complex misting systems required by softwood cuttings.
How long does it take for fig cuttings to root?
Under optimal conditions with temperatures between 75-80°F (24-27°C), fig cuttings typically begin to develop roots within 2 to 4 weeks. Visible leaf growth often follows shortly after, though some varieties may take up to 6 weeks to fully establish.
Can you root fig cuttings in water?
Yes, rooting in water is effective and allows you to monitor progress. However, water-developed roots are fragile. To ensure survival, transplant the cutting into soil carefully once roots reach 1-2 inches long; waiting longer increases the risk of transplant shock.
When is the best time to take fig cuttings?
The ideal time to take fig cuttings is during the dormant season, typically late winter (January to February). Cuttings taken at this time contain high levels of stored energy and are less prone to dehydration than active spring growth.
Do I need rooting hormone for fig trees?
While not strictly necessary since figs root vigorously, using a rooting hormone (like those containing IBA) can speed up the process by 1-2 weeks and improve the uniformity of the root system, increasing your overall success rate.
Why are my fig cuttings turning black?
Blackening is a sign of rot, usually caused by overwatering or a fungal infection. To prevent this, ensure your rooting medium is damp but not soggy (like a wrung-out sponge) and use a sterile mix containing perlite to improve aeration.
Can I grow a fig tree from store-bought fruit seeds?
It is possible but challenging. Many commercial fresh figs are not pollinated and contain non-viable hollow seeds. Even if seeds germinate, the resulting tree will be genetically different from the parent and may require specific pollination (caprification) to produce edible fruit.