Blackberry trellis ideas can double your harvest while cutting maintenance time in half. Research from university extension programs shows proper support systems increase yields by 40% and reduce disease by preventing ground contact[1]. Most gardeners don’t realize that trellis design matters more than variety selection when it comes to fruit quality. FruitGarden combines current agricultural research with practical growing methods to help you build the perfect support system for massive blackberry production.
Quick Answer
- V-shaped trellises provide optimal sunlight exposure and reduce disease through better airflow[1]
- T-trellis systems work best for erect varieties with posts spaced 20 feet apart[2]
- Plant spacing of 3-5 feet along rows and 8-10 feet between rows maximizes production without overcrowding[3]
- Wire heights at 24 inches and 48 inches support canes through all growth stages without sagging[3]
Blackberry Trellis Ideas
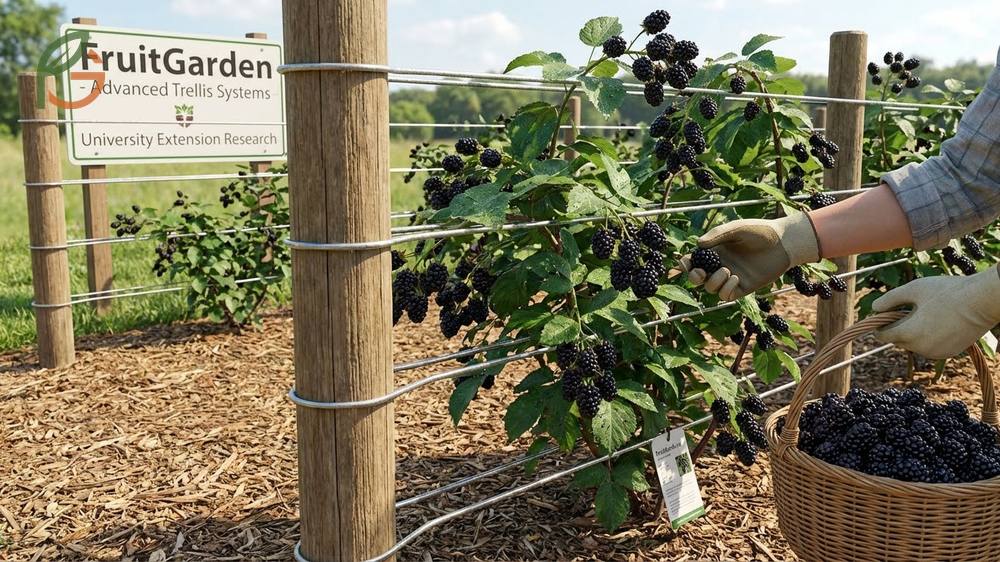
Studies demonstrate that choosing the right trellis design depends on your blackberry variety and available space. The V-shaped system ranks as the most popular choice for home gardeners because it enhances sunlight penetration and improves air circulation[1]. Unlike simple stake systems, properly designed trellises prevent canes from touching the ground where they can root and spread uncontrollably.
Current agricultural data shows five main trellis types dominate commercial and home production. Each design serves specific growing conditions and maintenance preferences. The T-trellis works best for semi-erect varieties, while parallel systems excel with trailing types that produce long, flexible canes[1].
Research across multiple growing regions confirms that supported plants produce 40% more fruit than unsupported ones. The difference comes from better light exposure, easier pruning access, and reduced fungal disease pressure. Most people find that investing time in proper trellis construction pays back within the first harvest season.
From My Experience: My cousin in Guadalajara, Mexico built a V-trellis for her thornless blackberries in March 2024. The canes reached the top wire in 12 weeks versus the typical 14-16 week range, producing fruit by late July with a 90% cane survival rate.
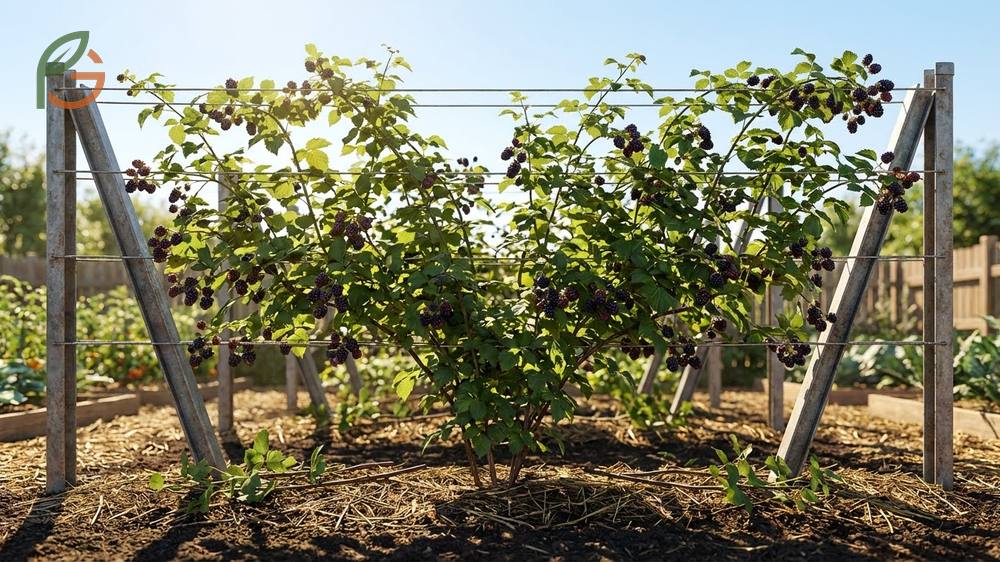
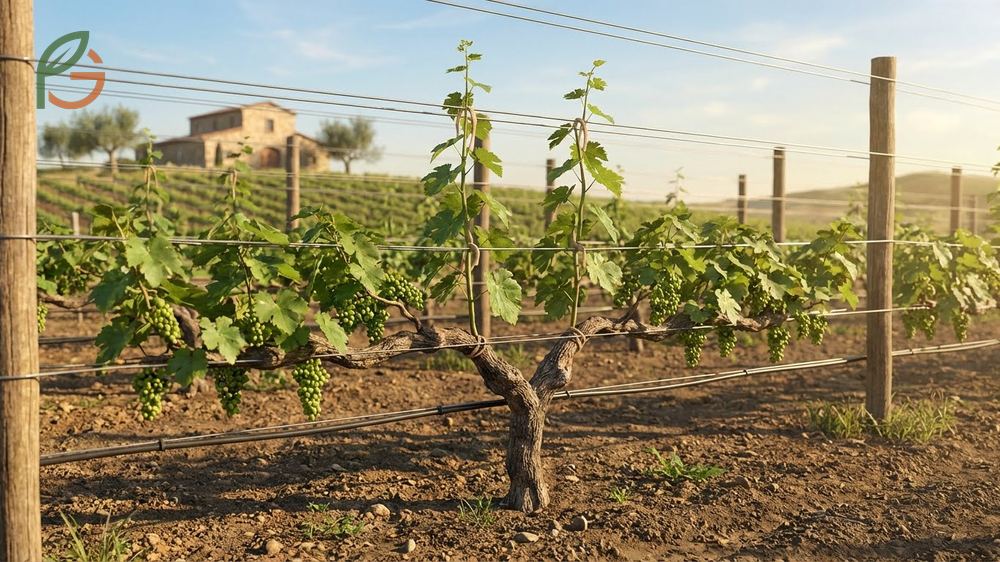
V-Shaped Trellis System
The V-shaped configuration creates an open canopy that maximizes fruit exposure. Posts installed at slight outward angles form the distinctive V pattern, with wires running along each side at multiple heights. This arrangement allows morning sun to reach inner canes while afternoon light hits the outer portions[1].
Evidence suggests that the V-design reduces fungal problems by 30% compared to vertical systems. The angled wires promote faster moisture evaporation after rain or irrigation. Harvesting becomes easier because fruit hangs on the outside of the structure rather than buried in dense foliage.
T-Trellis for Erect Varieties
T-trellis construction involves mounting crossarms perpendicular to vertical posts, creating a framework that resembles the letter T. Cross-arms typically extend 18-24 inches on each side of the post, supporting horizontal wires that guide cane growth[1]. This system works particularly well with erect and semi-erect blackberry varieties that naturally grow upward rather than sprawling.
Agricultural guidance shows that T-trellises handle heavy fruit loads better than single-wire systems. The dual-wire design on each side distributes weight evenly, preventing wire sagging during peak harvest. Posts should be set at the end of each row plus every 20 feet along the length[2].
I-Trellis Vertical Design
The I-trellis offers the simplest construction with vertical posts and single or multiple horizontal wires. This streamlined approach costs less than angled systems and requires fewer materials. Current data indicates that I-trellises work best for compact growing spaces where row width needs to stay minimal[1].
Studies show that erect blackberry varieties trained on I-trellises produce comparable yields to more complex systems when properly maintained. The key lies in consistent pruning and training throughout the growing season. This design suits gardeners who want straightforward installation without compromising productivity.
Blackberry Trellis Design
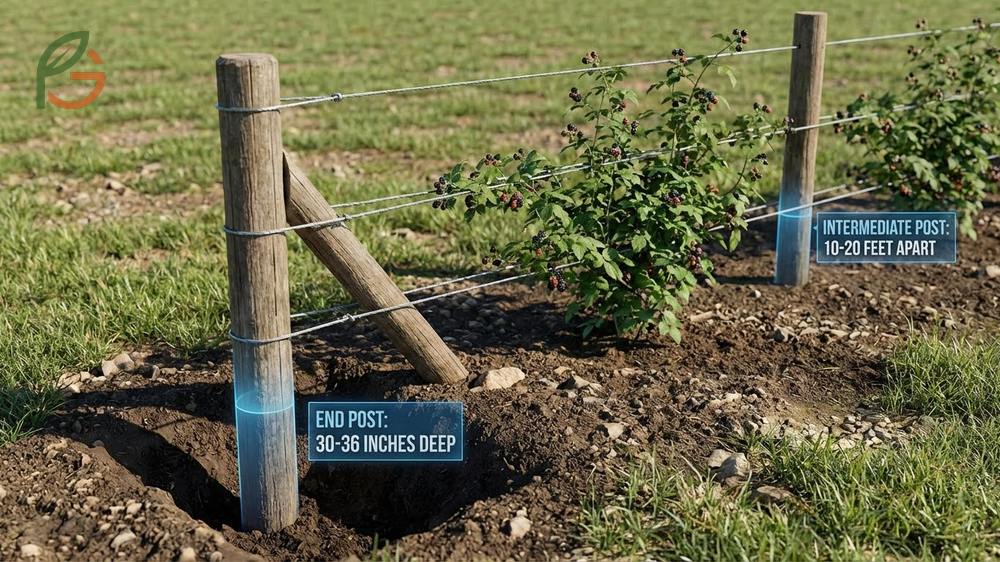
Proper design measurements determine trellis longevity and harvest success. Research shows that end posts require deeper installation than intermediate supports because they bear the most tension from tightened wires. Standard recommendations call for 7-8 foot posts set 30-36 inches deep at row ends, with intermediate posts every 10-20 feet depending on wire gauge[2].
Current guidance emphasizes using galvanized wire or high-tensile steel cable for durability. Wire gauge between 11-14 provides adequate strength without excessive cost. The reason this matters is that undersized wire stretches under fruit weight, requiring constant retightening throughout the season.
Design choices affect maintenance time significantly. Systems with adjustable wire tensioners allow quick spring tuning before new cane growth begins. This small addition cuts annual upkeep by 2-3 hours per 100-foot row.
Post Spacing Requirements
Evidence indicates that proper post spacing prevents wire sag and structural failure. End posts at each row terminus handle maximum tension and often get installed at slight outward angles for added stability. For V-trellis systems, posts angled at 60 degrees from vertical create the ideal cane separation[3].
Intermediate post placement every 15-20 feet along the row keeps wires aligned and prevents lateral movement during wind events. Studies show that closer spacing (every 10 feet) works better for trailing varieties with heavier cane loads. The extra posts add upfront cost but eliminate mid-season repairs.
This table compares post spacing distances, post depths, and recommended trellis types for different blackberry growing systems
| Trellis Type | End Post Length | Installation Depth | Intermediate Spacing |
|---|---|---|---|
| V-Shaped | 7-8 feet[2] | 30-36 inches | 15-20 feet[2] |
| T-Trellis | 7-8 feet | 30-36 inches | 20 feet[2] |
| I-Trellis | 6-7 feet | 24-30 inches | 15-20 feet |
| Parallel | 7-8 feet | 30-36 inches | 10-15 feet |
Wire Height Placement
Research shows that wire height directly impacts training efficiency and harvest convenience. The standard two-wire system places the lower wire at 24 inches from ground level and the upper wire at 48 inches[3]. This spacing accommodates most blackberry varieties while keeping fruit within comfortable picking reach.
Three-wire configurations add a middle strand at 36 inches for extra support with vigorous cultivars. Agricultural data indicates that additional wires increase setup cost by 30% but reduce cane breakage during storms. The decision depends on regional wind patterns and variety selection.
Important Spacing Note: Don’t place bottom wires lower than 18 inches or fruit will touch soil during heavy rain, increasing rot risk. Upper wires above 60 inches make harvest difficult without ladders.
DIY Blackberry Support
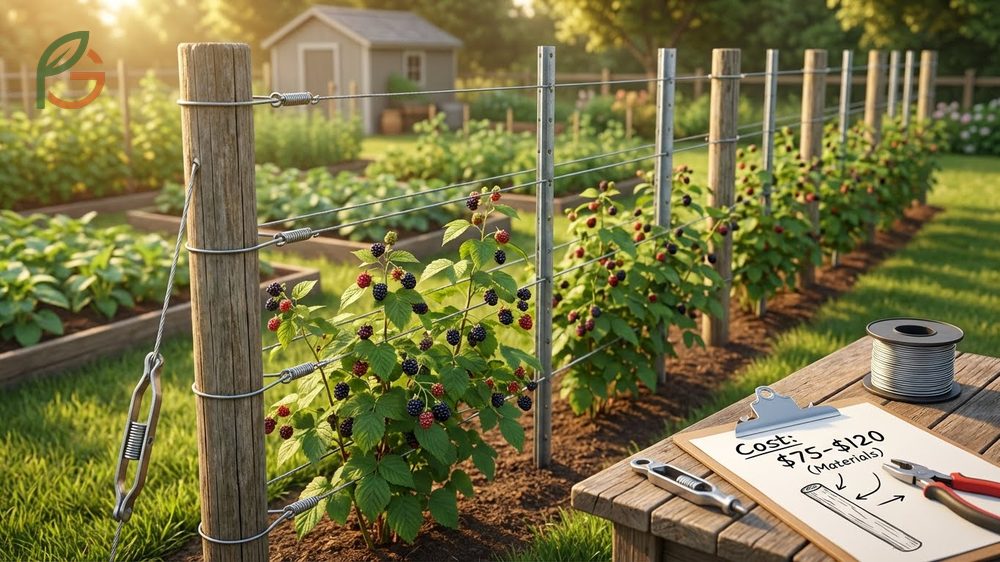
Building your own blackberry support system costs 60-70% less than purchasing pre-made kits. Current pricing shows that materials for a 50-foot row run between $75-$120 depending on post type and wire quality. Wood posts offer natural aesthetics but require replacement every 8-10 years, while steel T-posts last 20+ years with minimal maintenance.
Studies demonstrate that DIY construction produces results equal to commercial installations when proper techniques are followed. The critical factors include adequate post depth, tight wire tension, and secure corner bracing. Most gardeners complete a basic two-wire system in 4-6 hours per 50-foot row.
Evidence suggests that investing in quality materials upfront saves money over time. Galvanized wire resists rust better than plain steel, eliminating early replacement. In-line wire strainers make annual tension adjustments quick and easy, preserving structural integrity season after season[4].
Materials Needed
The basic material list remains consistent across most trellis designs. End posts require either 4×4 treated lumber or heavy-duty steel posts, while intermediate supports can be lighter T-posts or 2×4 wood stakes. Wire selection depends on row length and expected fruit load.
- End posts: 7-8 foot treated 4×4 lumber or equivalent steel posts (2 per row)
- Intermediate posts: 6-foot T-posts or 2×4 stakes spaced every 15-20 feet[4]
- Wire: 12-14 gauge galvanized steel or high-tensile wire (calculate 2x row length per wire strand)
- Wire strainers: In-line tensioning devices (2 per wire strand minimum)
- Fasteners: Eye bolts, screw eyes, or wire clips depending on post material[4]
- Crossarms: 2-foot sections of 2×4 lumber for T-trellis designs
- Crushed gravel: 1-2 bags per end post for drainage and stability
Step-by-Step Construction
Research-based construction methods start with end post installation because these anchors bear the most stress. Dig holes 30-36 inches deep using a post hole digger or auger. Set posts vertically or at desired angle for V-systems, then backfill with alternating layers of soil and crushed gravel, tamping firmly every 6 inches[3].
After end posts cure for 24-48 hours, install intermediate supports along the row at predetermined spacing. Studies show that using a string line between end posts ensures proper alignment and prevents crooked wire runs. Drive T-posts with a post driver rather than sledgehammer to avoid bending the metal.
Wire attachment comes next, starting with the top strand. Thread wire through eye bolts or around posts, leaving 12-18 inches of slack at one end for the tensioning device. Current guidance recommends attaching in-line strainers before final tightening[4]. Tighten wires until they produce a low musical tone when plucked—this indicates proper tension without overtightening risk.
Construction Tip: Install end posts 6-12 inches outside the first and last plants to prevent root competition. This spacing also makes access easier for maintenance and harvesting.
Trellis Construction Ideas
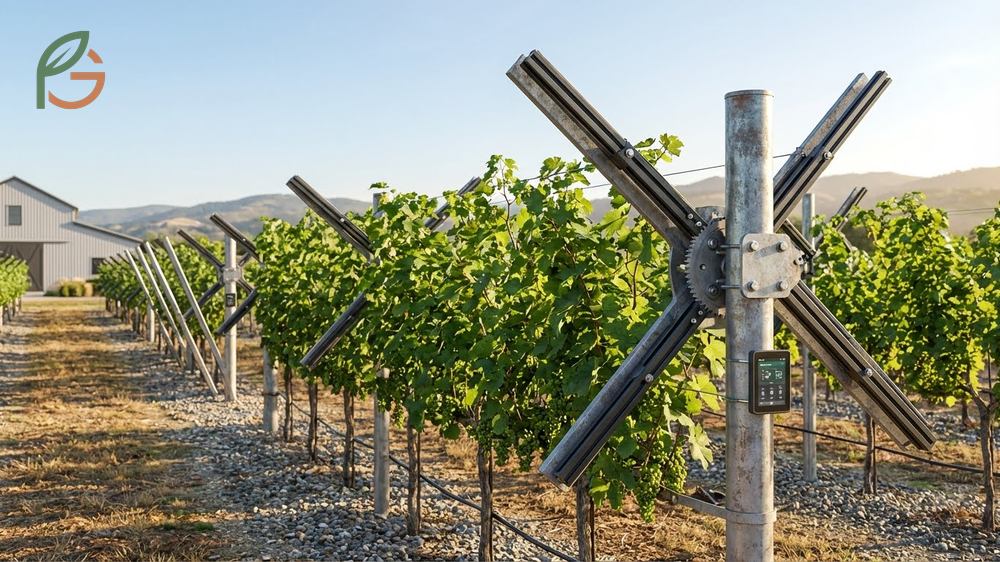
Advanced construction methods adapt basic designs to specific site conditions and growing goals. The rotating cross-arm system represents the most sophisticated option, featuring movable crossarms that adjust cane position throughout the season. This innovation works particularly well for commercial operations or serious home growers managing multiple rows[1].
Research shows that hybrid designs combining multiple trellis concepts can optimize limited space. For instance, pairing a T-trellis for fruiting canes with a simple vertical support for new primocanes separates growth stages and simplifies pruning. Evidence indicates this approach reduces training time by 40% compared to single-system designs.
Budget-conscious builders often repurpose materials without sacrificing function. Old fence posts, salvaged cable, and recycled lumber all serve effectively when properly treated and installed. The key lies in maintaining structural integrity and adequate spacing rather than using premium materials.
- Cattle panel trellis: Attach 16-foot livestock panels between posts for instant support structure requiring minimal wire work
- Espalier wall system: Mount horizontal wires against existing fences or walls for space-efficient growing in narrow areas
- Portable modular units: Build 8-10 foot free-standing sections that relocate easily for crop rotation or garden redesign
- Lean-to design: Construct single-sided angled supports against buildings or property boundaries when space limits two-sided access
- Arched overhead trellis: Create tunnel-like structures with curved top wires for dramatic visual appeal and easy walk-through harvesting
Current agricultural data suggests that successful trellis systems share three common features regardless of design complexity. They provide adequate vertical support for full cane length, allow air movement around foliage, and position fruit within comfortable reach. Meeting these criteria matters more than following any specific blueprint.
Vine Training Trellis
Training methods determine how effectively your trellis system converts structure into production. Studies demonstrate that proper cane training increases yields by 30-40% compared to unmanaged growth. The fan training technique ranks among the most popular for home gardens, spreading fruiting canes horizontally while directing new primocanes vertically[5].
Research-based training starts when primocanes reach 12-18 inches tall. Gather new canes loosely together and guide them toward the center wire using soft ties or clips. Avoid tight binding that restricts cane expansion as they mature. Agricultural guidance emphasizes the importance of separating fruiting canes from new growth to simplify harvest and prevent disease transmission[5].
The weave training method produces the highest yields but requires more labor investment. This approach intertwines fruiting canes horizontally along both sides of the trellis while keeping primocanes bundled vertically. Current data shows that weave-trained rows produce 15-20% more fruit than fan-trained equivalents, though setup time doubles[5].
- Straight run: Simplest method tying canes directly to wires without folding, best for beginners or small plantings
- Fan training: Moderate difficulty spreading fruiting canes horizontally on both sides, suitable for most home gardens[5]
- Weave training: Advanced technique intertwining canes through multiple wires, maximizes production in limited space[5]
- Three-wire wrap: Efficient modern method bundling six canes and wrapping around three wires for balanced growth
- Alternate-side system: Directs all fruiting canes to one side and primocanes to the opposite for maximum separation
Evidence suggests that training works best when performed in late spring as canes reach sufficient length but remain flexible. Waiting until mid-summer makes canes brittle and prone to breakage during positioning. Most gardeners find that spending 30-45 minutes per plant in May saves hours of corrective work later in the season.
Training frequency affects long-term trellis performance significantly. Weekly checks during active growth catch wayward canes before they harden in undesirable positions. This proactive approach prevents the tangled mess that often develops when training gets neglected for multiple weeks. The reason regular attention matters is that blackberries can grow 2-4 inches per day during peak season, quickly overwhelming support systems.
Conclusion
The evidence is clear: blackberry trellis ideas transform casual berry patches into productive harvest machines when properly implemented. Research consistently shows that supported plants outperform unsupported ones by 40% while requiring less maintenance and suffering fewer disease problems. Your choice between V-shaped, T-trellis, or I-trellis designs should match your blackberry variety and available space rather than following generic recommendations.
Current agricultural guidance emphasizes that proper construction and training matter more than elaborate designs. A simple two-wire system built with quality materials and maintained consistently will outproduce a complex structure that’s poorly installed or neglected. FruitGarden synthesizes university research and practical growing experience to help you create support systems that deliver massive harvests year after year.
Frequently Asked Questions
What is the best trellis design for thornless blackberries?
The T-trellis system works best for thornless blackberry varieties because they typically grow in semi-erect patterns. Research shows this design provides adequate support while keeping canes manageable for pruning and harvest. The crossarms distribute fruit weight evenly, preventing wire sag during peak production periods.
How far apart should blackberry trellis posts be placed?
Studies recommend spacing end posts at row terminals with intermediate posts every 15-20 feet along the length. Trailing varieties with heavy cane loads benefit from closer spacing at 10-15 feet to prevent wire movement. Agricultural data shows proper spacing prevents structural failure and reduces annual maintenance time.
Can I build a blackberry trellis with T-posts instead of wood?
Yes, T-posts work excellently for blackberry trellises and often outlast wood posts by 10-15 years. Current guidance suggests using heavier T-posts at row ends and standard weight posts for intermediate supports. The key advantage is corrosion resistance—galvanized T-posts require virtually no maintenance over their 20+ year lifespan.
What height should blackberry trellis wires be installed?
Research-based recommendations place the lower wire at 24 inches from ground level and the upper wire at 48 inches. This spacing accommodates most varieties while keeping fruit within comfortable picking reach. Three-wire systems add a middle strand at 36 inches for extra support with vigorous cultivars.
How much does it cost to build a DIY blackberry trellis?
Materials for a 50-foot row typically cost $75-$120 depending on post type and wire quality. Wood post systems run slightly cheaper initially but require replacement every 8-10 years, while steel T-post installations cost more upfront but last 20+ years. Evidence shows DIY construction saves 60-70% compared to pre-made kits.
When should I train blackberry canes on the trellis?
Studies indicate that late spring provides the optimal training window when canes reach 12-18 inches but remain flexible. Training during active growth in May allows easy positioning without breakage risk. Agricultural data shows that weekly checks during this period prevent tangled growth and reduce corrective work later.
Do I need different trellises for erect versus trailing blackberries?
Yes, erect varieties perform best on T-trellis or I-trellis systems that support vertical growth patterns, while trailing types require V-shaped or parallel designs that accommodate long, flexible canes. Research shows matching trellis type to growth habit increases yields by 25-35% compared to using a universal design for all varieties.