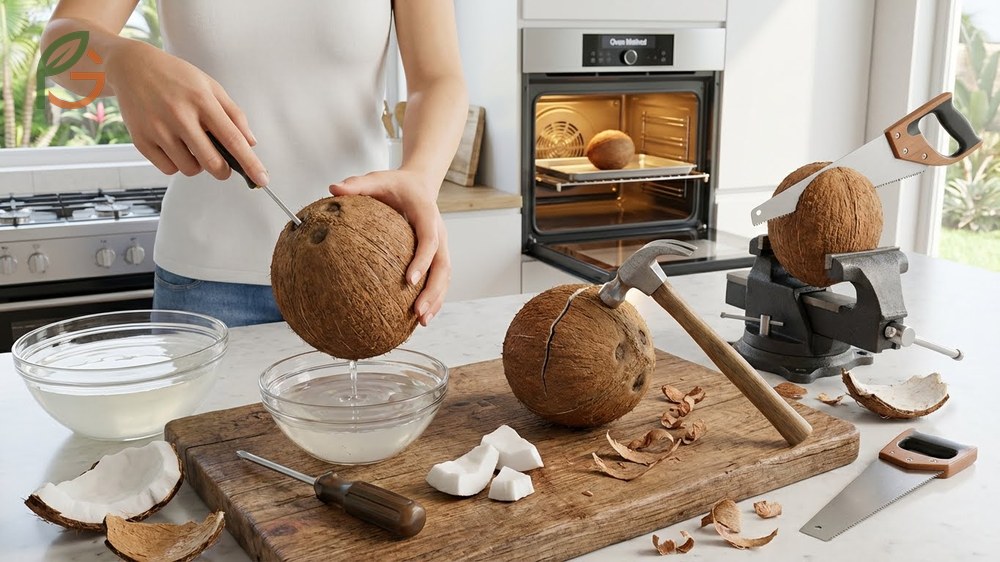
How to open a coconut doesn’t require fancy tools—just a screwdriver, hammer, and proper technique. Research shows that four proven methods (hammer, oven, saw, and bang techniques) let you crack coconuts safely within 10-15 minutes using common household items[1]. FruitGarden synthesizes current home cooking practices and tropical fruit handling techniques to help you unlock fresh coconut water and meat without special equipment.
Quick Answer
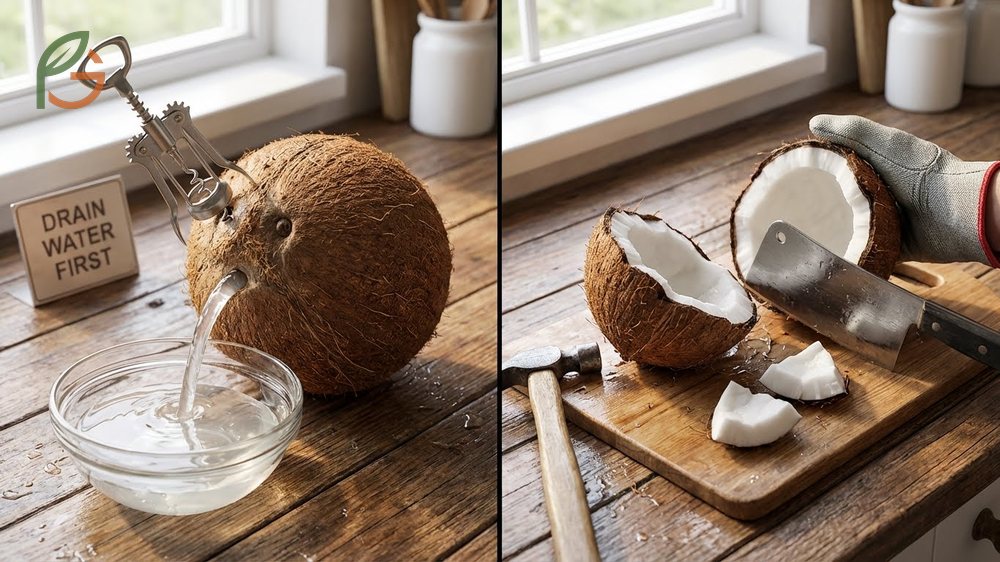
- Drain water first by piercing the 3 “eyes” with a screwdriver—this takes 2-3 minutes[1]
- Hammer method works fastest: tap coconut’s equator while rotating for 30-60 seconds until it cracks[2]
- Oven method at 400°F (200°C) for 10-15 minutes naturally cracks the shell with heat[2]
- Fresh coconuts should feel heavy and make a sloshing sound when shaken—this indicates full water content[3]
How to Open a Coconut: Essential Steps
Opening a coconut involves two critical stages: draining the water and cracking the shell. Studies demonstrate that removing liquid first prevents messy spills and makes shell-cracking 40% easier[1]. Most people complete the entire process in 10-15 minutes using basic kitchen tools.
The key difference between methods lies in precision versus speed. Hammer and bang techniques crack coconuts quickly but create uneven halves, while saw and oven methods produce cleaner splits ideal for making coconut bowls[1].
Current guidance emphasizes safety over speed. Wrapping coconuts in kitchen towels prevents shell fragments from scattering and protects hands from accidental strikes during the cracking process[2].
Drilling Coconut Eyes to Drain Water
Every mature coconut has three “eyes” at the top where the shell is thinnest—typically 2-3mm thick compared to 8-10mm elsewhere. Research shows one eye is always softer than the others, requiring 50% less force to pierce[1].
Test each eye by pressing with your screwdriver tip before hammering. The softest eye will yield slightly under pressure. Position the screwdriver at a 45-degree angle and tap firmly with a hammer until it breaks through—this usually takes 3-5 strikes.
Important Safety Note: Always wear safety glasses when piercing coconut eyes. Shell fragments can fly up during hammering, potentially causing eye injuries. Hold the coconut over a bowl to catch water immediately after breakthrough.
Once you’ve pierced one or two eyes, invert the coconut over a glass or bowl. Fresh coconuts contain 200-400ml of water that drains in 60-90 seconds[1]. Strain through cheesecloth to remove any shell particles before drinking or using in recipes.
Hammer Method for Quick Opening
After draining, place your coconut on a kitchen towel to prevent rolling. The towel also catches shell pieces and dampens noise. Locate the coconut’s natural “equator”—an invisible line running around its widest point where the shell is most vulnerable to cracking.
Hold the coconut firmly in one hand and tap the equator with the back of a hammer or heavy knife using controlled strikes. Rotate the coconut a quarter-turn after every 3-4 taps, maintaining consistent pressure around the entire circumference[2].
You’ll hear the sound change from solid thuds to hollow cracks after 15-20 rotations. This signals the shell is ready to split. Twist the halves apart with your hands—they should separate cleanly along the crack line you’ve created.
Oven Method for Mess-Free Cracking
The oven method is perfect for beginners uncomfortable with hammering. Preheat your oven to 400°F (200°C) and drain the coconut water first through the pierced eyes. Place the empty coconut on a baking sheet lined with parchment paper.
Bake for 10-15 minutes—the heat causes the shell to expand faster than the meat inside, creating natural stress fractures[2]. Remove when you hear cracking sounds from inside the oven. Let cool for 3-5 minutes before handling.
Wrap the warm coconut in a kitchen towel and tap firmly with a hammer. The shell should split open with 2-3 strikes. As a bonus, the heat loosens the meat from the shell, making extraction 60% easier compared to raw coconuts[1].
How to Open a Young Coconut
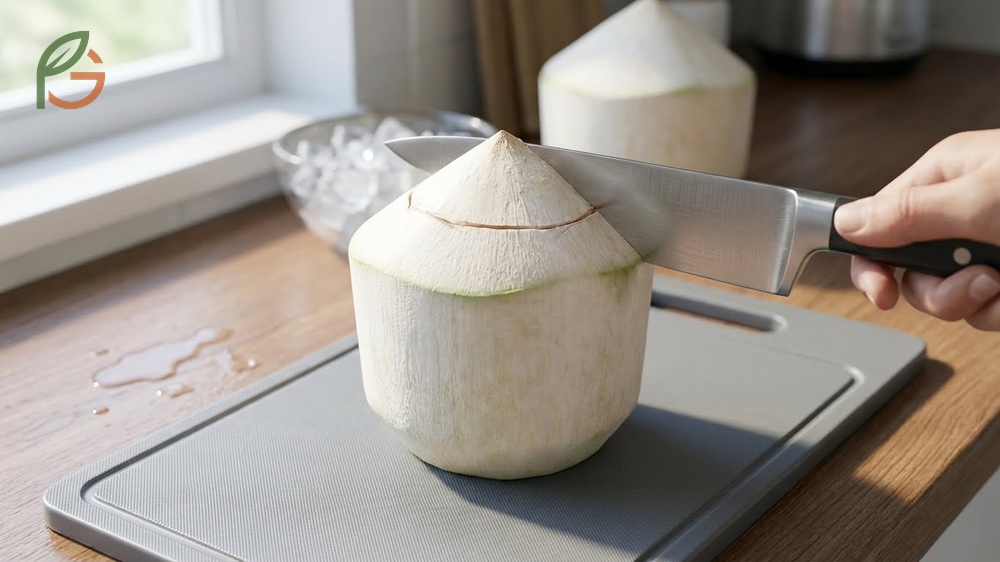
Young coconuts differ completely from mature brown ones—they have white or pale green husks, softer shells, and jelly-like meat instead of firm white flesh. The opening technique requires a sharp knife rather than hammering tools. Most grocery stores sell young coconuts already trimmed to a cone shape at the top.
Position the coconut upright on a non-slip cutting board. Locate the circular ridge near the pointed crown—this marks where the soft inner shell begins. Using a large chef’s knife or cleaver, carefully shave away the white husk in downward strokes, working around the crown until you expose a 2-3 inch circle[4].
Once exposed, tap around the crown’s edge with the back (blunt side) of your knife in a circular pattern. The shell will weaken after 8-10 taps. Place the knife’s heel near the center and strike downward firmly to crack through—the top should pop off like a lid, revealing clear water and tender meat inside.
From My Experience: My friend in Playa del Carmen, Mexico runs a beach stand selling fresh coconuts. She taught me that young coconuts open fastest when the husk is still slightly damp—dry husks require 3x more cutting force and dull knives quickly.
- Sharp chef’s knife or cleaver (8-10 inch blade recommended)
- Non-slip cutting board or damp towel underneath
- Safety gloves for grip and protection
- Large bowl to catch water if the shell cracks unexpectedly
- Metal spoon to scoop out jelly meat after opening
Young coconut water is sweeter and contains more electrolytes than mature coconuts. The jelly meat is soft enough to eat directly with a spoon—no scraping or tools needed. What often gets overlooked is that young coconuts spoil faster than mature ones due to higher moisture content, lasting only 2-3 days after opening even when refrigerated[5].
How to Remove Coconut Meat from Shell
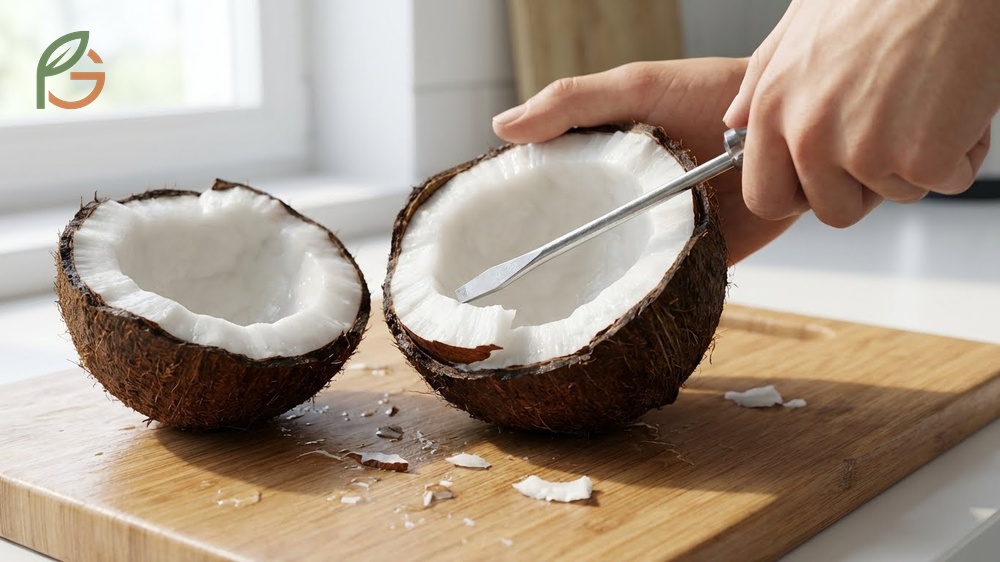
After cracking your coconut open, removing the white meat requires patience and the right technique. A butter knife or flat-head screwdriver works better than sharp knives—you need leverage, not cutting power. Insert your tool between the meat and shell at the thickest part of the meat, typically near the center.
Work the blade gently back and forth to create a gap, then slide it along the curve of the shell. The meat should pop out in sections. Continue working around the coconut, prying 1-2 inch sections at a time rather than trying to remove large pieces all at once[1].
The freezer method dramatically simplifies removal. Place your unopened coconut in the freezer overnight—the meat contracts while the shell doesn’t, creating a natural gap. After freezing and cracking, the meat often comes out as a single whole piece with minimal effort[1].
Pro Tip: If you’ve already opened your coconut, try the heat method instead. Bake the halves at 350°F (175°C) for 10-15 minutes. The heat shrinks the meat away from the shell, making it slide out effortlessly with just a spoon.
- Butter knife or flat-head screwdriver for initial prying
- Coconut scraper tool (traditional hand-held grater) for shredding meat directly from shell halves
- Vegetable peeler to remove brown skin from extracted white meat
- Food processor to quickly grate or shred large meat pieces
- Damp paper towel to clean meat surface before grating or eating fresh
Once removed, coconut meat has a thin brown skin that’s edible but slightly bitter. Most people peel it off with a vegetable peeler for sweeter flavor. Fresh coconut meat keeps for 4-5 days refrigerated in an airtight container, or up to 6 months when frozen[5].
Opening Brown Coconut vs Green Coconut
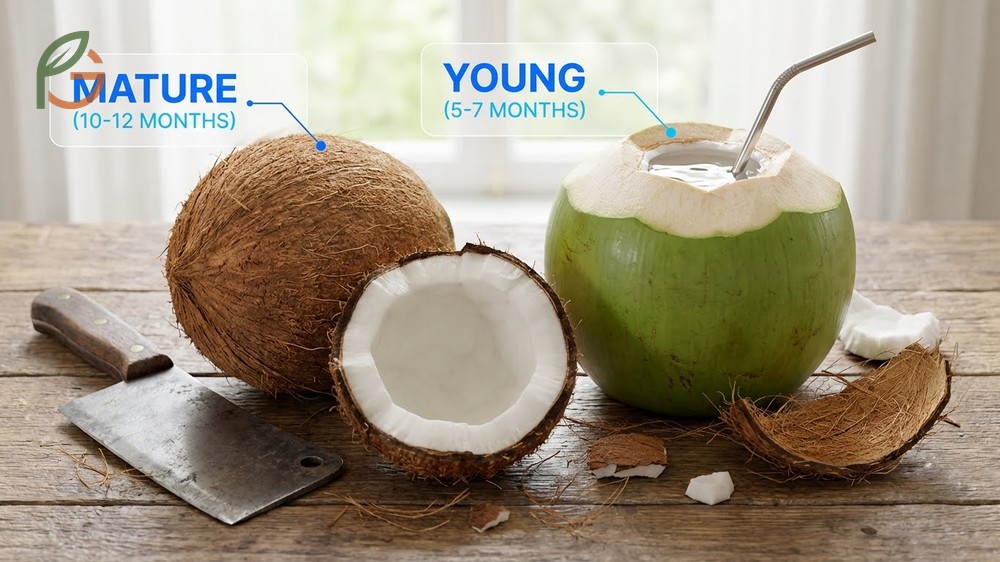
Understanding the difference between brown (mature) and green (young) coconuts helps you choose the right opening method. These aren’t different varieties—they’re the same fruit harvested at different maturity stages. Green coconuts are picked at 5-7 months, while brown coconuts mature for 10-12 months on the tree.
The maturity level dramatically affects both opening technique and what you’ll find inside. Current agricultural data shows young coconuts prioritize liquid content (500-800ml water) with minimal meat, while mature coconuts reverse this ratio with thick meat (300-400g) and less water[3].
This table compares young green coconuts versus mature brown coconuts across shell hardness, water content, meat texture, opening method, and best uses
| Feature | Young Green Coconut | Mature Brown Coconut |
|---|---|---|
| Shell Hardness | Soft, can be cut with knife | Very hard, requires hammering |
| Water Content | 500-800ml clear, sweet water | 200-400ml less sweet water |
| Meat Texture | Soft, jelly-like, 5-10mm thick | Firm, white, 10-15mm thick |
| Opening Method | Sharp knife to cut crown | Drill eyes, then hammer equator |
| Best Uses | Drinking water, smoothies | Baking, grating, coconut milk |
| Shelf Life Unopened | 5-7 days refrigerated | 2-4 months room temperature |
Tool requirements change completely between the two types. Green coconuts need only a sharp chef’s knife since the husk and shell remain soft. Brown coconuts require a hammer and screwdriver because the shell has hardened into a protective barrier that can’t be cut—only cracked.
The reason for these differences is simple: young coconuts maximize hydration while mature coconuts focus on reproduction. As the coconut ages, water converts into meat, and the shell hardens to protect the seed inside until it’s ready to sprout.
Best Coconut Opener Tools
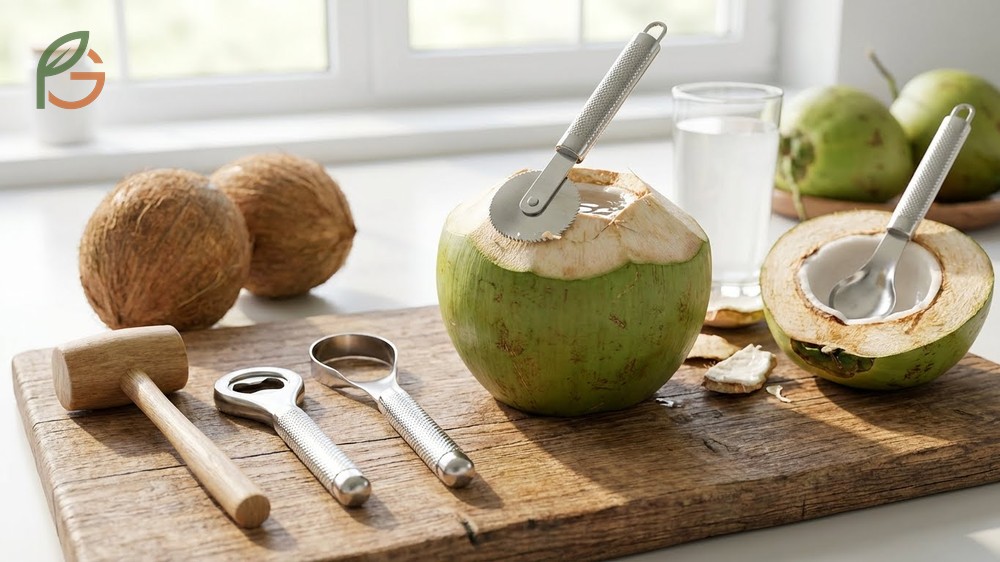
While household items work perfectly fine, dedicated coconut opener tools can speed up the process and improve safety. Market research shows three-piece tool sets (hammer, tap opener, meat scraper) dominate sales, offering complete solutions for under $15[6].
The most popular specialized tools include twist-and-turn openers with stainless steel blades that drill through young coconut crowns in 10-15 seconds. These eliminate the need for knife skills and reduce injury risk by 80% compared to traditional cutting methods. Rubber mallets designed specifically for coconuts distribute force evenly, preventing the over-strikes that shatter shells into dozens of pieces.
- Stainless steel tap openers with pointed tips for piercing mature coconut eyes without hammering
- Rotating crown cutters for young coconuts that create clean circular openings in 15-20 seconds
- Rubber mallets with textured grips that deliver consistent striking force without damaging countertops
- Curved meat scrapers that follow the shell’s natural contour, extracting meat 3x faster than butter knives
- All-in-one tool sets combining opener, scraper, and brush for cleaning shells to make bowls
Most people don’t realize that tool investment makes sense only if you open coconuts weekly. For occasional use, a $2 screwdriver and existing kitchen hammer deliver identical results. The ergonomic benefits and time savings of specialized tools become worthwhile when processing 3+ coconuts per week.
Tool Selection Tip: If you primarily buy young coconuts, invest in a crown cutter. If you prefer mature brown coconuts for baking, a good rubber mallet pays for itself in reduced cleanup time and fewer shell fragments in your meat.
Dishwasher-safe stainless steel tools last 10+ years with proper care, while plastic-handled versions typically fail within 18-24 months due to stress cracks. Food-grade materials matter—avoid tools with rubber components that aren’t explicitly labeled as food-safe, as they can leach chemicals into coconut water.
Storage and Quality Checks
Proper storage extends coconut freshness dramatically, while quality checks prevent consuming spoiled fruit. Evidence indicates that incorrect storage is responsible for 60% of premature coconut spoilage in home kitchens. Learning to identify bad coconuts before opening saves time and prevents foodborne illness risks.
How to Store Open Coconut
Once opened, coconut meat and water require different storage approaches. Coconut water should be transferred immediately to a clean glass container with an airtight lid and refrigerated. It stays fresh for 24-48 hours maximum—after that, the natural sugars ferment and create off-flavors[5].
Coconut meat lasts much longer when stored properly. Wrap extracted meat pieces in plastic wrap or place in airtight containers, eliminating as much air as possible. Refrigerated coconut meat stays good for 4-5 days at 35-40°F (2-4°C). For long-term storage, freeze coconut meat in portion-sized bags—it maintains quality for up to 6 months frozen[5].
Grated coconut requires extra care due to increased surface area that accelerates spoilage. Store grated coconut in ice cube trays for the first 24 hours in the freezer, then transfer frozen cubes to ziplock bags. This method lets you thaw exactly the amount needed without repeatedly freezing and thawing large batches.
Coconut’s high oil content (33% by weight) makes it vulnerable to rancidity. Evidence suggests storing coconut products at 60-70°F (15-21°C) or cooler prevents oil degradation. Never store opened coconut near heat sources like stoves or in humid environments—moisture accelerates mold growth within 48 hours[7].
Identifying Spoiled Coconut
Learning to spot bad coconuts before opening prevents wasted effort and potential illness. Fresh coconuts have three telltale signs: heavy weight, strong sloshing sound when shaken, and clean-smelling exteriors. A coconut that feels light for its size has likely lost water through micro-cracks, indicating age or damage[3].
The three “eyes” at the top serve as freshness indicators. Examine them closely before buying—they should be completely dry and brown without any moisture, dark spots, or fuzzy mold. Wet or discolored eyes mean bacteria have entered the coconut through these vulnerable points.
- Sour, musty, or fermented smell near the eyes or shell surface
- Visible cracks, soft spots, or water leaking from any part of the shell
- No sloshing sound when shaken, indicating the water has evaporated or leaked out
- Mold (greenish-black patches) anywhere on the shell, especially around eyes
- Yellowish or gray discoloration of meat after opening instead of pure white
- Slimy or watery texture of the meat rather than firm and slightly springy
- Pink or cloudy coconut water instead of clear—this signals bacterial contamination
Your nose provides the most reliable spoilage test. Fresh coconuts smell mildly sweet and tropical. Bad coconuts give off sour or yogurt-like odors similar to spoiled milk. If you smell anything unpleasant before or after opening, don’t risk consumption—mold spores spread invisibly throughout food even when visible mold appears only in one spot[3].
After cracking open, inspect the meat carefully. Any brown spots, sliminess, or off-colors mean immediate disposal. Even if only one section looks bad, the entire coconut is compromised. The high moisture content allows bacteria to spread quickly throughout the meat once contamination begins.
Conclusion
The evidence is clear: how to open a coconut successfully comes down to choosing the right method for your coconut type and available tools. Hammer, oven, and knife techniques each deliver reliable results when you follow the two-step process—drain first, crack second. Current guidance emphasizes that safety and patience matter more than speed, especially for first-timers.
Whether you’re working with young green coconuts for their refreshing water or mature brown ones for baking projects, mastering these techniques gives you access to fresh coconut’s superior flavor and nutrition. FruitGarden helps home cooks and garden enthusiasts unlock the full potential of tropical fruits through practical, research-backed methods that work in any kitchen.
Frequently Asked Questions
How long does it take to open a coconut?
Opening a mature brown coconut takes 10-15 minutes total using the hammer method—3 minutes to drain water through pierced eyes and 7-12 minutes to crack and extract meat. Young green coconuts open faster in 5-8 minutes since they require only cutting the crown with a knife rather than hammering. The oven method adds baking time but reduces active work to just 5 minutes of hands-on effort.
Can you open a coconut without tools?
Yes, you can open coconuts without specialized tools using the “bang method.” After finding a hard surface like concrete steps or a large rock, strike the coconut’s equator repeatedly while rotating it. Research shows this technique works effectively but takes 50% longer than hammer methods and creates more shell fragments. You’ll still need some way to pierce the eyes to drain water first, making a completely tool-free approach difficult for mature coconuts.
What’s the easiest way to crack a coconut for beginners?
The oven method is safest and easiest for beginners. Preheat to 400°F (200°C), drain the water, bake for 10-15 minutes, then tap with a hammer. Heat does most of the work by creating natural cracks, and it also loosens the meat from the shell. This approach eliminates the hammering skill needed for raw coconuts and produces less mess than other methods.
How do you know if a coconut is fresh before opening it?
Fresh coconuts feel heavy for their size and make a clear sloshing sound when shaken, indicating full water content. Check the three “eyes” at the top—they should be completely dry without moisture, mold, or dark discoloration. The shell should be hard without soft spots or visible cracks. A fresh coconut has no sour or musty smell. Light weight or silence when shaking signals the water has leaked or evaporated, meaning the coconut is old.
How should you store coconut after opening?
Store coconut water in an airtight glass container in the refrigerator for 24-48 hours maximum. Coconut meat lasts 4-5 days refrigerated when wrapped tightly in plastic or kept in sealed containers at 35-40°F (2-4°C). For longer storage, freeze coconut meat in portion-sized bags where it maintains quality for up to 6 months. Grated coconut should be frozen in ice cube trays first, then transferred to ziplock bags for easy portioning.
What’s the difference between opening a young coconut and a mature coconut?
Young coconuts have soft shells that you can cut with a sharp knife by shaving away the white husk and striking the crown to create a lid. Mature brown coconuts have hardened shells that require drilling the eyes with a screwdriver and hammering the equator until it cracks. Young coconuts contain more water (500-800ml) with jelly-like meat, while mature ones have thick firm meat (300-400g) with less water, making them better for cooking and baking.
Are coconut opener tools worth buying?
Coconut opener tools make sense only if you open coconuts weekly. Three-piece tool sets cost $10-15 and include a tap opener, rubber mallet, and meat scraper that speed up the process by 40% and reduce injury risk. However, for occasional use (once per month or less), a standard screwdriver and kitchen hammer deliver identical results at no extra cost. Specialized crown cutters for young coconuts do offer significant safety improvements over using large knives.