Can you freeze cherries? Yes, you can! Fresh cherries freeze beautifully and maintain their quality for 10-12 months when stored properly.[1] Whether you’re dealing with a bumper harvest or taking advantage of peak season prices, freezing cherries lets you enjoy this nutritious fruit year-round. FruitGarden brings you proven methods from commercial growers and home preservation experts to help you freeze cherries like a pro.
Quick Answer
- Frozen cherries last 10-12 months in standard freezers, up to 1 year in deep freezers[2]
- You can freeze cherries with or without pits—pitting first saves time later
- Flash freezing on baking sheets prevents clumping and maintains quality
- Use frozen cherries directly in smoothies and baking without thawing
Can You Freeze Cherries

Cherries freeze exceptionally well and retain most of their nutritional value throughout the freezing process.[2] Both sweet and sour cherry varieties respond well to freezing, making this preservation method ideal for home gardeners and bulk buyers. The key is using proper technique to avoid the most common pitfall: cherries freezing into one solid clump.
Research shows that flash freezing at lower temperatures preserves more nutrients than slow freezing methods. When water freezes slowly, large ice crystals form and rupture cell walls, leading to mushy texture and vitamin loss. Fast freezing creates smaller crystals that protect the fruit’s structure and nutritional content.
Fresh cherries contain delicate compounds that break down at room temperature. Freezing halts this degradation process within hours of harvest. If you’re like most Americans, you’ll appreciate having frozen cherries ready for smoothies, pies, and cobblers without the hassle of washing and pitting during busy mornings.
The best candidates for freezing are firm, ripe cherries without bruises or soft spots. Overripe cherries can still be frozen, but they’ll turn mushy when thawed. For optimal results, freeze cherries within 24 hours of picking or purchasing.
How to Freeze Cherries
The flash freezing method produces superior results compared to simply bagging cherries and tossing them in the freezer. This technique takes about 6 hours total but prevents your cherries from freezing into a solid block.[3] It’s the same method commercial processors use, scaled down for home kitchens.
You’ll need rimmed baking sheets, parchment or wax paper, and freezer-safe bags or containers. The process works equally well for sweet Bing cherries, tart Montmorency cherries, or delicate Rainier varieties. Don’t skip the lining paper—cherries will stick directly to metal pans.
Preparation Steps
Start by giving your cherries a cold water rinse to remove dirt and pesticide residue. Some growers recommend a 30-minute water bath to remove any hidden insects, though this isn’t necessary for store-bought fruit.[2] Pat them completely dry with paper towels since excess moisture creates extra ice crystals.
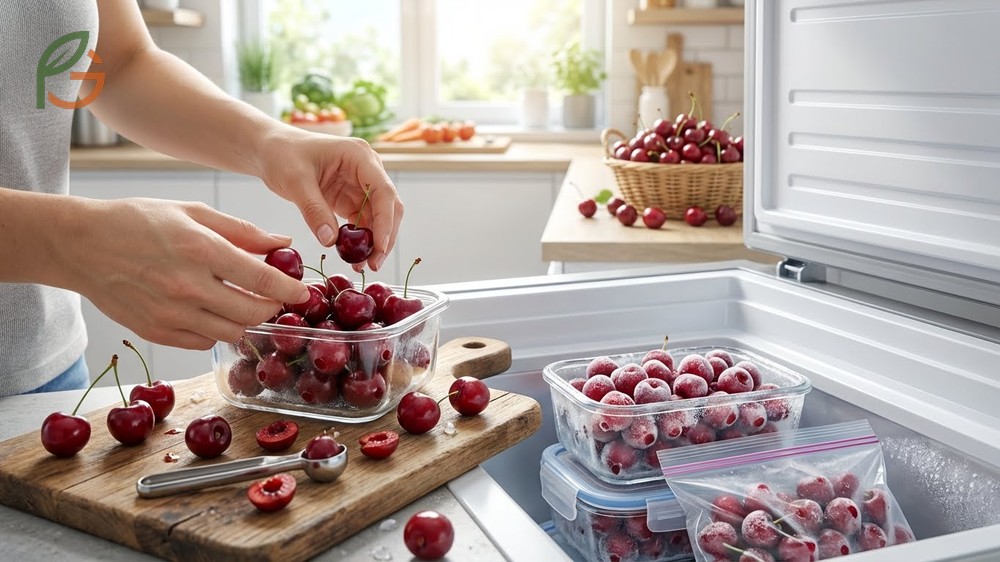
Remove the stems by twisting gently—don’t pull straight or you’ll tear the flesh. Decide whether you want to pit now or later. Most experienced preservers pit before freezing because it’s easier to work with room-temperature fruit than frozen cherries.
- Rinse cherries under cold running water
- Dry thoroughly with clean kitchen towels or paper towels
- Remove all stems by twisting at the base
- Pit cherries if desired (see methods below)
- Inspect for damaged fruit and discard any with mold or severe bruising
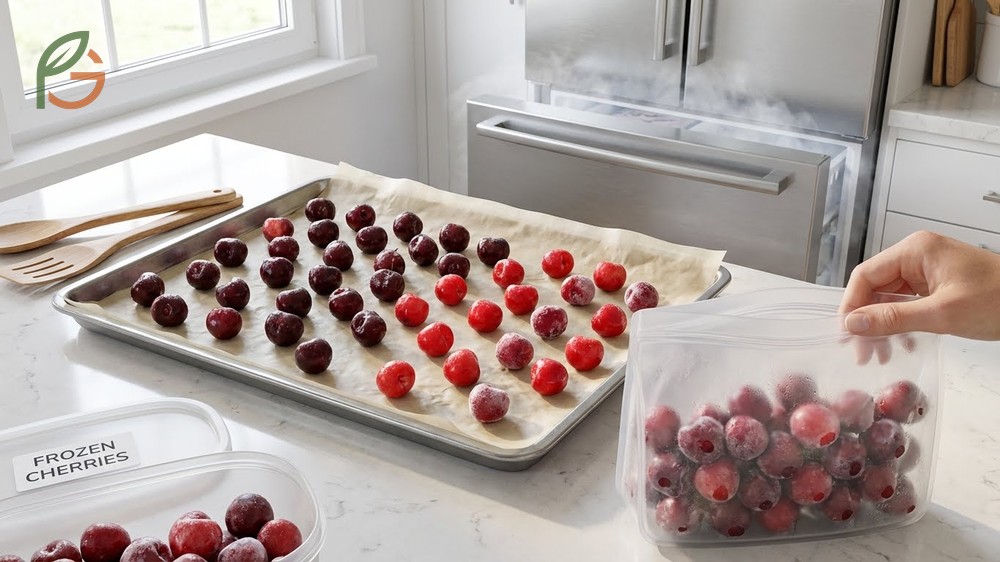
Flash Freezing Method
Spread your prepared cherries on parchment-lined baking sheets in a single layer. Leave space between each cherry so they don’t touch—this prevents them from freezing together. Slide the sheets into your freezer, making sure they’re level so cherries don’t roll together.
Check after 2 hours for small batches or 6 hours for heavily loaded sheets.[3] Cherries are ready when they’re solid throughout—test by squeezing one gently. Once frozen, you can work quickly to transfer them into storage containers.
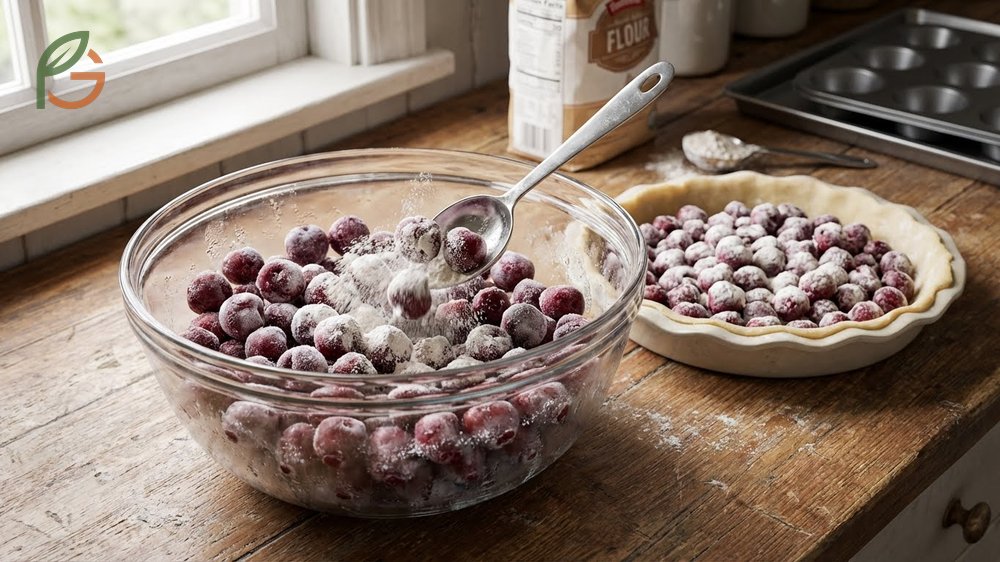
Label your freezer bags with the date and variety. This simple step saves confusion later when you’re staring at identical bags of frozen fruit. Remove as much air as possible before sealing to minimize freezer burn risk.
How to Pit Cherries Without Pitter

You don’t need expensive gadgets to pit cherries efficiently. The chopstick and bottle method works surprisingly well and processes cherries faster than most handheld pitters.[4] Grab any empty glass bottle with a narrow neck—wine bottles, beer bottles, or small soda bottles all work.
Position the cherry stem-side-up on the bottle opening. Hold it steady with one hand while you push a chopstick (flat end works best) straight down through the stem hole. Apply firm pressure until the pit pops out the bottom and drops into the bottle. The bottle catches all the pits and most of the juice, keeping your workspace cleaner.
My cousin in Guadalajara, Mexico tried this method last summer with 10 pounds of cherries from a local orchard. She pitted them all in under 45 minutes—much faster than the hour-plus she’d spent using a knife the previous year.
- Chopstick and bottle method: fastest for large quantities
- Paperclip method: unbend a large paperclip and push through the stem end to hook and remove the pit
- Pastry tip method: use the wide end of a metal piping tip to push pits through
- Straw method: thick reusable metal straws work like mini pitters when pushed through
- Knife method: slice around the pit’s equator and twist apart (creates halves instead of whole cherries)
Safety Note: Cherry pits contain small amounts of cyanogenic compounds. While accidentally swallowing one whole pit won’t harm you, never blend pits into smoothies or grind them. Always remove pits before blending frozen cherries.
Freezing Pitted vs Unpitted Cherries
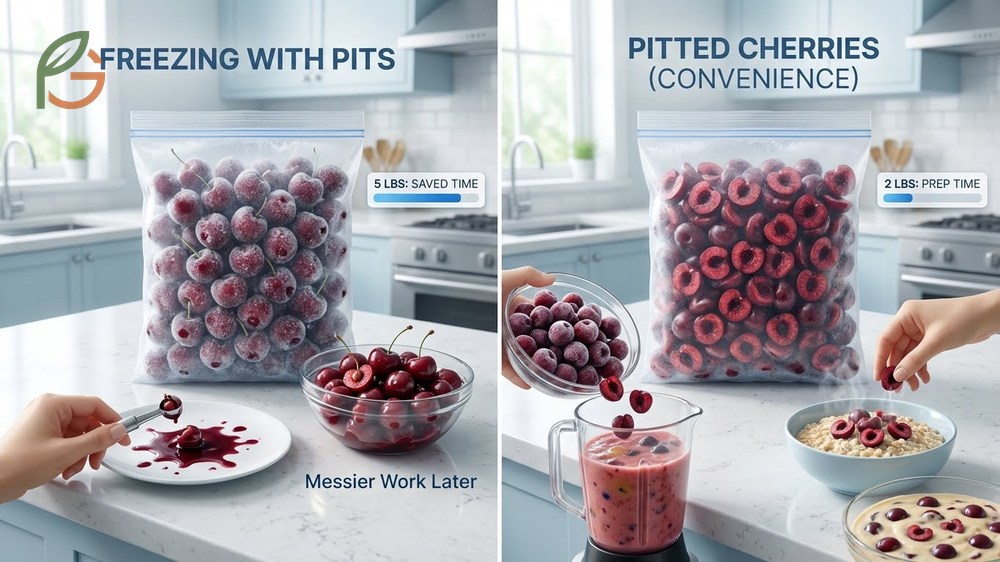
Both approaches work, but each has distinct advantages depending on your intended use. Freezing with pits saves significant time upfront—you can freeze 5 pounds of whole cherries in the time it takes to pit and freeze 2 pounds. However, you’ll face messier work later when the frozen fruit needs pitting.
Pitted cherries offer more convenience for immediate use. You can toss them straight from the freezer into smoothies, pancake batter, or oatmeal without thawing. They’re also safer if you have kids who might grab frozen cherries as snacks. The downside is the extra 30-45 minutes of prep work before freezing.
Here’s what changes when you freeze cherries whole: the freezing process bursts cell walls slightly, making it easier to squish pits out with your fingers after thawing.[5] Some bakers actually prefer this method for making pies and preserves since partially broken-down cherries release more juice during cooking.
This table compares freezing time, convenience, best uses, and shelf life between pitted and unpitted frozen cherries
| Factor | Pitted Before Freezing | Frozen With Pits |
|---|---|---|
| Prep Time | 30-45 minutes for 5 lbs | 10-15 minutes for 5 lbs |
| Convenience | Use directly from freezer | Must thaw and pit before use |
| Best For | Smoothies, baking, snacking | Jams, pies, cooked applications |
| Safety | No pit hazard | Easy to forget pits are present |
| Storage Space | Slightly more compact | Pits take up ~15% more volume |
For most home users, pitting before freezing makes more sense. The hour you invest now saves frustration later when you’re trying to pit rock-hard frozen cherries. If you’re processing a massive harvest and time is limited, freeze them whole and pit later in smaller batches as needed.
How Long Do Frozen Cherries Last
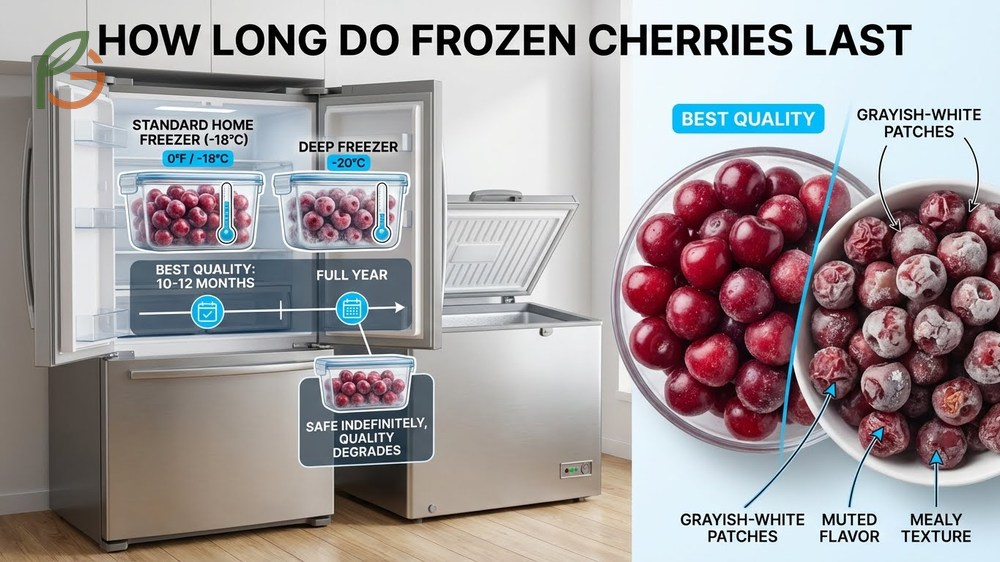
Properly frozen cherries maintain best quality for 10-12 months in standard home freezers set to 0°F (-18°C).[1] Deep freezers that maintain lower temperatures can extend this to a full year.[3] After these timeframes, cherries remain safe to eat indefinitely if kept at 0°F, but quality degrades noticeably.
The decline in quality shows up as freezer burn—grayish-white dry patches on the fruit’s surface. Flavor becomes muted and texture turns mealy. These changes accelerate if your freezer goes through frequent temperature fluctuations from door opening or defrost cycles.
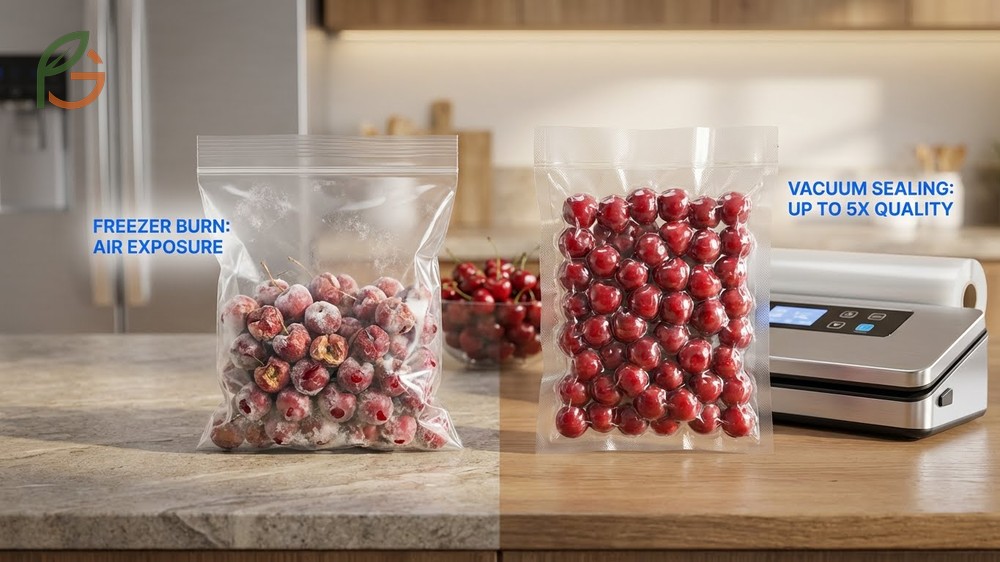
What often gets overlooked is how packaging affects storage life. Cherries in thin sandwich bags might last 6 months, while the same cherries in vacuum-sealed bags can maintain peak quality for 18 months. The difference comes down to air exposure—oxygen is frozen fruit’s worst enemy.
- Freezer temperature: maintain 0°F (-18°C) or lower consistently
- Packaging quality: vacuum-sealed bags outlast zipper bags by 6+ months
- Air removal: squeeze out all air before sealing to prevent oxidation
- Initial fruit quality: ripe, firm cherries last longer than overripe or damaged fruit
- Container type: rigid freezer containers protect better than bags but take more space
- Temperature fluctuations: chest freezers maintain steadier temps than upright models
Storage Tip: Write both the freezing date and “use by” date on your bags. When you freeze cherries in July 2025, mark them “Use by July 2026” so you don’t have to calculate later. This simple habit prevents mystery bags lingering for years.
Using Frozen Cherries for Baking
Most baking recipes work perfectly with frozen cherries used directly from the freezer—no thawing required. Adding frozen cherries to pies, cobblers, and muffins actually produces better results than thawed fruit because they release less juice during mixing. The extended baking time allows frozen cherries to thaw and cook simultaneously.
You’ll need to adjust your technique slightly compared to fresh cherries. Toss frozen cherries with an extra tablespoon of flour or cornstarch beyond what the recipe calls for. This absorbs the extra liquid that frozen fruit releases as it thaws in the oven. Skip this step and you’ll end up with a soggy bottom crust.
Expect to add 10-15 minutes to your total baking time when using frozen cherries. A cherry pie that normally bakes for 45 minutes might need 55-60 minutes with frozen fruit. The center should bubble vigorously before you remove it from the oven—this indicates the filling has thickened properly.
For smoothies, frozen cherries work brilliantly without any modifications. They create the same thick, frosty texture as other frozen fruits. Blend them with milk, yogurt, and a banana for a classic cherry smoothie, or mix with frozen raspberries for a more complex flavor profile.
Thawing makes sense for certain applications. If you’re making a fresh cherry topping for cheesecake or folding cherries into whipped cream, thaw them overnight in the refrigerator. Place the frozen cherries in a strainer set over a bowl—this lets excess juice drain away, preventing your dessert from becoming watery.
- Use frozen for pies, cobblers, and crisps—they create better texture than thawed
- Add 1-2 tablespoons extra thickener (cornstarch or flour) to compensate for juice release
- Increase baking time by 10-15 minutes and watch for vigorous bubbling
- Don’t thaw before adding to muffin or pancake batter—keeps them from sinking
- For stovetop compotes and sauces, cook frozen cherries directly over medium heat
Preventing Freezer Burn on Cherries
Freezer burn happens when air reaches frozen food and causes dehydration and oxidation. Those dried-out, discolored patches don’t make cherries unsafe, but they taste terrible—papery texture and virtually no flavor. The good news is freezer burn is entirely preventable with proper packaging technique.
Vacuum sealing extends frozen cherry quality by up to 5 times compared to regular storage bags.[6] The vacuum process removes oxygen that causes deterioration. If you freeze cherries regularly, a home vacuum sealer pays for itself within a season by reducing waste.
Can’t afford a vacuum sealer? The water displacement method works nearly as well. Place your flash-frozen cherries in a freezer bag, then slowly lower the unsealed bag into a large bowl of water. Water pressure pushes air out through the opening. Once water reaches just below the seal line, zip the bag closed while it’s still submerged.
Double-bagging provides extra protection for long-term storage. Place your filled freezer bag inside a second bag, squeezing air from both layers. This creates a buffer zone that insulates cherries from temperature fluctuations when you open the freezer door.
Container choice matters more than most people realize. Rigid plastic freezer containers with tight-sealing lids protect better than bags but consume more freezer space. Glass containers work too, but leave adequate headspace—frozen cherries expand and can crack glass if overfilled.
- Remove all air from bags using vacuum sealer or water displacement method
- Choose freezer-specific bags (thicker plastic) over standard storage bags
- Flash freeze first, then bag—prevents cherries from freezing in air pockets
- Fill containers to 90% capacity allowing expansion room
- Store cherries in back of freezer where temperature stays most consistent
- Avoid storing near freezer door where temperature fluctuates
- Use within recommended timeframe even if packaging is perfect
Pro Tip: Add a thin layer of water to completely cover pitted cherries before freezing in rigid containers. This creates an ice shell that blocks all air exposure. It works wonderfully for cherries destined for smoothies but makes a mess for baking applications.
Conclusion
The evidence is clear: freezing cherries successfully requires just three key steps—proper preparation, flash freezing, and airtight packaging. Whether you choose to pit before freezing or tackle that task later depends on your schedule and intended uses. Either approach preserves your harvest for 10-12 months of delicious eating.
Current guidance emphasizes the flash freezing technique over simply bagging fresh cherries. That extra hour of effort prevents frustrating clumps and preserves better texture. FruitGarden readers who follow these methods report consistently excellent results with both sweet and tart cherry varieties, from backyard harvests to farmers market hauls.
Frequently Asked Questions
Can I freeze cherries with stems on?
It’s best to remove stems before freezing. Stems take up extra freezer space and make cherries harder to pack efficiently. More importantly, they can puncture freezer bags during storage. The only exception is if you’re freezing cherries specifically for decorative purposes like cocktail garnishes, where the stem adds visual appeal.
Do Rainier cherries freeze differently than Bing cherries?
Rainier cherries freeze using the same method as darker varieties, but their delicate flesh means you should handle them more gently during preparation. They tend to bruise more easily than Bing cherries. Both varieties maintain quality for 10-12 months when properly frozen. Rainiers may show more color change after thawing, but flavor remains excellent.
How do I thaw frozen cherries quickly?
The microwave offers the fastest thawing method—spread frozen cherries on a paper towel-lined plate and microwave in 30-second bursts on defrost setting. Alternatively, place frozen cherries in a sealed bag and submerge in cold water for about 2 hours. For best texture, thaw overnight in the refrigerator at 40°F (4°C) and drain excess liquid through a strainer.
Can you refreeze cherries after thawing?
You can safely refreeze thawed cherries if they’ve been kept refrigerated and still contain ice crystals. However, quality suffers significantly—texture becomes mushy and flavor fades. It’s much better to freeze cherries in small portions so you only thaw what you’ll use immediately. Once thawed cherries reach room temperature, don’t refreeze them.
What’s the best way to bag frozen cherries?
Flash freeze cherries on baking sheets first until solid, then transfer to freezer bags in usable portions (2-4 cups per bag works well). Remove as much air as possible using the water displacement method or a vacuum sealer. Label each bag with the date and variety. Store bags flat in the freezer until solid, then stack vertically to save space.
Should I wash cherries before freezing?
Yes, always wash cherries before freezing. Rinse them under cold running water to remove dirt, pesticides, and any surface bacteria. The crucial step most people skip is drying thoroughly—pat cherries completely dry with paper towels or a clean kitchen towel. Excess water creates large ice crystals that damage texture and contribute to freezer burn.
Are frozen cherries good for smoothies?
Frozen cherries are excellent for smoothies and often work better than fresh. They create a thick, frosty texture without requiring added ice, which can dilute flavor. Use pitted frozen cherries directly from the freezer—no thawing needed. Combine with milk, yogurt, and banana for a classic cherry smoothie, or blend with frozen raspberries for more depth.