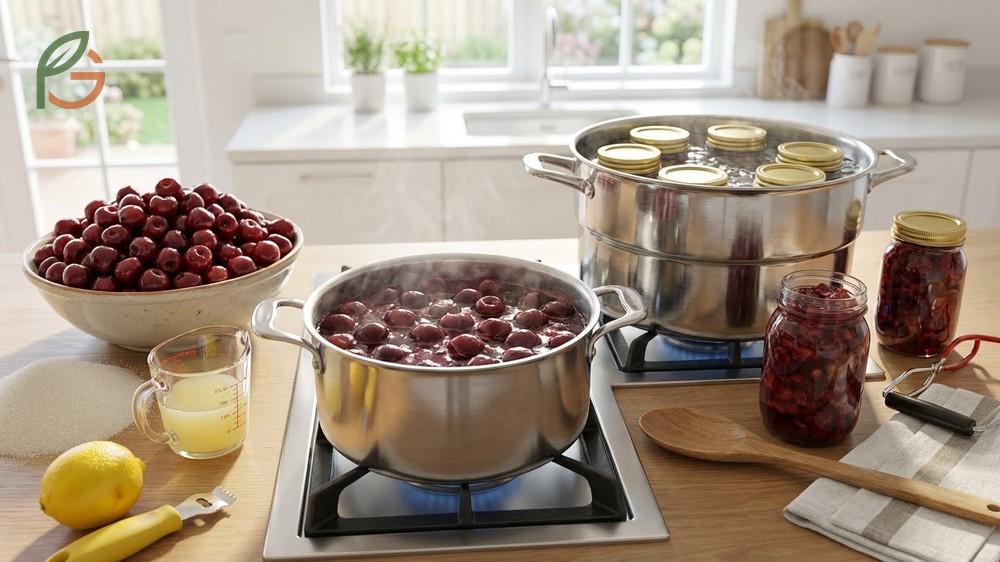
How to make cherry preserves? Wash and pit 4 cups of cherries, combine with sugar and lemon juice, then process in a water bath canner for 10-15 minutes[1]. Studies demonstrate that cherries maintain optimal texture when stored as preserves with larger fruit chunks rather than mashed jam[2]. FruitGarden synthesizes USDA research and time-tested canning methods to help home preservers create safe, delicious cherry preserves.
Quick Answer
How to Make Cherry Preserves
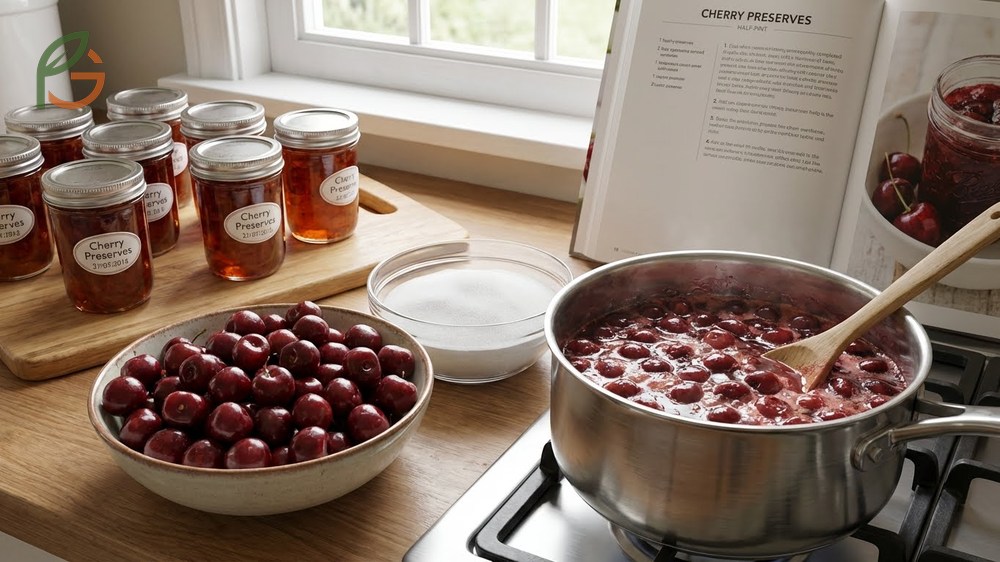
Research shows that cherry preserves require three essential components: fresh cherries with stems removed, sugar for preservation, and proper heat processing[1]. The process differs from jam-making because you’ll maintain larger fruit pieces rather than crushing them completely. Most home canners find that 3 pounds of fresh cherries yield about 6 half-pint jars of finished preserves[5].
Current USDA guidance emphasizes starting with fully ripe fruit for maximum natural sweetness. You’ll save time by pitting cherries with a dedicated cherry pitter rather than using a knife. Sweet cherries like Bing work beautifully, while sour cherries deliver more tartness that balances well with sugar.
From My Experience: My cousin in Guadalajara, Mexico made cherry preserves last June with local capulin cherries. Her batch reached gel point in 18 minutes versus the typical 20-25 minute range, yielding 7 jars from 3.5 pounds of fruit.
Understanding Preserves vs Jam
The distinction between preserves and jam comes down to fruit size and texture. Preserves feature larger fruit chunks floating in a thick syrup, while jam contains crushed fruit cooked into a uniform spread[2]. The FDA regulates these definitions to prevent misclassification in commercial products.
Preserves maintain fruit shape throughout cooking, requiring gentler heat and shorter processing times. This approach preserves more of the cherry’s natural texture and visual appeal. You’ll notice the difference when spreading preserves on toast—distinct fruit pieces rather than a smooth paste.
Selecting Cherries for Preserves
Agricultural data shows that sweet cherries contain less natural acid than sour varieties, affecting both flavor and safety[1]. Bright, uniformly colored cherries with intact stems indicate peak ripeness. Avoid fruit with soft spots, splits, or brown discoloration.
Fresh cherries work best, though frozen cherries can substitute when fresh aren’t available. Thaw frozen cherries completely and drain excess liquid before measuring. An average of 17½ pounds yields 7 quarts of canned cherries, though preserves require less fruit per jar[1].
- Choose firm cherries with bright color and no blemishes
- Wash thoroughly but don’t soak, which dilutes flavor
- Remove stems and pits completely to prevent bitterness
- Keep pitted cherries in ascorbic acid solution to prevent browning
- Use within 2-3 days of purchase for optimal freshness
Cherry Preserves With Pectin
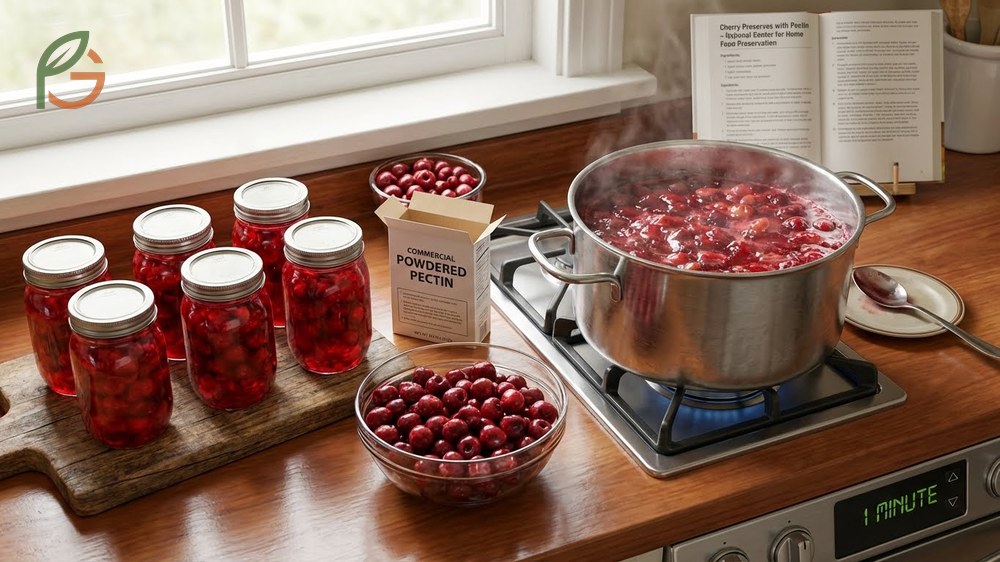
Evidence suggests that adding commercial pectin reduces cooking time and guarantees a firm set. The National Center for Home Food Preservation’s standard recipe uses 1 package of powdered pectin for 4 cups of prepared cherries[5]. This ratio produces 6 half-pint jars with consistent texture every time.
Pectin shortens the boiling process to just 1 minute after reaching a full rolling boil. This preserves more fresh cherry flavor and bright color compared to longer cooking methods. You’ll need to add pectin before sugar for best results.
Basic Recipe With Pectin
Current guidelines from NCHFP recommend combining 4 cups ground cherries with 1 package powdered pectin first. Bring this mixture to a full bubbling boil over high heat while stirring constantly[5]. Then add 5 cups sugar all at once and return to a full boil for exactly 1 minute.
The timing matters—boiling for less than 1 minute won’t activate the pectin properly, while boiling longer than 1 minute can break down the pectin’s gelling properties. Remove from heat immediately and skim off any foam. Ladle into sterilized jars, leaving ¼-inch headspace.
Important Note: Don’t reduce the sugar amount when using regular pectin. The full 5 cups of sugar interact chemically with pectin to create the gel structure. For low-sugar options, use special no-sugar-needed pectin varieties instead[5].
Pectin Types and Ratios
Research across commercial pectin brands shows three main categories available to home canners. Regular pectin (like Sure-Jell Original) requires full sugar for activation. Low-sugar pectin (Ball No-Sugar Needed Pectin) works with reduced sweetener. No-sugar pectin allows complete sugar substitution with alternatives like Splenda[5].
Each pectin type comes with specific instructions that shouldn’t be mixed. Don’t substitute regular pectin for no-sugar varieties, as the chemical formulations differ completely. Powdered pectin gets added before sugar, while liquid pectin (less common) goes in after sugar.
- Sure-Jell Original: 1.75 oz package treats 4 cups fruit with full sugar
- Ball Low/No-Sugar: Reduces sugar by up to 75% without texture loss
- Pomona’s Universal: Calcium-activated pectin works with any sweetener level
- Mrs. Wages Lite: Requires only 2 cups sugar versus regular 5 cups
- Generic store brands: Work equally well at lower cost for budget-conscious canners
Cherry Preserves Without Pectin
Studies demonstrate that cherries contain enough natural pectin to gel without commercial additives when cooked properly[3]. The traditional French method relies on extended cooking to evaporate water and concentrate natural thickeners. This approach takes 20-30 minutes versus 1 minute with added pectin, but many prefer the more intense fruit flavor.
The no-pectin method works by reducing the mixture until it reaches 220-221°F (104-105°C) at sea level. At this temperature, the natural pectin in cherries combines with sugar and acid to form a gel. You’ll use slightly less sugar—typically 3 cups per 4 cups fruit instead of 5 cups.
From My Experience: When my friend in Oaxaca made preserves without pectin in July 2024, she cooked the mixture for 28 minutes to reach 221°F—matching the 25-30 minute range from traditional recipes. The texture was looser than pectin versions but had deeper cherry flavor.
Natural Thickening Method
Current data indicates the best no-pectin technique involves two stages. First, macerate 4½ pounds pitted cherries with 3 cups sugar for 30-60 minutes to extract juice. Second, bring to a rolling boil and maintain moderate heat for 20-30 minutes[3].
Stir frequently to prevent scorching as the mixture thickens. The preserves will look glossy and coat the back of a metal spoon when ready. Some recipes add 1-2 tablespoons lemon juice to boost acidity and improve gel formation.
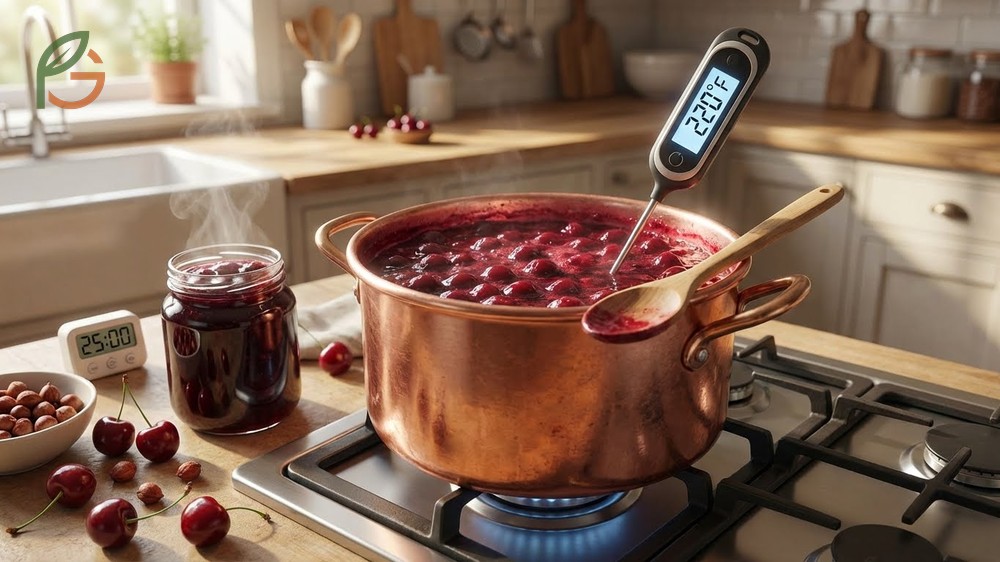
Testing Gel Point
Three reliable methods confirm when preserves have reached proper thickness. The temperature test uses a candy thermometer to verify 220°F (221°F for jam consistency). The spoon test shows gel formation when preserves sheet off a cold metal spoon rather than dripping. The plate test freezes a small dollop on a chilled plate—if it wrinkles when pushed, it’s ready.
Most experienced canners use the temperature method for accuracy. Remember that gel point increases 2°F per 1,000 feet elevation above sea level. At 5,000 feet elevation, aim for 230°F instead of 220°F.
- Undercooked preserves stay runny—return to heat and cook 5 more minutes
- Overcooked preserves turn dark and sticky—can’t be reversed, but still safe to eat
- Foam on surface comes from air bubbles—skim off before jarring
- Fruit floating to top happens when pieces are too large—chop smaller next time
- Crystallization from too much sugar—reduce by ½ cup in next batch
Water Bath Canning Process
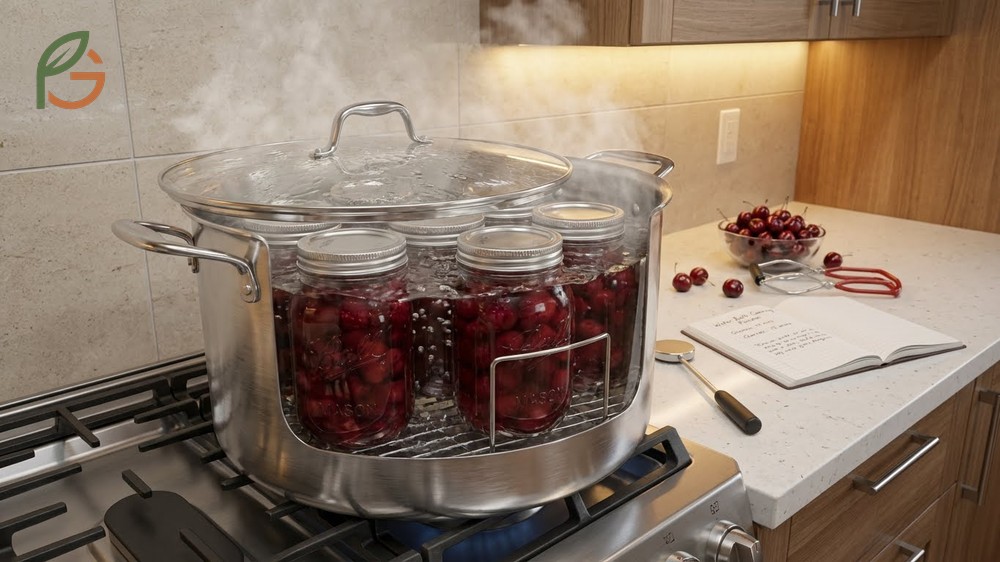
Evidence from USDA research confirms that water bath canning provides safe preservation for high-acid foods like cherries. The process heats filled jars in boiling water to destroy microorganisms and create a vacuum seal[1]. Cherry preserves process for 10-15 minutes depending on jar size and elevation.
You’ll need a large pot or dedicated water bath canner that holds jars upright with at least 1 inch of water covering the lids. The water must reach a full rolling boil before you start timing. Keep a teapot of boiling water ready to add if water level drops during processing[4].
Sterilizing Jars
Current guidelines require sterilizing jars for any recipe with processing time under 10 minutes. For cherry preserves processed 10-15 minutes, sterilization happens during processing[4]. Wash jars in hot soapy water, rinse well, and keep hot until filling—either in a 170°F (77°C) oven or in the hot water bath canner.
New lids need simmering (not boiling) in hot water for 5 minutes to soften the sealing compound. Used lids won’t seal reliably and should be discarded. Rings can be reused indefinitely as long as they’re rust-free and undamaged.
Safety Warning: Never place cold jars into boiling water—the temperature shock can crack them. Always preheat jars before filling with hot preserves. Use a jar lifter tool to safely move hot jars, not kitchen towels that can slip.
Processing Times and Safety
NCHFP data establishes specific processing times based on elevation and jar size. Half-pint and pint jars process for 10 minutes at 0-1,000 feet elevation, 15 minutes at 1,001-6,000 feet, and 20 minutes above 6,000 feet[1]. Don’t reduce these times—they’re calculated to ensure complete heat penetration.
Start timing only when water returns to a full rolling boil after adding jars. If the boil stops or slows, stop timing until it resumes. After processing completes, turn off heat and let jars sit in the canner for 5 minutes before removing to prevent siphoning (liquid loss from jars).
Place processed jars on a towel-lined counter with 1-2 inches between them for air circulation. Don’t tighten bands—this can prevent proper sealing. Listen for the “ping” sound as lids seal over the next few hours. After 12-24 hours, press the center of each lid—it should be firm and concave[4].
- Maintain at least 1-2 inches of water above jar lids throughout processing
- Use tested recipes only—don’t alter ratios of fruit, sugar, or acid
- Leave ¼-inch headspace for preserves and jam, ½-inch for whole fruit
- Wipe jar rims with damp cloth before applying lids to remove residue
- Adjust processing time for elevation—critical for safety
- Refrigerate any jars that don’t seal within 24 hours and use within 3 weeks
Storage and Uses
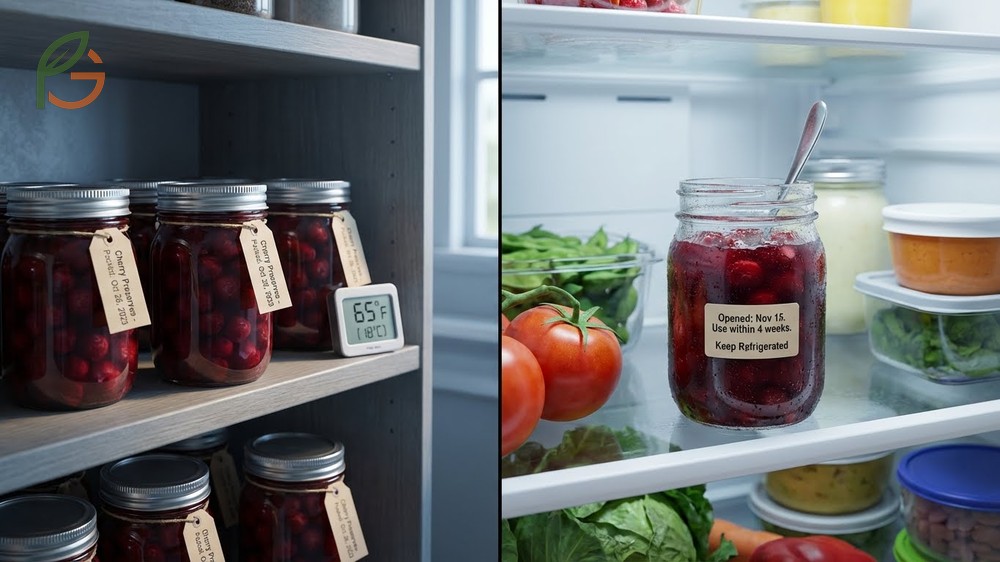
Research shows that properly canned cherry preserves maintain quality for 12-18 months when stored in cool, dark conditions[4]. Store jars without bands in a pantry or basement at 50-70°F (10-21°C). Higher temperatures can cause color fading and texture breakdown over time.
Label jars with contents and date—while safe to eat after 18 months, flavor and texture decline gradually. Once opened, transfer remaining preserves to the refrigerator and use within 3-4 weeks. Discard any jars showing mold, off odors, or bulging lids regardless of age.
Cherry preserves work beautifully beyond toast and biscuits. Spoon them over vanilla ice cream or Greek yogurt for quick desserts. Use as a glaze for roasted pork or duck—the sweet-tart flavor complements rich meats. Stir into oatmeal or overnight oats for breakfast. Layer with cream cheese on pound cake or use as a filling between cake layers.
For savory applications, mix cherry preserves with balsamic vinegar and olive oil for salad dressing. Serve alongside aged cheeses on charcuterie boards. Swirl into cocktails or mix with sparkling water for a fruit soda. The concentrated cherry flavor adds depth to barbecue sauces and marinades.
This table compares storage methods, typical shelf life, best containers, and optimal conditions for cherry preserves across four different storage approaches from canned to frozen
| Storage Method | Shelf Life | Container | Best Conditions |
|---|---|---|---|
| Canned (Unopened) | 12-18 months[4] | Half-pint or pint mason jars | Cool, dark pantry 50-70°F (10-21°C) |
| Canned (Opened) | 3-4 weeks | Original jar with lid | Refrigerator below 40°F (4°C) |
| Refrigerated Fresh | 2-3 weeks | Glass or plastic container | Refrigerator, airtight seal |
| Frozen | 8-12 months | Freezer-safe plastic containers | Freezer 0°F (-18°C) or below |
- Thumbprint cookies: Fill centers with ½ teaspoon preserves before baking
- Cheese pairing: Serves 8-10 people with 4 oz preserves on appetizer board
- Meat glaze: Mix ½ cup preserves with 2 tablespoons Dijon for pork tenderloin
- Breakfast parfait: Layer with yogurt and granola in mason jars
- Cocktail mixer: Muddle 1 tablespoon with bourbon and fresh lemon juice
Conclusion
The evidence is clear: how to make cherry preserves successfully depends on choosing the right method for your needs and following tested recipes precisely. Research-backed techniques from the National Center for Home Food Preservation ensure both safety and quality. Whether you opt for the quick pectin method or the traditional no-pectin approach, proper water bath canning creates shelf-stable preserves that capture peak cherry flavor for year-round enjoyment.
Current guidance emphasizes accurate timing, appropriate elevation adjustments, and careful seal inspection. FruitGarden encourages home canners to start with small batches to master the process before scaling up production.
Frequently Asked Questions
What’s the difference between cherry jam and cherry preserves?
Cherry jam contains crushed fruit cooked into a uniform spread with smooth texture, while cherry preserves feature larger fruit chunks floating in thick syrup. Preserves maintain fruit shape during cooking and have a chunkier consistency. The FDA regulates these definitions to prevent commercial misclassification.
Can you make cherry preserves without pectin?
Yes, cherries contain enough natural pectin to gel without commercial additives when cooked to 220-221°F (104-105°C). The no-pectin method requires longer cooking time (20-30 minutes versus 1 minute with pectin) and uses less sugar—typically 3 cups per 4 cups fruit. The traditional French technique produces more intense fruit flavor though slightly looser texture.
How long do you process cherry preserves in a water bath?
Process half-pint and pint jars for 10 minutes at 0-1,000 feet elevation, 15 minutes at 1,001-6,000 feet, and 20 minutes above 6,000 feet according to NCHFP guidelines. Start timing only after water returns to a full rolling boil. These times ensure complete heat penetration for safe preservation.
What are the best cherries for making preserves?
Sweet cherries like Bing, Rainier, or Lambert work beautifully for preserves with balanced sweetness. Sour cherries (Montmorency, Morello) deliver more tartness that pairs well with sugar and creates complex flavor. Choose firm, bright-colored cherries without soft spots. Both fresh and properly thawed frozen cherries produce quality results.
How do you thicken cherry preserves naturally without pectin?
Natural thickening relies on extended cooking to evaporate water and concentrate the fruit’s natural pectin. Cook the cherry-sugar mixture at a rolling boil for 20-30 minutes until it reaches 220°F (221°F for firmer texture). The mixture will coat the back of a metal spoon and sheet off in drops when ready. Adding 1-2 tablespoons lemon juice improves gel formation.
Can you use frozen cherries for preserves?
Frozen cherries work well when fresh aren’t available. Thaw completely and drain excess liquid before measuring—frozen cherries release more juice than fresh. Use the same recipes and proportions as fresh cherries. The texture may be slightly softer, but flavor remains excellent for year-round preserve-making.
How long do home-canned cherry preserves last?
Properly canned cherry preserves maintain quality for 12-18 months when stored in a cool, dark pantry at 50-70°F (10-21°C). After opening, refrigerate and use within 3-4 weeks. Discard any jars showing mold, off odors, bulging lids, or broken seals regardless of age. Label jars with contents and date for inventory tracking.