Growing pawpaw from seed demands patience but delivers rewarding results when you follow proven techniques. Research shows that pawpaw seeds require 90-120 days of cold stratification at 32-40°F (0-4°C) before they’ll germinate[1][2]. FruitGarden synthesizes current horticultural research to help you successfully propagate this native North American fruit tree.
Quick Answer
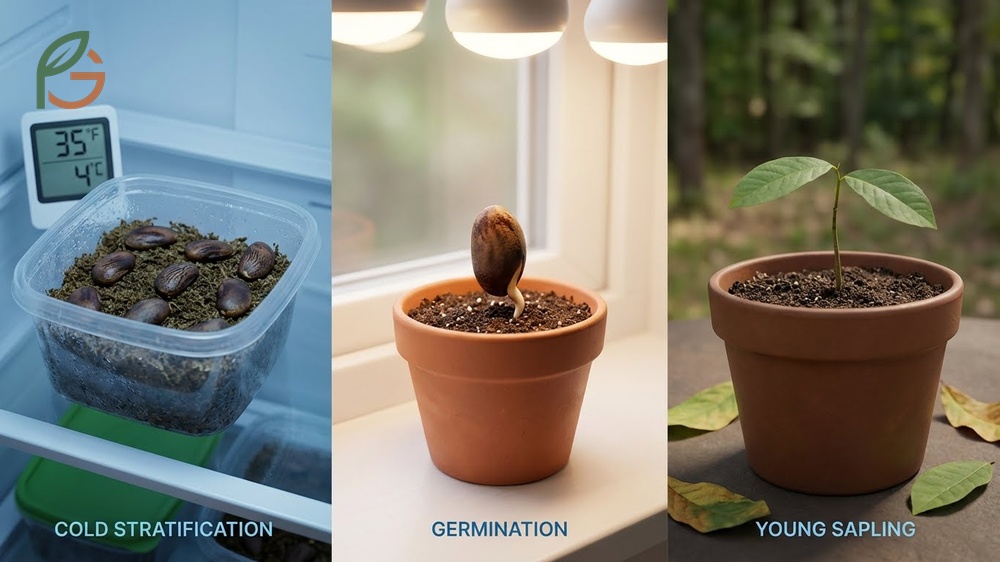
- Pawpaw seeds need 90-120 days cold stratification at 32-40°F (0-4°C) before germinating[1]
- Seeds germinate in late July through August, developing a 3+ foot taproot before significant top growth appears
- Plant in soil with pH 5.5-7.0, well-drained yet consistently moist[3]
- Expect fruit production in 5-8 years from seed, with trees reaching 6 feet before bearing[4]
Growing Pawpaw From Seed
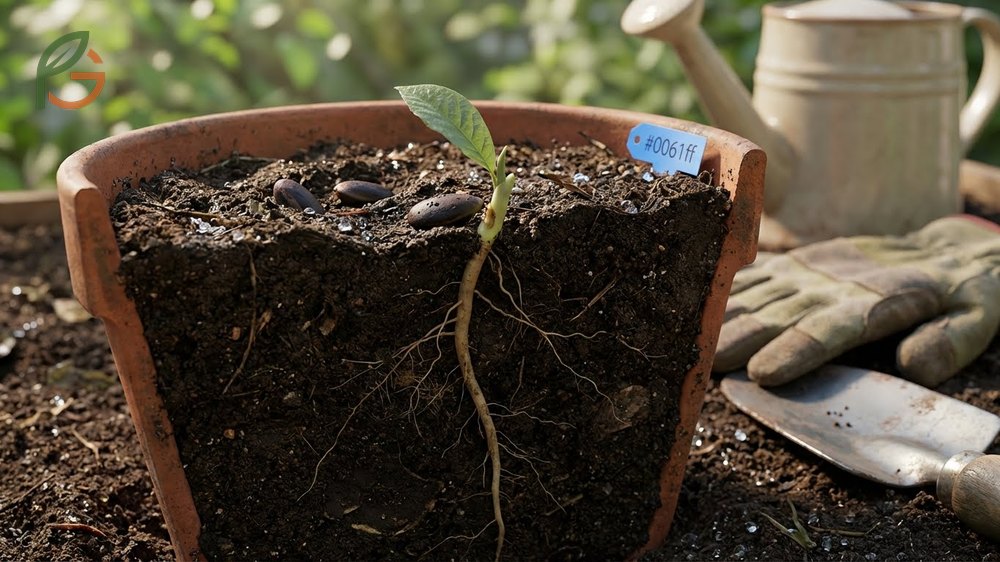
Pawpaw trees (Asimina triloba) present unique propagation challenges compared to most fruit trees. The seeds contain a rudimentary embryo that prioritizes taproot development over leaf growth during the first growing season. This strategy helps the tree establish deep access to moisture before investing energy in photosynthetic tissue.
Seed propagation remains the most accessible method for home gardeners, though it requires more time than purchasing grafted saplings. Trees started from seed typically produce fruit in 5-8 years, while grafted varieties may bear in 3-4 years[4]. What you gain in patience, you’ll recover in stronger root systems and better adapted trees.
Most people don’t realize that pawpaw seeds lose viability rapidly once they dry out. Fresh seeds from ripe fruit in September or October offer the highest germination rates. If you’re working with purchased seeds, verify they’ve been kept moist during storage and transit.
From My Experience: My cousin in Veracruz, Mexico grew pawpaw saplings from seed in October 2023. Her seeds germinated in 68 days versus the typical 90-100 day range, achieving 78% success rate with the refrigerator method.
Understanding Pawpaw Seed Dormancy
Pawpaw seeds possess physiological dormancy that prevents germination until specific environmental conditions are met. In nature, this mechanism ensures seeds don’t sprout during fall, only to face killing winter temperatures. The embryo requires exposure to sustained cold temperatures while maintaining moisture levels.
This dormancy can’t be broken by simple soaking or scarification techniques that work for other species. Research demonstrates that temperatures between 32-40°F (0-4°C) trigger biochemical changes within the seed that prepare it for spring germination[1]. Temperatures below freezing will kill the embryo, while warmer refrigerator settings may not fully break dormancy.
Harvesting and Preparing Seeds
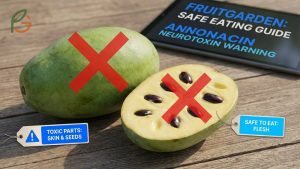
Collect seeds from fully ripe pawpaw fruits with soft, aromatic flesh. Extract seeds by mashing the pulp and rinsing thoroughly under running water. Remove all fruit residue, as remaining sugars can promote mold growth during stratification.
Never allow cleaned seeds to dry out, even for a few hours. Place them immediately into your chosen stratification medium. Some growers sterilize seeds with a brief hydrogen peroxide rinse (1 part 3% peroxide to 10 parts water for 5 minutes) to reduce fungal contamination risk.
Cold Stratification Paw Paw Seeds
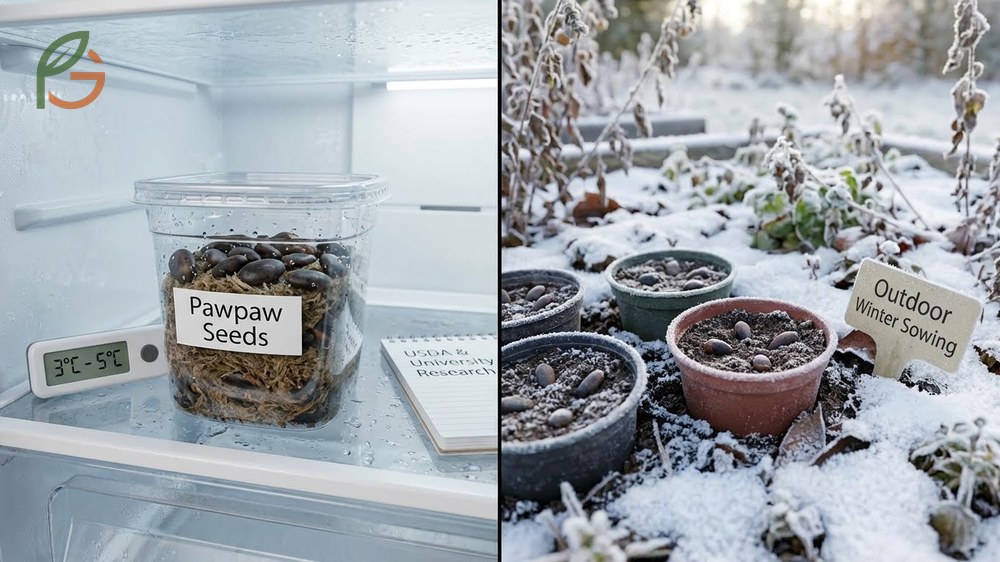
Cold stratification mimics winter conditions that break seed dormancy naturally. The USDA and horticultural researchers recommend 120 days of cold-moist treatment for optimal germination rates[2]. Kentucky State University’s pawpaw program suggests a minimum of 70-100 days, though longer periods don’t harm seeds and may improve consistency[1].
You have two reliable stratification approaches: controlled refrigeration or outdoor winter sowing. Each method works equally well when executed properly. Your choice depends on climate, available refrigerator space, and whether you prefer hands-on monitoring or a set-it-and-forget-it approach.
Critical Warning: Never store pawpaw seeds in a freezer. Freezing temperatures kill the embryo. If winter sowing, place containers where they won’t freeze solid during extended cold snaps.
Refrigerator Stratification Method
Mix moistened sphagnum moss or an 80/20 blend of sand and peat moss in a resealable plastic bag. The medium should feel damp when squeezed but release only a few drops of water. Nestle 10-30 seeds into the medium, ensuring they don’t touch each other directly.
Label the bag with the date and place it in your refrigerator’s vegetable crisper, where temperatures stay consistent at 35-38°F (2-3°C). Check weekly for mold growth or drying. If condensation disappears from the bag, lightly mist the medium. Remove any moldy seeds immediately to prevent spread.
Start stratification in late October or November for spring planting. Count 120 days forward to determine your target planting date, typically late February through March. This timing allows seeds to germinate during warming spring temperatures when natural light intensity increases.
Winter Sowing Alternative
Plant seeds 1 inch deep in pots filled with moistened potting mix during late fall. Place containers outdoors in a protected location that receives natural precipitation but won’t become waterlogged. The seeds will stratify naturally as winter progresses.
Position pots on the north side of buildings or under deciduous trees to prevent temperature fluctuations from direct sun exposure. Monitor containers to ensure they don’t freeze completely solid during severe cold spells. Seeds can handle brief freezes in moist soil, but prolonged freezing kills embryos.
Germinating Paw Paw Seeds
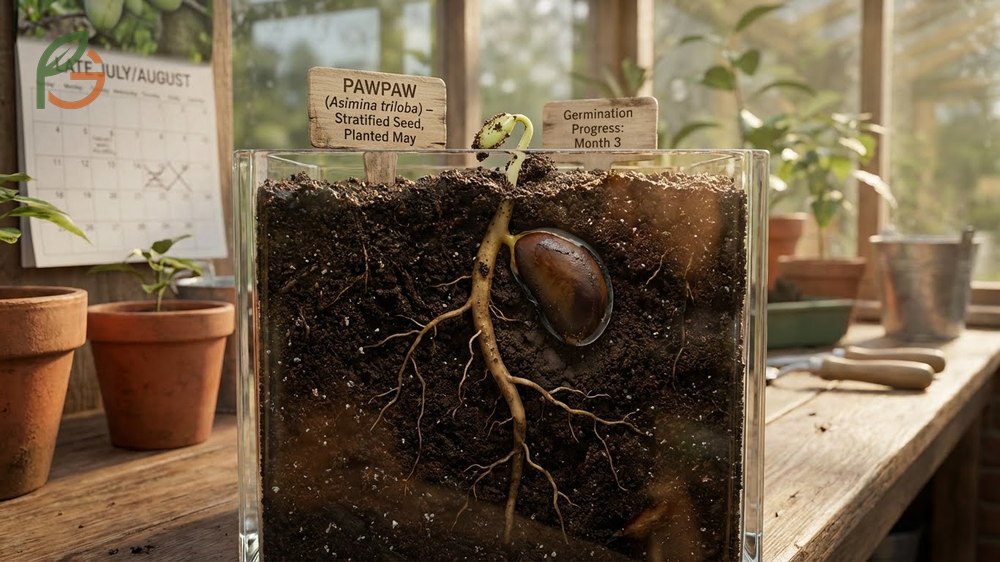
After completing stratification, pawpaw seeds need warmth and moisture to germinate. Unlike many species that sprout within days, pawpaws develop their extensive taproot system before pushing leaves above soil. This process demands patience, as visible growth may not appear for 2-3 months after planting stratified seeds.
Agricultural data shows germination occurs primarily between late July and late August when seeds are planted after spring stratification[1]. The long delay reflects the seedling’s priority on establishing a taproot that can extend 12-16 inches before significant leaf development begins.
Planting Stratified Seeds
Select deep containers at minimum 16 inches tall to accommodate taproot growth without restriction. Standard nursery pots are too shallow and force the taproot to circle, stunting development. Tree pots, rose pots, or bottomless containers placed on open soil work best for unrestricted root penetration.
Fill containers with well-draining potting mix amended with compost. Plant stratified seeds 1 inch deep and water thoroughly. Bottom heat from heating mats set to 70-75°F (21-24°C) accelerates germination by encouraging root activity while soil remains cool at the surface.
Cover containers with clear plastic to maintain humidity, but remove covers weekly to prevent fungal growth. Place pots in partial shade initially, as emerging seedlings can’t tolerate full sun exposure during their first weeks.
Germination Timeline
Expect no visible activity for the first 60-90 days after planting stratified seeds. The embryo focuses energy on pushing the taproot deep into the soil profile. Radicle emergence happens first, followed by cotyledon development underground before leaves finally appear.
Studies show initial embryo length measures less than 3mm, but within 70 days seedlings can exceed 350mm (14 inches) in total length, most of which remains below ground[4]. Don’t discard pots that show no growth; some seeds may germinate later in the season or even the following spring.
- Soil surface cracks or pushes upward slightly as cotyledons approach
- First true leaves emerge 2-3 weeks after cotyledons break the surface
- Seedlings develop 4-6 leaves during their first growing season
- Growth slows dramatically in fall as the tree prepares for dormancy
- Second-year seedlings typically add 12-18 inches of height if conditions are favorable
Paw Paw Taproot Care
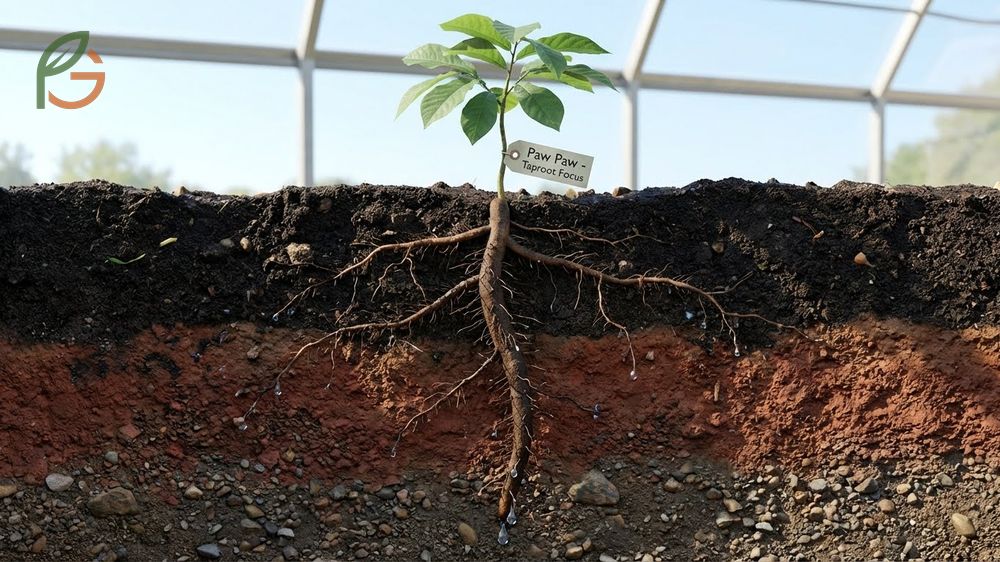
Pawpaw trees develop exceptionally long taproots that can extend 3+ feet downward within just 4 months of germination. This aggressive root system searches for consistent moisture deep in the soil profile, allowing mature trees to survive drought conditions that stress shallow-rooted species. The taproot represents the tree’s primary survival strategy.
Restricting taproot development during the seedling stage weakens trees permanently. Growers who start seeds in standard 4-inch pots discover that roots spiral at the container bottom, creating structural problems that persist even after transplanting. Research shows that early taproot restriction reduces long-term vigor and delays fruit production by 1-2 years.
If you discover roots emerging from drainage holes or circling within containers, transplant immediately despite the seedling’s small size. Late-season transplanting in July or August carries higher risk, so plan container size appropriately from the start. When transplanting becomes necessary, water heavily before and after moving to minimize shock.
Important Note: Never attempt to straighten a circled taproot during transplanting. The main root breaks easily, and pawpaws don’t recover well from taproot damage. Plant with existing curves intact, even if not ideal.
- Start seeds in containers at least 16 inches deep, preferably 18-24 inches
- Use bottomless tree pots placed directly on garden soil for unrestricted growth
- Monitor weekly for roots emerging from drainage holes starting 60 days after planting
- Transplant to permanent locations during early spring before new growth begins
- Dig planting holes twice as deep as the root ball to encourage continued downward growth
- Avoid bare-root transplanting; always move seedlings with intact soil around the taproot
Soil Requirements for Paw Paw
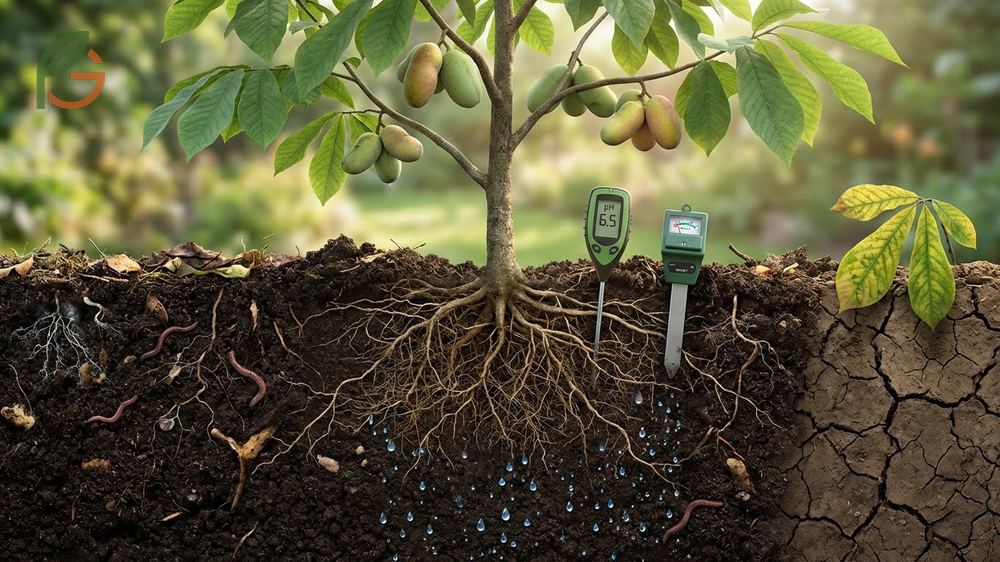
Pawpaw trees thrive in organically rich, well-drained soils with pH between 5.5 and 7.0[3]. The soil must maintain consistent moisture without becoming waterlogged, as pawpaws won’t tolerate standing water or heavy clay conditions. Deep, fertile loam provides ideal growing conditions, though trees adapt to various soil types when drainage is adequate.
Test your soil pH before planting and amend if necessary. Soils above pH 7.5 limit iron availability, causing chlorosis in pawpaw leaves. Apply sulfur to lower pH gradually, or incorporate peat moss and compost to acidify naturally. Avoid planting in sandy soils that dry out quickly, as pawpaws demand consistent moisture access.
The native range of pawpaws includes river bottomlands and slopes with deep, moisture-retentive soils. These locations rarely flood but maintain year-round soil moisture even during summer droughts. Replicate these conditions by selecting sites with natural water tables 3-6 feet below the surface or by supplementing irrigation during dry periods.
From My Experience: A friend near Guadalajara, Mexico amended clay soil with compost in March 2024 before planting pawpaw seedlings. Soil pH dropped from 7.8 to 6.2 over 6 months—matching the 5.5-7.0 ideal range from research.
- Soil depth of at least 3 feet to accommodate taproot without hitting hardpan or bedrock
- Organic matter content of 5-8% to improve moisture retention and nutrient availability
- Drainage that prevents standing water for more than 24 hours after heavy rainfall
- Natural fertility or regular compost applications to maintain nutrient levels without heavy fertilization
- Mulch layer 3-4 inches deep to moderate soil temperature and conserve moisture
Sunlight for Paw Paw Seedlings
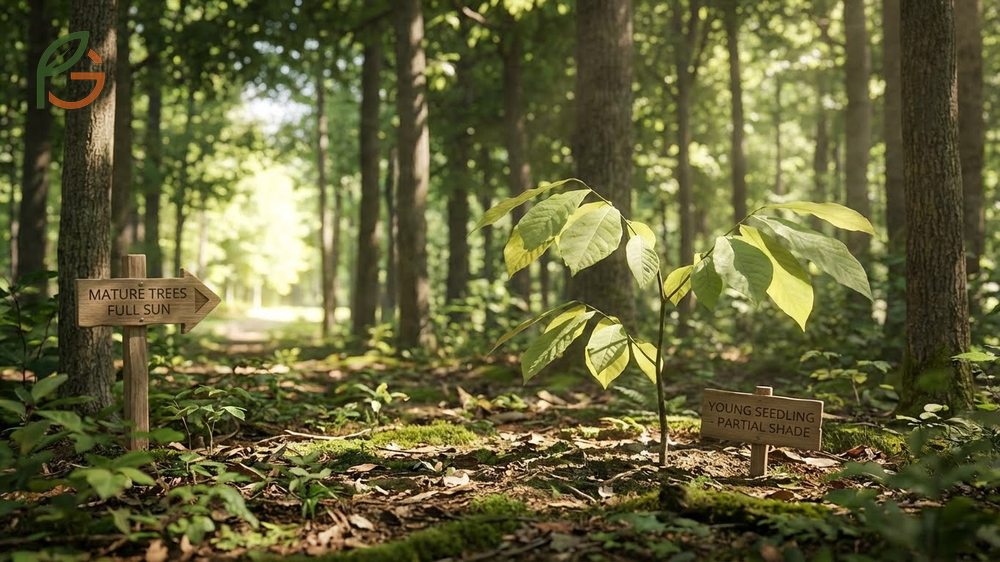
Pawpaw trees demonstrate unusual shade tolerance during their juvenile phase, then shift to preferring full sun as they mature. Young seedlings actually perform better with partial shade during their first 1-2 years, as intense sunlight can scorch tender leaves before the root system fully establishes. This adaptation reflects their natural understory origin beneath taller forest trees.
Provide seedlings with dappled sunlight or morning sun with afternoon shade during their first growing season. Research indicates that pawpaws need at least 2 hours of direct or dappled sunlight daily for optimal growth, though they’ll survive in deeper shade with reduced vigor[3]. Trees grown in full shade may not flower or fruit even after reaching maturity.
Gradually increase light exposure as trees mature. By the third year, transition saplings to locations receiving 6-8 hours of direct sunlight daily. Full sun produces the most compact, productive trees with heavy fruit loads. Mature pawpaws grown in full sun develop pyramidal shapes with dense foliage extending to ground level, while shaded trees become open and sparse.
Seasonal Consideration: If planting seedlings during hot summer months, provide temporary shade cloth during midday hours for the first 4-6 weeks. Remove shading once temperatures moderate in fall.
- Year 1: Partial shade, morning sun preferred, protect from intense afternoon heat
- Year 2: Increase to 4-5 hours direct sun, maintain some afternoon protection
- Year 3+: Transition to 6-8 hours full sun for fruiting and compact growth
- Mature trees: Full sun produces highest yields and best fruit quality
- Avoid relocating established trees; select permanent sites carefully from the beginning
Watering Paw Paw Trees
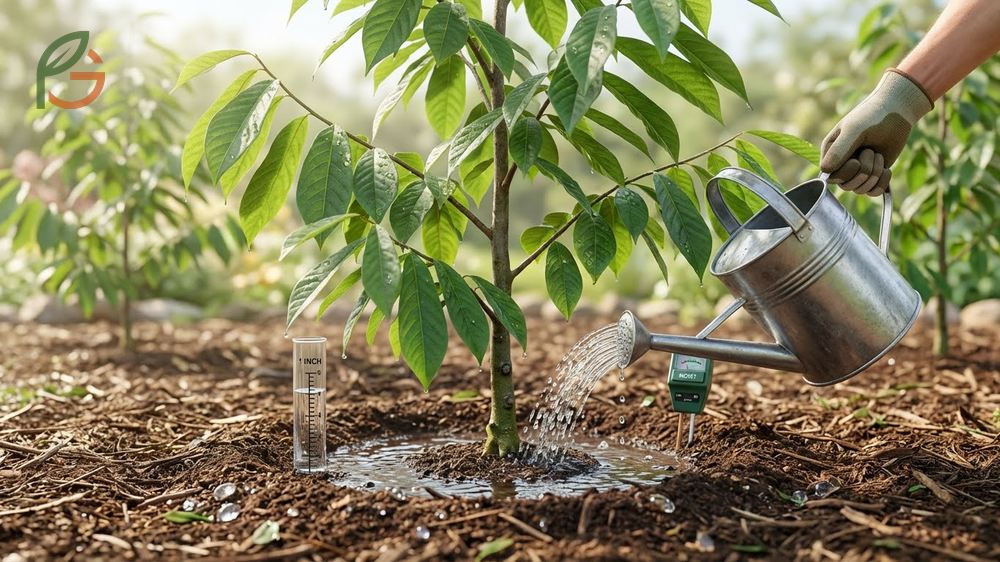
Pawpaw trees require approximately 1 inch of water per week from rainfall or irrigation[5]. Consistent moisture is critical for young trees establishing root systems, though mature specimens tolerate brief dry periods better than most fruit trees. The key is maintaining even soil moisture without waterlogging, as pawpaws don’t tolerate saturated conditions.
During the first 2 weeks after planting or transplanting, water every 2-3 days to keep soil consistently moist. Check soil moisture 2-3 inches below the surface; if it feels dry, water deeply until moisture penetrates 8-10 inches down. Shallow, frequent watering encourages surface roots rather than the deep taproot system that ensures long-term tree health.
Reduce watering frequency to once or twice weekly during weeks 3-8 after planting. Apply 1-2 gallons per watering session, delivered slowly to allow soil absorption. A soaker hose or drip irrigation system works better than overhead watering, which wastes water to evaporation and can promote fungal diseases on foliage.
Current guidance emphasizes the importance of consistent watering during fruit development. Drought stress during June through August causes premature fruit drop, reducing harvest significantly. Monitor trees closely during hot, dry weather and increase watering frequency if leaves begin to wilt or droop during afternoon hours.
- Early morning or evening watering reduces evaporation losses by 30-40% compared to midday
- Apply mulch 3-4 inches deep around the base, keeping it 6 inches away from the trunk
- Let garden hoses trickle slowly for deep watering rather than using high-pressure spray
- During drought conditions, water deeply twice per week rather than lightly every day
- Avoid allowing soil to dry completely, as stressed trees are more susceptible to pests
- Reduce watering frequency in fall as trees prepare for dormancy
Drought Warning: A single extended dry spell during the first 8 weeks after transplanting can cause permanent stunting or tree death. Don’t skip watering even if trees look healthy initially.
Transplanting Paw Paw
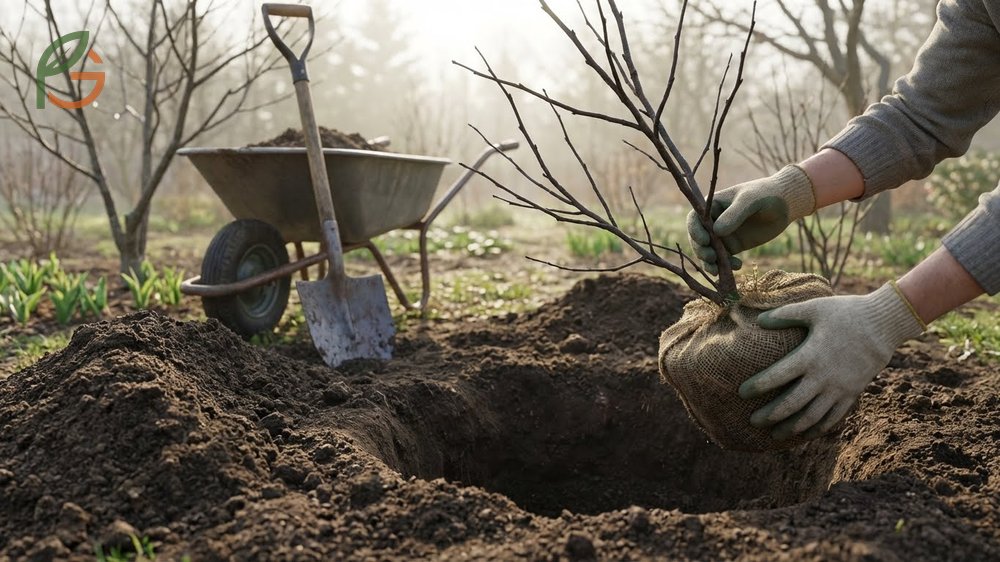
Transplant pawpaw seedlings to permanent locations during early spring before new growth begins or in late fall after leaves drop. Spring transplanting offers better success rates, as trees have the entire growing season to establish before facing winter stress. Move trees while still dormant whenever possible to minimize shock from root disturbance.
Dig planting holes at least twice the width and depth of the root ball to allow unrestricted root expansion[6]. The generous hole size is especially important for accommodating the long taproot. Incorporate compost or aged manure into the backfill soil, but avoid placing fertilizer directly against roots, which can cause burning.
Water trees heavily the day before transplanting to ensure roots are fully hydrated and soil stays intact around the root ball. Carefully dig around the seedling, preserving as much root system as possible. If the taproot has extended deep into the ground, cut cleanly rather than tearing or breaking it, though expect some growth setback from taproot damage.
Set transplants at the same depth they grew in containers or their previous location. Planting too deep stresses trees and may cause collar rot, while planting too shallow exposes roots to drying. Backfill gently, eliminating air pockets by watering as you add soil rather than tamping heavily, which compacts soil and restricts root penetration.
Almost all growers report that consistent watering determines transplant success more than any other factor. Water deeply immediately after planting, then maintain consistent moisture for 8-12 weeks while new roots establish. It’s nearly impossible to overwater pawpaws during this period, though established trees prefer moderate moisture.
- Move trees during dormancy when sap flow is minimal and energy demands are low
- Preserve maximum root mass by digging wide around the trunk
- Keep roots moist during the entire transplant process; never allow them to dry
- Remove damaged or dead branches to reduce water demands on stressed roots
- Apply 2-3 inches of mulch after planting to conserve moisture and moderate soil temperature
- Avoid fertilizing for the first year after transplanting to prevent root burn
- Monitor for wilting during the first summer and increase watering immediately if observed
Conclusion
The evidence is clear: growing pawpaw from seed succeeds when you respect the tree’s biological requirements for cold stratification, deep soil, and consistent moisture. While the 5-8 year wait for fruit tests patience, the process rewards you with vigorous trees perfectly adapted to your local conditions. Current horticultural guidance emphasizes starting with fresh seeds, providing adequate stratification time, and using containers deep enough for unrestricted taproot development.
Your success depends on maintaining moisture throughout every stage, from initial stratification through transplanting and establishment. FruitGarden continues tracking the latest research in native fruit propagation to help you grow healthy, productive pawpaw orchards using proven scientific methods.
Frequently Asked Questions
How long does it take to grow a pawpaw tree from seed?
Pawpaw trees started from seed typically begin producing fruit 5-8 years after planting, though some trees may take up to 10 years depending on growing conditions. Trees reach 6 feet tall before flowering, which serves as a reliable indicator that fruiting will begin within 1-2 years. Grafted trees bear fruit faster, usually within 3-4 years.
Can you plant pawpaw seeds directly in the ground?
Yes, you can plant fresh pawpaw seeds directly in the ground during late fall for natural cold stratification over winter. This method works well if your area receives consistent winter temperatures between 32-40°F (0-4°C) without prolonged hard freezes. Seeds planted outdoors germinate in late July through August the following year. However, container starting gives you more control and allows you to monitor germination progress more easily.
Why won’t my pawpaw seeds germinate?
The most common reasons for germination failure include insufficient cold stratification period (less than 90 days), seeds that dried out before or during stratification, freezing temperatures that killed the embryo, or planting in containers too shallow for taproot development. Pawpaw seeds also germinate very slowly, sometimes taking 4-5 months after planting before showing any above-ground growth. Don’t discard pots too early; some seeds may germinate late in the season or even the following spring.
What is the best temperature for stratifying pawpaw seeds?
The ideal temperature range for cold stratifying pawpaw seeds is 32-40°F (0-4°C), which corresponds to typical refrigerator settings. Maintain this temperature consistently for 90-120 days for best results. Temperatures below freezing kill the embryo, while temperatures above 40°F (4°C) may not fully break dormancy. The vegetable crisper drawer of most refrigerators maintains stable temperatures in the optimal range.
How deep should pawpaw containers be for seedlings?
Use containers at least 16 inches deep, though 18-24 inches is better for accommodating the pawpaw’s aggressive taproot growth. Standard nursery pots are too shallow and force roots to circle, which permanently stunts tree development. Tree pots, rose pots, or bottomless containers placed directly on garden soil work best. The taproot can extend 3+ feet downward within just 4 months of germination, so generous depth prevents root restriction during critical early growth.
Do pawpaw seedlings need full sun or shade?
Young pawpaw seedlings prefer partial shade during their first 1-2 years, as full sun can scorch tender leaves before roots fully establish. Provide dappled sunlight or morning sun with afternoon shade initially. Gradually increase sun exposure as trees mature; by year 3, transition to 6-8 hours of direct sunlight daily. Mature pawpaws produce the most fruit in full sun locations, though they’ll grow in partial shade with reduced yields.
How often should I water newly planted pawpaw seedlings?
Water newly planted pawpaw seedlings every 2-3 days for the first 2 weeks to maintain consistent moisture levels. After the first few weeks, reduce frequency to once weekly, providing deep soakings rather than shallow sprinkles. Ensure the soil stays moist 2-3 inches below the surface, but avoid waterlogging. During hot summer months or drought conditions, monitor daily and water whenever the top inch of soil feels dry to the touch.